Embedded Custom Icons in Excel File
Sometimes, when we download an Excel file from the Internet, we get icons that are actually previews of the contents of the Excel file. We can get icons like this if we enable thumbnails for Office files. We will see below how to achieve this.

But even better, we can replace those preview icons with our brand icons. So, we get something like the icons below for our Excel files, but also for our Word and PowerPoint files. When we send such files to someone else, that person will receive files with our custom icons. We cannot remove the small images in the corner (1), they are automatically placed by Office, but the rest of the icon is free to customize.

How to Enable Thumbnails for Office Files
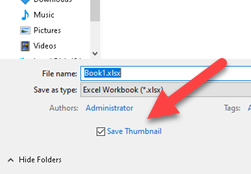
When we save files from Excel, Word or PowerPoint for the first time, there is a check box that will produce the saved files with a preview icon. We just need to check that checkbox before saving our file. Programs will remember our setting so the next time we save some other file, this checkbox will be checked. We have to do this separately for Excel, Word and PowerPoint.
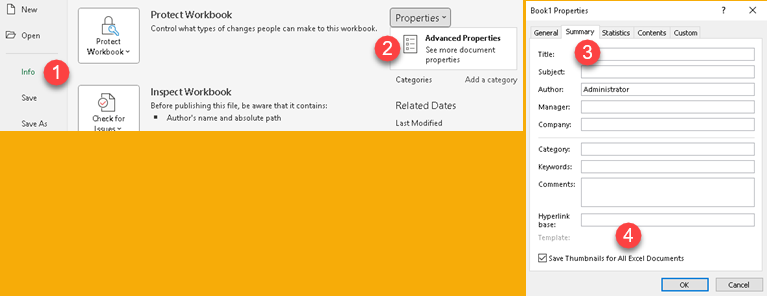
It is also possible to enable this checkbox if we go to File > Info (1) > Properties > Advanced Properties (2). In the new dialog, we would have to go to the Summary tab (3) and there we have to check (4) "Save thumbnails for all Excel documents". "Save Thumbnail" and "Save Thumbnail for All Excel Documents" are the same checkbox and they are always synchronized.
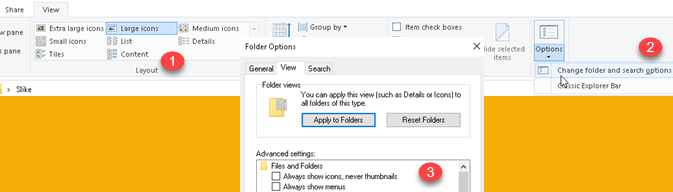
Such preview icons will only be visible on the desktop or within a Windows Explorer window. Within the Windows Explorer window, the View selected should be "Large Icons" or some similar option (1). If we still can't see our preview icon, we should also check inside View > Options > Change folder and search options (2). That will open a new window, where in the View tab we have the option "Always show icons, never thumbnails" (3). We should make sure to disable that option.
Insert a New Icon Manually from Scratch
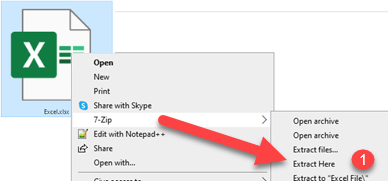
The file formats XLSX, DOCX, PPTX are actually ZIP files. We can use some program that can extract such archives to get the inside of our Office files. In Figure (1) we can see how to use the popular 7-Zip program to extract our archive. For some other programs, you will first need to change the Excel file extension from XLSX to ZIP, and then use that other program to decompress. 7-Zip doesn't need that step, it will happily extract the XLSX file directly.
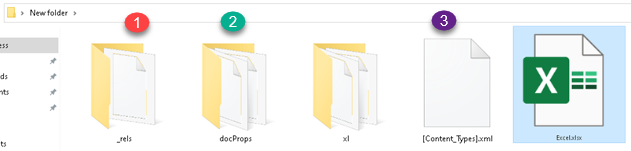
As we can see below, we would get at least three folders and one XML file from one Excel file. There may be some other files inside, but for our project we are only interested in the folders (1), (2) and the XML file (3).
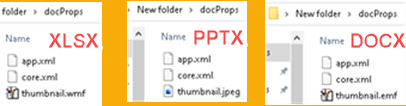
Inside the "docProps" folder we will place our icon. The icon must be in WMF file format for Excel, JPEG file format for PowerPoint, EMF file format for Word. I use a size of 64×64 pixels. The icon names should be "thumbnail.vmf", "thumbnail.jpeg", "thumbnail.emf".
In XML file "[Content_Types].xml", before </Types>, we need to add red text from bellow. For PPTX files, text is almost the same, we just use jpeg format so the text should be "<Default Extension="jpeg" ContentType="image/jpeg"/>". For DOCX files we use "<Default Extension="emf" ContentType="image/x-emf"/>".
…heetml.styles+xml"/><Override PartName="/docProps/core.xml" ContentType="application/vnd.openxmlformats-package.core-properties+xml"/><Override PartName="/docProps/app.xml" ContentType="application/vnd.openxmlformats-officedocument.extended-properties+xml"/><Default Extension="wmf" ContentType="image/x-wmf"/></Types>Inside the "_rels" folder there is ".rels" XML file. Inside it we do something similar. Before </Relationships>, we need to add red text from bellow.
…nxmlformats.org/officeDocument/2006/relationships/officeDocument" Target="xl/workbook.xml"/><Relationship Id="rId999" Type="http://schemas.openxmlformats.org/package/2006/relationships/metadata/thumbnail" Target="docProps/thumbnail.wmf"/></Relationships>For Powerpoint files, the only difference for ".rels" file is that we use "thumbnail.jpeg" instead of wmf.
<Relationship Id="rId999" Type="http://schemas.openxmlformats.org/package/2006/relationships/metadata/thumbnail" Target="docProps/thumbnail.jpeg"/>For word we use EMF.
<Relationship Id="rId999" Type="http://schemas.openxmlformats.org/package/2006/relationships/metadata/thumbnail" Target="docProps/thumbnail.emf"/>The final step is to zip all the insides of our Excel file back into the ZIP file (1). After that we just change the extension of that ZIP file to XLSX and our custom icon is applied (2).

What if We Already Have a File with a Thumbnail?
In that case, the procedure above is almost the same, but the only modification would be to replace existing WMF (or JPEG or EMF) image with our own. If the office file already has a thumbnail, then there is no need to modify XML files, we just replace the image.
Such Custom Icons are Fragile
If the user opens our file, changes some content, and then he clicks "Save", our custom icon will be lost. There are two scenarios here:
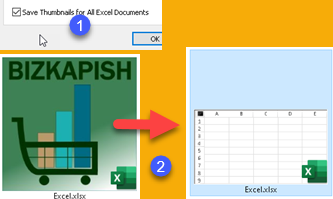
1. If the user has "Save Thumbnails for All Excel Documents" option turned on (1), then our custom icon will change to a preview thumbnail (2).
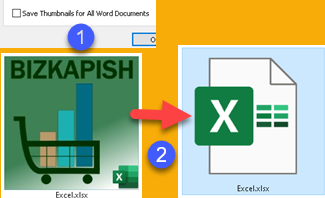
2. If "Save Thumbnails for All Excel Documents" option is turned off (1), clicking on "Save" will revert our custom icon to the standard Excel icon (2).
Changing Default Template
Is it possible to change our default template so that every new Excel file has our custom icon?
Well, that is not possible. You can create a new file from a template, but when you save that file, your custom icon will be removed, so it is not possible to inherit custom icon from the default templates.
How to Automatically Change Office File Icons to Custom Icons
If you have a lot of Office files and want to change their icons to custom icons, then you can use my VBA project which is available for download at the bottom of this blog post. This project will work both on files without preview icon, and on files that have a preview icon. The VBA project will work on all files that have four-character extensions where the first three characters are XLS*, PPT* or DOC*. This means that this VBA project will also change the icons of XLSM and similar files, too.
First download "Icons Customization" folder (1). You can place this folder anywhere and you can rename it. Inside it there is a subfolder "Icons1" (2). Within that subfolder you can find WMF, EMF and JPEG files (3). I also uploaded original SVG files there. I transformed those SVG files into PNG files, and then those PNG files into WMF and EMF files. I couldn't get the correct WMF and EMF files directly from SVG files. The "Icons2" folder is the same as folder "Icons1". You can have up to 20 such folders with different icons sets. These "Icons" subfolders shouldn't be renamed.
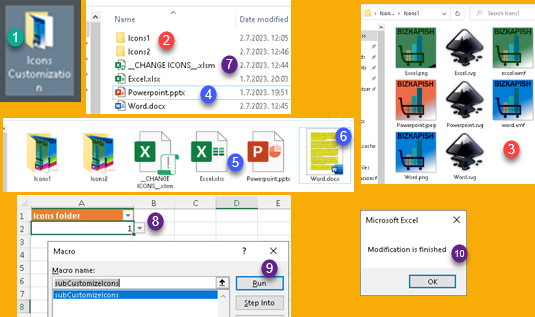
Files "Excel, Powerpoint, Word" (4) are the files that will get a new icon. You can place more Office files here and all of them will be modified. Note that files for Excel and Powerpoint (5) are regular files, but the Word file (6) has a preview icon.
Now, open the "CHANGE ICONS" file (7). Choose from drop down menu (8) which icon set you want to use. Then run the "subCustomizeIcons" macro (9). When the project is completed, you will get a message (10). If you have many files and if they are big in size, then this procedure will take longer. Every file must be zipped and unzipped, and this takes time.
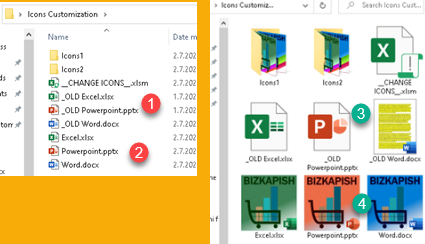
All original files will now be prefixed with "_OLD" (1). The new files will have original names (2). If we switch to "Large icons" view, we will see that our original files are unchanged (3), but our new files have branded icons (4).
From here you can dowload VBA project: