Export all formulas from Power BI desktop
There are three kinds of formulas in Power BI desktop. We can create measures, calculated columns or calculated tables. Let's say we want to find all places where one of our columns is mentioned in formulas. For that to happen, we can export all formulas and than we can use Search to find all formulas with our column mentioned.
We'll use Tabular Editor program to extract all formulas from Power BI file. Tabular Editor can be downloaded from here:
https://github.com/TabularEditor/TabularEditor/releases/tag/2.16.1
After installing Tabular Editor, we should open it.
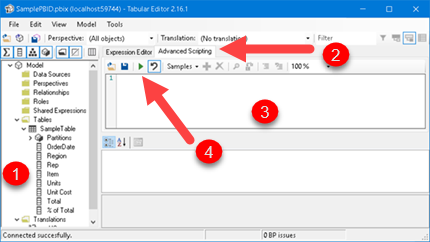
In order to be able to get all formulas we need to check option (1). This option is located in File > Preferences > Features in Tabular Editor. Next step is to attach to the PBID from the Tabular Editor. Go to File> Open> From DB (2). In the "local instance" we select our PBID file (3). PBID file has to be already opened.

Tabular Editor will now look like this. In the left pane we will see the tables and columns from our Power BI file (1). Advanced Scripting (2) is the area where we will enter the code. After entering the code in (3), we will start the code by clicking on the green arrow (4).
using System.IO;
var file = @"C:\Users\Sima\Desktop\A.csv";      //file where to export column names

using(var fileWriter = new StreamWriter(file,false, new System.Text.UTF8Encoding (true))  )
We will loop through all of Columns and if column is calculated we will print in our file its type, name of a column and formula that is used to create column. We will remove all line breaks from formula. Semicolon sign ";" is used as delimiter in final CSV file.
foreach(var Col in Model.AllColumns)
    if ( Convert.ToString( Col.Type ) == "Calculated" )
        {
            fileWriter.Write( "CalculatedColumn" + ";" + Col.Name + ";" + (Col as CalculatedColumn).Replace("\n", "") +"\n" );
        }
Next, we will loop through all tables, and through all of their Partitions. In this context, Partition is part of calculated tables that is created by table creating formula. Again, we will write to our file type of table, its name and its expression.
foreach(var Tab in Model.Tables)
foreach(var Part in Tab.Partitions )
        if ( Convert.ToString( Part.SourceType ) == "Calculated" )
             {
                     fileWriter.Write( "CalculatedTable" + ";" + Tab.Name + ";" + Part.Expression.Replace("\n", "") +"\n" );
            }
Last part of puzzle is similar. It is used to extract formulas for measures. When we combine all building blocks we'll get our final and complete code:
using System.IO;
var file = @"C:\Users\Sima\Desktop\A.csv"; //file where to export column names
using(var fileWriter = new StreamWriter(file,false,new System.Text.UTF8Encoding(true)) )
{
foreach(var Col in Model.AllColumns)
if ( Convert.ToString( Col.Type ) == "Calculated" )
{
fileWriter.Write( "CalculatedColumn" + ";" + Col.Name + ";" + (Col as CalculatedColumn).Expression.Replace("\n", "") +"\n" );
}
foreach(var Tab in Model.Tables)
foreach(var Part in Tab.Partitions )
if ( Convert.ToString( Part.SourceType ) == "Calculated" )
{
fileWriter.Write( "CalculatedTable" + ";" + Tab.Name + ";" + Part.Expression.Replace("\n", "") +"\n" );
}
foreach(var M in Model.AllMeasures)
{
fileWriter.Write( "Measure" + ";" + M.Name + ";" + M.Expression.Replace("\n", "") +"\n" );
}
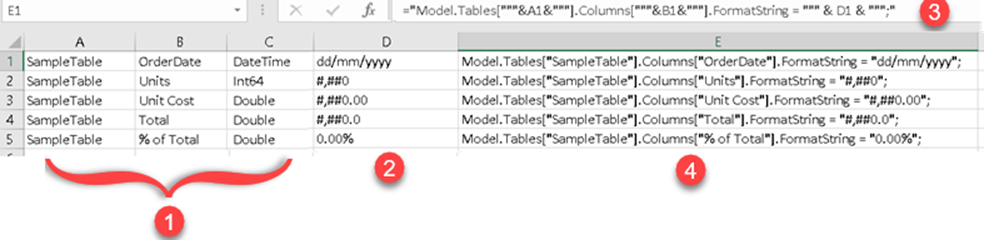
}After we run our code, we can open our CSV file in Excel. This is how it will looks like:

Here you can download sample PBIX file to test code.