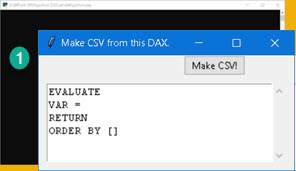
This is explanation how, with python, to make an external Power BI Desktop tool that will export your DAX query to CSV. In Power BI desktop ribbon we have a button (1) "Export to CSV". This button will open window (2) where we have to type our DAX query. We already have template in this dialog to help us with writing. After this, we click on button (3) "Make CSV!". If something is wrong we will get message (4). If everything is OK, new file will appear on our desktop. That file will hold data from our query (5). Let's see how to make such external tool.

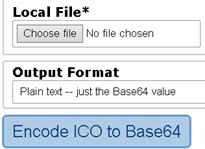
First step is to create JSON file which will tell Power BI desktop how to create button and what that button should do. We can see bellow sample of such file. Version is just a version of our tool. Just leave it as "1.0". Name is text that will appear bellow button. We can add some description of our tool. Path is fullpath to python executive file. Use backslashes and double them. Arguments has two parts. First part is fullpath to our python script. Second part are arguments that Power BI desktop will provide for our script. "Server" is address of our server ("localhost:57800"), and "database" is name of our database ("c6fb254f-f146-464d-99cf-b2a6e322eb38"). Our script will use name of a server for its execution. Last element is image in base64 format. Base64 format is textual presentation of an image. This format has two parts. First part is prefix, and prefix is always the same. Second part is base64 code. We can go to web site base64.guru and there we can upload our icon. Result will be long text that is base64 presentation of our image. This text will be really long, but all of it should be placed in JSON file, after the prefix.
{
  "version": "1.0",
  "name": "Export to CSV",
  "description": "Export user's DAX to CSV file.",
  "path": "G:\\WPy64-3950\\python-3.9.5.amd64\\pythonw.exe",
  "arguments": "C:/Users/Sima/Desktop/ExportToCSV.pyw \"%server%\" \"%database%\"",
  "iconData": "data:image/png;base64,iVBORw.......0KGgo"
}
Notice that instead of "python.exe" and "ExportToCSV.py" we are using version with "W" – "pythonw.exe" and "ExportToCSV.pyw". This is because we want to avoid black command prompt window (1) to be opened in background of our window.
Fullpath to our python script doesn't have spaces in it. If we have fullpath with spaces, we have to delimit that fullpath with quotes, but those quotes has to be escaped. In that case "arguments" would loook like:
"\"C:/Users/Sima/Desktop/ExportToCSV.pyw\" \"%server%\" \"%database%\""
We can see that arguments "server" and "database" were already delimited this way because they have "%" sign in them.
This is not needed for "path" element.
This JSON file should be placed on this address. If last two folders (\Power BI Desktop\External Tools) don't exist, create them and place JSON file inside. Name of our JSON file has to end with ".pbitool.json".
C:\Program Files (x86)\Common Files\Microsoft Shared\Power BI Desktop\External Tools\ourtool.pbitool.json
When we click on button in ribbon, python script mentioned in JSON file, will be called. This script has two parts. One part is about using python to create GUI window. The other part is explained bellow. This part is used to connect to Power BI desktop, read data and write them in CSV file. str(sys.argv[1]) is a python way to get first argument sent to script. This is name of server ("localhost:49380"). This address will be used inside connection string. By using connection string we will connect to PBID and we will execute our DAX.
Python will return names of columns as Table[ColumnName]. We will use regex to leave only "ColumnName" part.
Last part is where we read fullpath of desktop to create new file name. After this, all we need is to write data in CSV file by using python CSV modul.
    conn = adodbapi.connect("Provider=MSOLAP;Data Source=" + str(sys.argv[1]) + ";Initial Catalog='';")
    cursor = conn.cursor()
    cursor.execute(DAX)

    #fix names of columns. By default they contain table name and brackets.
    NamesOfColumns = [desc[0] for desc in cursor.description]
    CorrectedNamesOfColumns = [re.findall('\[(.*?)\]', NoC)[0] for NoC in NamesOfColumns]

    #write to CSV
    FileName = os.path.join(os.path.join(os.environ['USERPROFILE']), 'Desktop') + '\CSVfromPBID.csv'
    with open(FileName, 'w', newline='') as f:
        csv.writer(f, delimiter=',').writerow(CorrectedNamesOfColumns)
        csv.writer(f, delimiter=',').writerows(cursor)
Whole python script, JSON file and PBIX sample file are here. Don't forget to change fullpaths inside JSON file.