Let's run this command to find configuration file. openssl version -d
I will jump to this folder "/usr/lib/ssl". Inside of it we will find "openssl.cnf". We can see that this is not a file, but a symlink toward "/etc/ssl/openssl.cnf".
I will open the folder symlink is directed to. The file inside is writable only by the root. cd /etc/ssl
I will open this file, as a read only. I will see there one big configuration file. This is configuration file for OpenSSL. nano /etc/ssl/openssl.cnf
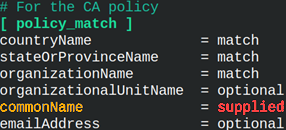
This file is organized as a INI file. It is divided in sections, where the name of the section is between square brackets ( [policy_match] ). Settings are in the form of "key=value". Comments are starting with "#".
This configuration file is used to define default values that OpenSSL will use. This makes the usage of OpenSSL standardized and predictable.
Making of a Configuration File
We will never make changes in the configuration file provided by OpenSSL installation. We will make our own file that contains only those settings that we need. "Openssl.cnf" file is a huge file with many settings, but in reality, only some of them are regularly used.
I will create a file and I will paste this text into that file. For now, you don't have to know what this text means. cd /home/fff/Desktop touch openssl.cnf
After pasting, I will protect this file. sudo chmod 644 openssl.cnf sudo chown root:root openssl.cnf
HOME = . # Unused variable. Dot is current directory. KEY_SIZE = 2048 # Variable .include extensions.cnf # Inclusion of another file [req]# CERTIFICATE REQUEST prompt = no default_bits= $KEY_SIZE# Key size when generating a new key default_md= sha256# Hash algorithm distinguished_name = req_dn# Referring to other section x509_extensions= server_cert# Referring to section in included file [req_dn]# DISTINGUISHED NAME countryName = RS organizationName = Organization commonName = Common Name
Inclusion of Other File
The third line in the configuration file is for including another configuration subfile. Everything we place in this other configuration file will be available inside of the main configuration file. .include extensions.cnf
I will create this subfile. touch extensions.cnf I will add the content to this file, and I will set safety attributes. sudo chmod 644 extensions.cnf sudo chown root:root extensions.cnf
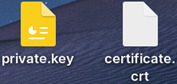
We can use the configuration file we created to create self signed key. openssl req -new -newkey rsa -noenc -x509 -days 365 -config openssl.cnf -keyout private.key -out certificate.crt
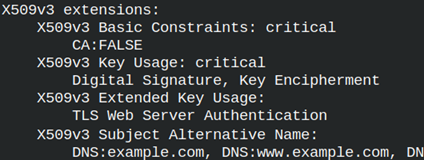
We can read some segments from our certificate. Inside data is taken from the configuration file.
openssl x509 -in certificate.crt -text -noout
Characteristics of a Configuration File
Variables
At the top we can see two variables. We can later refer to these variables like this. We write the dollar sign before the variable name. default_bits = $KEY_SIZE
HOME = . # Unused variable. Dot is current directory. KEY_SIZE = 2048 # Variable
Inclusion of Other File
We have already saw how to include another file. Here, I will tell you to include another file only after the variables.
KEY_SIZE = 2048 # Variable .include extensions.cnf # Inclusion of other file
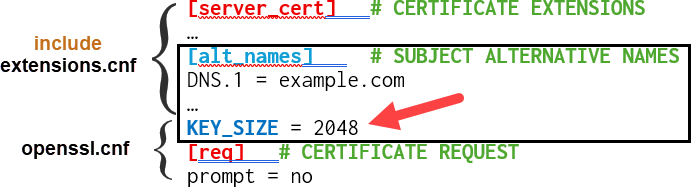
If we reverse the order, subfile will be expanded above variables. Because the section [alt_names] ends when the new section starts, the variable KEY_SIZE will be considered as a part of the [alt_names] section. This will raise an error. This is why it is important to first declare variables.
Usual Sections in "openssl.cnf" File
[req]
Here we place fields that are important for creation of CSR and self signed certificates.
[req_dn]
Fields that explain subject are here ( Country, State, City… ).
[v3_req],[usr_cert],[v3_ca]
This is where we place extensions ( basicConstraints, keyUsage, authorityKeyIdentifier … ).
[ca],[CA_default]
You can be your own CA. For that you use these sections.
[policy_match],[policy_anything]
Used when we are CA. It defines how Distinguished Name (DN) fields of certificate and a CSR should match.
Only [req] and [ca] sections are mandatory, and they are the entry points. All other sections are a convenient way to organize our settings.
Multiline Settings
We can turn a long line into a multi-line line by putting a backslash at the end of each line.
For better organization, we can divide some sections into several sections. We can then reference the detailed sections by their name within the main section. The detailed sections can be from an included file.
[req]# CERTIFICATE REQUEST distinguished_name = req_dn# Referring to other section x509_extensions = server_cert# Referring to section in included file [req_dn]# DISTINGUISHED NAME countryName = RS [server_cert]# CERTIFICATE EXTENSIONS; from inluded file basicConstraints = critical,CA:FALSE
Long Lists
Long lists, like this one, can be difficult to read. We can break such list into lines inside of the auxiliary section.
Auxiliary sections are created as any other section, and they can have custom names. When we refer to them, we must use the sign "@" before their name.
Configuration file will never contain private keys, but it can contain sensitive paths or passwords. Sensitive paths can lead to private keys. We should avoid placing delicate data inside of this file.
Location of "openssl.cnf" File
1) OpenSSL will first search for a configuration file on the location written inside of the environment variable "OPENSSL_CONF".
2) We can write the exact location of the configuration file in the command that we use ( -config /home/fff/Desktop/openssl.cnf ).
3) We will use default configuration file that was created during installation ( openssl version -d ).
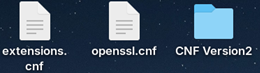
I will create a new folder. I will copy the files "extensions.cnf" and "openssl.cnf" in that folder. We now have 2 versions of these 2 files. We also have official "openssl.cnf" file. We will use them all for testing.
1) IncludeIF ( Official Configuration File )
I will open official configuration file in nano text editor. sudo nano /etc/ssl/openssl.cnf
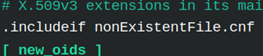
I will add this line into it, below variables. .includeif nonExistentFile.cnf
The purpose of this command is to include another configuration file, but only ifthat file exists. Otherwise, it will be ignored.
I will create certificate using official certification file. I am expecting that no error will be raised. This time, we don't use "-config" option.
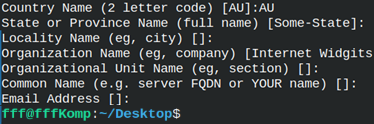
We will be asked to provide subject data, but no error will appear. "IncludeIF" command is ignored.
I will now read the content of my certificate. Inside of it I can see that the default organization is "Internet Widgits Pty Ltd". openssl x509 -in /home/fff/Desktop/certificateOfficial.crt -text -noout
If we read from the official "openssl.cnf" file, we can see where from the organization name comes from. sudo cat /etc/ssl/openssl.cnf | grep Widgits
2) Variables from Other Sections ( Version 1 Files )
Inside of the version 1 "openssl.cnf" file I will make some changes. I will create a new variable inside of the "req" section with a name "newVariable". I will reference that variable in "req_dn" section.
[req]# CERTIFICATE REQUEST newVariable = Ultra Organization# we will add new variable [req_dn] # DISTINGUISHED NAME organizationName = $req::newVariable
I will create new certificate by using Version 1 configuration file. openssl req -new -newkey rsa -noenc -x509 -days 365 -config openssl.cnf -keyout privateNewV.key -out certificateNewV.crt
I will read from this new certificate. We read variable from other section. openssl x509 -in certificateNewV.crt -text -noout | grep Subject
3) Environment Variables ( Version 2 Files )
I will read the content of the USERNAME environment variable.
env | grep USERNAME # USERNAME=fff
We can use this environment variable inside of the "openssl.cnf" file, version 2. I will change the value of "organizationName" into the value of this environ.
organizationName = $ENV::USERNAME
This time I will set "OPENSSL_CONF" environment variable.
I will create new key and certificate. Let's see what version of configuration file will this command use. openssl req -new -newkey rsa -noenc -x509 -days 365 -keyout privateENV.key -out certificateENV.crt
Version 2 of a configuration file is used. This is thanks to "OPENSS_CONF" environ. The value of organization field is the same as USERNAME environ. openssl x509 -in certificateENV.crt -text -noout | grep Subject