Notice: In this blog post, we will create a VOC database. This database will be used as the main database for most subsequent blog posts.
Getting the Codename of our Ubuntu Version
First, we need to know the code name of our Ubuntu version. We can find that by reading from the file "os-release". From this file we can read only the line that has words "VERSION_CODENAME" inside of it.
cat /etc/os-release | grep VERSION_CODENAME
Our Ubuntu codename is "focal". It is also possible to use command:
lsb_release -cs
We can see from the command line above that our user account is "fffovde". "FffOvdeKomp" is the name of our computer.
Installing GPG key
GPG key is a key that Ubuntu will use to verify MonetDB packages before installing them.
First, we will create folder /etc/apt/keyrings, if we don't have it. We will use permissions 755 on this folder. Administrator will have full access to this folder, but other users will have read and execute rights. This is necessary because "apt" application will access this GPG key, not only with administrator rights, but also as a special low-privilege user. sudo mkdir -p /etc/apt/keyrings #option -p means that we will create parent directories, if they do not exist. sudo chmod 0755 /etc/apt/keyrings
We will use wget to download GPG key from the internet. Option "-O" means output. sudo wget -O /etc/apt/keyrings/monetdb.gpg https://dev.monetdb.org/downloads/MonetDB-GPG-KEY.gpg
We will also change permissions on this binary ".gpg" file. sudo chmod 0644 /etc/apt/keyrings/monetdb.gpg
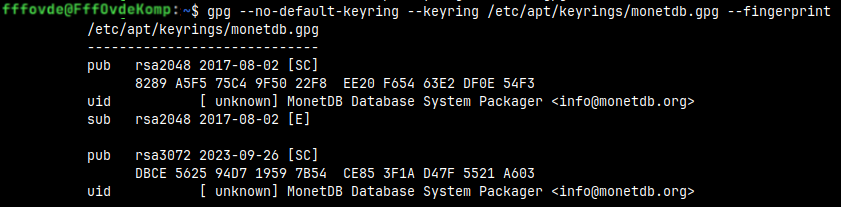
This monetd.gpg file is a binary file. We can read its content with the command: gpg --no-default-keyring --keyring /etc/apt/keyrings/monetdb.gpg --fingerprint
--no-default-keyring #This means that we will not read other GPG keys. --keyring /etc/apt/keyrings/monetdb.gpg #We will read only this GPG key. --fingerprint #Because GPG key is binary file, we will only read its textual presentation, its "fingerprint". #This fingerprint is a long hexadecimal number.
If result of this command is equal to " DBCE 5625 94D7 1959 7B54 CE85 3F1A D47F 5521 A603" for MonetDB, then that means that we have installed the correct key. There is also a key "8289 A5F5 75C4 9F50 22F8 EE20 F654 63E2 DF0E 54F3", but that key is for versions of MonetDB older than 11.49.
Adding a Repository Where MonetDB is Stored
Next, in folder "/etc/apt/sources.list.d" we will create a file with the name "monetdb.list".
#jump to that folder cd /etc/apt/sources.list.d #create new file, you will be asked to provide password sudo touch monetdb.list
Inside of this file we must place this text. These are addresses to MonetdDB repository.
deb [signed-by=/etc/apt/keyrings/monetdb.gpg] https://dev.monetdb.org/downloads/deb/ focal monetdb deb-src [signed-by=/etc/apt/keyrings/monetdb.gpg] https://dev.monetdb.org/downloads/deb/ focal monetdb
We can add this text by running these two lines in our terminal:
Now we can install MonetDB. First, we will update our list of available software with the command:
sudo apt update
Then we can install MonetDB server and client: sudo apt install monetdb5-sql monetdb-client
Creating a DBfarm
In MonetDB, databases are located inside a folder usually called "DBfarm". In addition to the databases, in this folder we will find configuration files with settings for the DBfarm.
Monetdbd, linux daemon, is used to initialize DBfarm by placing configuration files inside it. We use this daemon for changing DBfarm settings and for communication with databases. Monetdbd manages DBfarm and its databases.
monetdbd create /home/fffovde/DBfarm1
We will use "monetdbd" to create a DBfarm on our disk.
Inside of this folder, a new file ".merovingian_properties" will appear. ls -A /home/fffovde/DBfarm1
The Merovingian dynasty was the ruling family of the Franks from the mid-5th century until 751. This dynasty ruled the Netherlands, the country from which MonetDB originates. MonetDB is using this term for some of its internal files and commands.
If we look inside of this file, we will find only one property. All other properties are using default values. We can read those default values by command: monetdbd get all /home/fffovde/DBfarm1
property
hostname
dbfarm
status
mserver
logfile
pidfile
loglevel
sockdir
listenaddr
port
exittimeout
forward
discovery
discoveryttl
control
passphrase
snapshotdir
snapshotcompression
mapisock
controlsock
value
FffOvdeKomp
/home/fffovde/DBfarm1
no monetdbd is serving this dbfarm
unknown (monetdbd not running)
/home/fffovde/DBfarml/merovingian.log
/home/fffovde/DBfarml/merovingian.pid
information
/tmp
localhost
/50000
60
proxy
true
600
no
<unset>
<unset>
.tar.lz4
/tmp/.s.monetdb.50000
/tmp/.s.merovingian.50000
Now, that DBfarm is created, I will start the daemon. We can use daemon to control DBfarm.
monetdbd start /home/fffovde/DBfarm1
Inside of the DBfarm1, we now have 4 files: ls -A /home/fffovde/DBfarm1
File ".merovingian_lock" is empty. This file probably just signalizes that this is DBfarm.
File "merovingian.pid" has the number 1863. This is the number of monetdbd process. If we use command "sudo ss -tlnp" to show us all listening ports, we will see the name monetdbd beside process 1863, and this process will listen the default port 50000.
We can also read content of the log file.
cat /home/fffovde/DBfarm1/merovingian.log
Creation of a Database
While monetdbd is used to manage DBfarm, "monetdb" console application is used to manage individual databases. In the background, "monetdb" will send our commands to monetdbd, and monetdbd will be the one exercising direct control over databases. So, we control databases from "monetdb", but through the power of monetdbd.
This is how we create a database with the name "voc": monetdb create voc
A folder with the name "voc" will appear inside of the DBfarm1 directory.
When database is created, it will only have one default user. That user is administrator "monetdb", and he has default password "monetdb". Database will be created in the maintenance mode. That means that only administrator will be able to start the database, and only on the local computer.
Administrator should create the database with this command. Then he should log into database, and he should change his default password to some other secret and complex password. We will not do that this time, we will continue using the default password "monetdb".
I will change the mode of the database, and I will take it out of the maintenance mode. We can do this to make database available to all the users ( although we currently don't have other users ). monetdb release voc
We can start our database. After the database start, it will be ready for users to log in. monetdb start voc We can check the status of the database with the command: monetdb status
The process with our database server is called "mserver5". This process will run when the database is opened: pgrep mserver5
This command will return process ID of our database server process.
Logging into Database
Now that our database is working and is listening on port 50000, we can try to use it. We will now use another application, with the name "mclient". Let's first recapitulate three console applications used by MonetDB:
"monetdbd" is managing DBfarm.
"monetdb" is managing individual database, with the help of "monetdbd".
Database will run as a "mserver5" process. We'll use "mclient" application to send queries to this process.
We will login to the "voc" database as a "monetdb" user. Password is the default password "monetdb". mclient -u monetdb -d voc
This will be our welcome screen. We will get "sql>" prompt. There we can type our queries.
I can run this query in my database: SELECT 'columnValues' as columnName;
We can exit the "mclient" program by typing the word "quit".
How to Stop our Server?
This is how we can stop "mserver5" process, the process of the Monetdb database. monetdb stop voc
Log file will tell us what happened. tail -1 /home/fffovde/DBfarm1/merovingian.log
We can put our database in maintenance mode at any time. It doesn't matter if database is opened or closed. We use "lock" command. monetdb lock voc
Next time, only administrator, on the local computer, can start the database with "monetdb start voc" command. He can start the database in exclusive mode, so that he can run some maintenance operations on the database ( he can do backup, or he can make changes in the schema ). We saw previously that database can be taken out of maintenance mode with "monetdb release voc" command. After that, any user can login to a database.
We can also stop "monetdbd" daemon.
monetdbd stop /home/fffovde/DBfarm1
Log file will show us that daemon has stopped.
Install MonetDB in Alternative Way
This time I will jump to the newer version of the Ubuntu. It is "noble". cat /etc/os-release | grep VERSION_CODENAME
Then, I will go the web page https://www.monetdb.org/downloads/deb/repo/. On this web page we have a list of the newest versions of the Ubuntu and Debian. One of the versions is "noble". Enter that folder, click on "monetdb-repo.deb". Firefox will download this file.
We will install this "monetdb-repo.deb" package. sudo apt install /home/fff/Downloads/monetdb-repo.deb
This package will add the file "monetdb.sources" inside of the "/etc/apt/sources.list.d". This file has the same content as the file "monetdb.list" that we have created by hand during the original installation.
This "monetdb-repo.deb" package will also provide GPG keys that can be found on this location "/usr/share/keyrings/monetdb-1.4.gpg". We now understand that we can prepare our computer for monetdb installation by using this package, instead of doing everything by hand.
I will uninstall MonetDB on the "noble" server. We will first create and start a DBfarm, because I want to show you the whole process.
For uninstallation process, if monetdbd is running, we must stop it.
monetdbd stop /home/fff/DBfarm1
We will now list all the packages that have "monetdb" in their name. dpkg -l | grep monetdb
We will remove all those packages. When we delete "monetdb-repo", files with repositories and gpg keys will also be deleted. sudo apt purge libmonetdb-client28 libmonetdb-mutils libmonetdb-stream28 libmonetdb30 monetdb-client monetdb-repo monetdb-server monetdb-sql monetdb5-sql
We will clean all the possible remains: sudo apt autoremove sudo apt autoclean
We still have "monetdb" group and user. cat /etc/passwd | grep monetdb getent group monetdb
We will delete the group and the user. sudo deluser monetdb sudo delgroup monetdb Actually, when we delete the user, the group will also be deleted, so we don't have to delete it separately.
This will not delete DBfarms, only MonetDB application.