Power BI Desktop

Read the Properties of all Measures

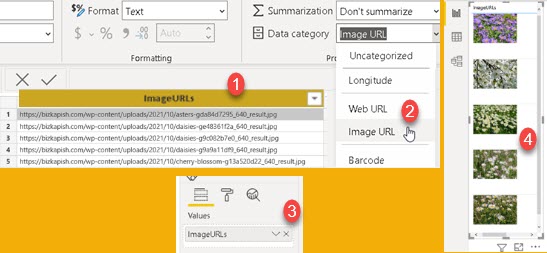
Make list of all the properties

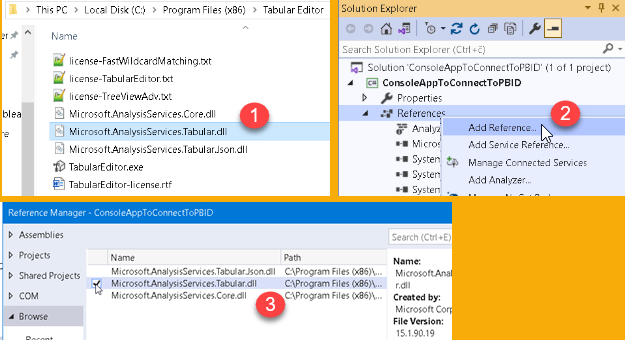
We want to see what properties exist for measures in Power BI desktop. We'll use Tabular Editor for this. We already saw how to use tabular editor in this post. This time we will first read all possible properties for Measures. We can use code below to achieve that. Result will be written to CSV file.

using System.Reflection;
using System.IO;
var file = @"C:\Users\Sima\Desktop\MeasureProperties.csv";

using(var fileWriter = new StreamWriter(file))
foreach(var Property in typeof( Measure ).GetTypeInfo().GetProperties() )   
{    
    fileWriter.Write( Property.Name + "\n" );
}

We will get 36 properties.

AnnotationsDataCategoryDataTypeDaxObjectFullNameDaxObjectNameDaxTableName
DependsOnDescriptionDetailRowsExpressionDisplayFolderErrorMessageExpression
ExtendedPropertiesFormatStringInPerspectiveIsHiddenIsRemovedIsSimpleMeasure
IsVisibleKPILineageTagMetadataIndexModelName
NeedsValidationObjectTypeObjectTypeNameParentReferencedBySourceLineageTag
StateSynonymsTableTranslatedDescriptionsTranslatedDisplayFoldersTranslatedNames

I highlighted, with blue color, properties that return more than one value. For example "Synonyms" could have several strings. With green background color I highlighted properties that I don't know what are. We will still try to read their values. Pink color is for properties that will return objects. We already have property DaxTableName that will give us name of a table measure belongs to. For that reason pink color properties (Table, Parent, Model) are not so useful for us.

Get values for all the properties

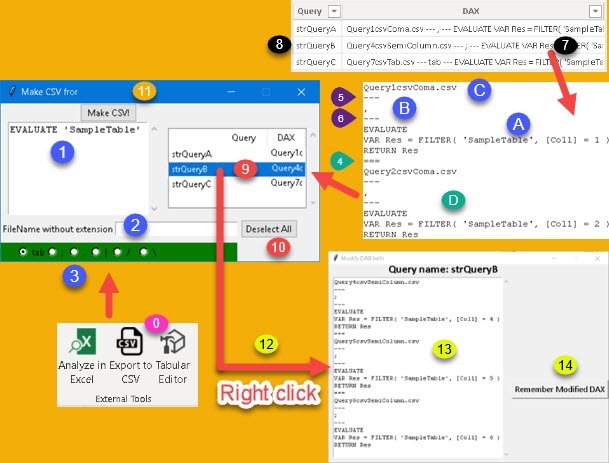
We have one table "SampleTable" with only one column "Col1" (1). In this table we have four measures that are interdependent (3). We will mostly focus our attention to Measure2 (4). For this measure we will change some of the properties so that we have something to work with (5).

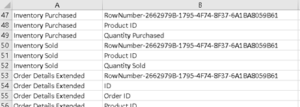
Now we can use code to read values of all of this properties. You can find this code in download files for this post. In the table below we can see result of a code for our sample table. Not all of the properties are shown. Notice the property "DependsOn". This property will list all the objects our measure is depending on. Similar property is "ReferencedBy". This property will show all the objects that reference our measure. This two properties are part of Tabular Editor and you will not find them if you use Visual Studio.

MeasurePropertyValue|MeasurePropertyValue
Measure2DataTypeInt64|Measure2Expression[Measure1] + 1
Measure2DaxObjectFullName[Measure2]|Measure2FormatString#.##0,00
Measure2DaxTableName'SampleTable'|Measure2IsHiddenFALSE
Measure2DependsOn[Measure1]|Measure2IsVisibleTRUE
Measure2DependsOn'SampleTable'|Measure2NameMeasure2
Measure2DependsOn'SampleTable'[Col1]|Measure2ReferencedBy[Measure3]
Measure2DescriptionMeasure2Description|Measure2ReferencedBy[Measure4]
Measure2DisplayFolderMeasure2DisplayFolder|Measure2SynonimsMeasure2Synonym1, Measure2Synonym2

Sample PBIX file and Tabular Editor code can be downloaded here:

Connect to Power BI Desktop from Visual Studio

We will connect to Power BI Desktop database from Visual Studio and read all of its Table and Column names. When we open Visual Studio, we choose to create a new project (1). As a type of project we will choose "Console App" (2). In new dialog we add a name to our project (3). Here we can choose where our project will be saved (4). Add this folder to your Antivirus program as an exception. My Antivirus program (Avast) blocked execution of a console app.


After we declared our project, we have to download two dll libraries. Those are "Microsoft.AnalysisServices.Core.dll" and "Microsoft.AnalysisServices.Tabular.dll". I added them to files for download, at the end of this post. We already have them on our computer if Tabular Editor is installed. If that is true, in "Program Files (x86)/Tabular Editor" folder, we have both libraries (1). Those two libraries have to be referenced in our project. In "Solution Explorer" of Visual Studio, we add both of them (2,3). Now, they are available in our project.


Below we can see the code of our project. In purple parts we have to enter credentials of our PBIX file, and fullpath of the file in which we will write the names of tables and columns. Orange part is for creating server object and connecting to database by using Connect method and connection string. Green part is preparation for writing to disk. Blue part is a loop which will get all names of a table and column names.

using System;
using Microsoft.AnalysisServices.Tabular;
using System.IO;

namespace TOMSamples

{

   class Program
   {
     static void Main(string[] args)
     {
       string ConnectionString = "DataSource=localhost:58064";
       using (Server server = new Server())

       {        
       server.Connect(ConnectionString);
        var OurModel = server.Databases["a02591ad-8656-4e1d-9a75-1672b223c8e6"].Model;
        string file = @"C:\Users\Sima\Desktop\TablesColumns.csv
";
        using (StreamWriter fileWriter = new StreamWriter(file))
         foreach(var Tbl in OurModel.Tables)
         {
          foreach (Column Col in Tbl.Columns)
           {
             fileWriter.Write(Tbl.Name + ";" + Col.Name + "\n");
           }
         }
       }   
     }    
   }     
}

You can find more samples of code to interact with tabular model on this address. This code is placed in Visual studio (1) and executed by clicking on the Start button (2).

Final result is CSV file with all table and column names. Interesting is that each table has column with the name "Row Number-2662979B-1795-4F74-8F37-6A1BA8059B61". This is probably primary key column used internally by Power BI Desktop.


PBIX sample file, dll libraries and C# code can be downloaded below.

Python CSV external tool for Power BI desktop 2

Old CSV tool

This is an improvement on a previously created external tool.

https://bizkapish.com/power-bi-desktop/python-csv-external-tool-for-power-bi-desktop/

The old solution could only create a CSV file from the DAX we entered. I wanted to improve this tool.

It would be great if we could store some DAX in a PBID table, similar to saved queries. It would also be great to be able to change that stored DAX just before execution. This would give us an opportunity to parameterize our query.

New solution

So I made a new tool presented below. We open this tool with a button from ribbon tab (0). As before, we can type our DAX query (1), but this time we can also choose the name of a file (2), and CSV delimiter (3). If we don't enter name of file and CSV delimiter, default values will be used ("CSV exported.csv" and ";" delimiter). What is new is that we can select some of the stored queries from the listbox (9). This listbox will read its content from a PBID table.

One row in that PBID table has a name of a query (8) and its definition (7). Definition has DAX string (A), CSV delimiter (B) and the name of a file (C). They are all separated with three dashes (5,6). Then we can add three signs of equality (4), and then a new query (D). We can have multiple queries in one row of table (7 = A+D).
Each row from the table will become one row in Listbox (9). If we select one query from the Listbox (9), and we type some query in (1), we can then click on "Make CSV" (11) button. This will create several CSV files. One for our typed (1) DAX and several more for our stored query (7).

We can do one more thing. Before executing queries, we can change something in our stored query. This will not be permanent change, nothing will be changed in a table (7,8). First we have to right click query we want to change (9,12). New dialog will open. This new dialog will show our query (13). We have to change manually something in our query and then we click on "Remember Modified DAX" (14). This temporary change will be only saved in the listbox control. This is how we can parameterize our query.

Implementation

Implementation is almost the same as for the old tool. We just have to replace old python script with the new one. The only real difference is that we have to create a table with the name "CSVqueries" and columns "query" (name of query) and "DAX" (definition of a query). This table can be empty, but without her this external tool will not work at all.

In stored queries delimiter can be any character, but only single character. Tab sign is the only special sign that can be used. If you want to use tab sign, type "tab" as delimiter.

Sample files can be downloaded here. Your have to change fullpaths in JSON file.

Python CSV external tool for Power BI desktop

This is explanation how, with python, to make an external Power BI Desktop tool that will export your DAX query to CSV. In Power BI desktop ribbon we have a button (1) "Export to CSV". This button will open window (2) where we have to type our DAX query. We already have template in this dialog to help us with writing. After this, we click on button (3) "Make CSV!". If something is wrong we will get message (4). If everything is OK, new file will appear on our desktop. That file will hold data from our query (5). Let's see how to make such external tool.

First step is to create JSON file which will tell Power BI desktop how to create button and what that button should do. We can see bellow sample of such file. Version is just a version of our tool. Just leave it as "1.0". Name is text that will appear bellow button. We can add some description of our tool. Path is fullpath to python executive file. Use backslashes and double them. Arguments has two parts. First part is fullpath to our python script. Second part are arguments that Power BI desktop will provide for our script. "Server" is address of our server ("localhost:57800"), and "database" is name of our database ("c6fb254f-f146-464d-99cf-b2a6e322eb38"). Our script will use name of a server for its execution. Last element is image in base64 format. Base64 format is textual presentation of an image. This format has two parts. First part is prefix, and prefix is always the same. Second part is base64 code. We can go to web site base64.guru and there we can upload our icon. Result will be long text that is base64 presentation of our image. This text will be really long, but all of it should be placed in JSON file, after the prefix.

{
  "version": "1.0",
  "name": "Export to CSV",
  "description": "Export user's DAX to CSV file.",
  "path": "G:\\WPy64-3950\\python-3.9.5.amd64\\pythonw.exe",
  "arguments": "C:/Users/Sima/Desktop/ExportToCSV.pyw \"%server%\" \"%database%\"",
  "iconData": "data:image/png;base64,iVBORw.......0KGgo"
}

Notice that instead of "python.exe" and "ExportToCSV.py" we are using version with "W" – "pythonw.exe" and "ExportToCSV.pyw". This is because we want to avoid black command prompt window (1) to be opened in background of our window.

Fullpath to our python script doesn't have spaces in it. If we have fullpath with spaces, we have to delimit that fullpath with quotes, but those quotes has to be escaped. In that case "arguments" would loook like:
"\"C:/Users/Sima/Desktop/ExportToCSV.pyw\" \"%server%\" \"%database%\""
We can see that arguments "server" and "database" were already delimited this way because they have "%" sign in them.
This is not needed for "path" element.

This JSON file should be placed on this address. If last two folders (\Power BI Desktop\External Tools) don't exist, create them and place JSON file inside. Name of our JSON file has to end with ".pbitool.json".
C:\Program Files (x86)\Common Files\Microsoft Shared\Power BI Desktop\External Tools\ourtool.pbitool.json

When we click on button in ribbon, python script mentioned in JSON file, will be called. This script has two parts. One part is about using python to create GUI window. The other part is explained bellow. This part is used to connect to Power BI desktop, read data and write them in CSV file. str(sys.argv[1]) is a python way to get first argument sent to script. This is name of server ("localhost:49380"). This address will be used inside connection string. By using connection string we will connect to PBID and we will execute our DAX.

Python will return names of columns as Table[ColumnName]. We will use regex to leave only "ColumnName" part.

Last part is where we read fullpath of desktop to create new file name. After this, all we need is to write data in CSV file by using python CSV modul.

    conn = adodbapi.connect("Provider=MSOLAP;Data Source=" + str(sys.argv[1]) + ";Initial Catalog='';")
    cursor = conn.cursor()
    cursor.execute(DAX)

    #fix names of columns. By default they contain table name and brackets.
    NamesOfColumns = [desc[0] for desc in cursor.description]
    CorrectedNamesOfColumns = [re.findall('\[(.*?)\]', NoC)[0] for NoC in NamesOfColumns]

    #write to CSV
    FileName = os.path.join(os.path.join(os.environ['USERPROFILE']), 'Desktop') + '\CSVfromPBID.csv'
    with open(FileName, 'w', newline='') as f:
        csv.writer(f, delimiter=',').writerow(CorrectedNamesOfColumns)
        csv.writer(f, delimiter=',').writerows(cursor)

Whole python script, JSON file and PBIX sample file are here. Don't forget to change fullpaths inside JSON file.

Local Image Server for Power BI Desktop

If we create table in Power BI desktop that has images URL-s in one column (1), this will allow us to present those images in Report View (4). For this to work, we have to mark this column as "Image URL" column (2). First we select our column (1) and then we go to Column tools > Properties > Data category. There, we choose option "Image URL" (2). Now, that our column is of "Image URL" type, we can add this column as a Field to a table visual (3). Final result is table, in Report View (4), that has image in every cell of table presented.

If we don't have URL-s for our images, but the images are available in some folder on our computer or network, we have to raise our local image server. Here, I will explain two ways how to do that easily.

Python http.server modul

We will open windows CMD environment. This CMD environment has to stay open for the time we are using our images in Power BI Desktop. When we close this environment, images will not be available any more. Then, first we have to change current folder to folder with images (1). Second, we have to open python "http.server" module (2). This module asks for port number. We can type anything, but for this example I used port number 21.000.

(1)
>cd "c:\Folder with images" 
(2)
>pyhton.exe -m http.server 21000 

All images in folder are now available as URL links. On our computer we can approach those links with "localhost" and our port number (1). On our computer, and all other computers on local network, we can open page with links by using IP address of our computer and our port number (2). Access from local network can be limited by firewall, so we need to have rights to access computer where python server works.

http://localhost:21000 (1) 
http://192.168.0.103:21000 (2)

Links to images will be generated as "http://localhost:21000/" + "Name of image.jpg". If we have names of all our images in Excel, we just have to prefix them with "http://localhost:21000/" and then we will have the links to all our images. Those links can be imported in Power BI Desktop and used in Report View.

http://192.168.0.103:21000/asters-gda84d7295_640_result.jpg

Mongoose server

There is a very simple server that can be used for the same purpose. Its name is "Mongoose server" and can be downloaded from https://mongoose.ws/desktop-app/. This is small portable executable file. Just click on it to open it.

New icon will appear in system tray. Right click this icon to access main menu. With option (1) we can change folder with images that are publish online. With (2) we can open browser and jump directly on page where all our images are listed. Link for this page and for each of images will be similar to one that python web server created.

http://192.168.0.103:8000
http://192.168.0.103:8000/flowers-g0eaf923f2_640_result.jpg

We can see bellow how page with image links looks like (1). On the right side (2) we can see that Mongoose server can share our images globally. This option has to be enabled by clicking on (3) on the image above. In this case sharing is done through Mongoose server so the link is something like "https://32cf61d37e7299.share.mongoose.ws". Global sharing of our images is not something that we want in this case and could present security risk because now anyone on world can access our images. It is best to turn this option off.

Here is PBIX sample file and one folder with collection of images.