A SQL Stored Procedure is a named set of SQL statements that are frequently executed together. When we want to execute those statements, we only need to specify the procedure name and the argument values.
Procedures are very similar to functions, but they differ in purpose and usage.
1) The purpose of functions is to perform calculations and return values. The purpose of procedures is to change database objects. This means that DML statements should be used within procedures, not within functions.
2) Functions are used in statements. They can be used in SELECT, WHERE, GROUP BY, and HAVING. Procedures are self-contained and independent from other statements. They are executed with the "CALL" statement.
DDL Statements in Procedures
CREATE OR REPLACE PROCEDURE procDDL()
BEGIN
     CREATE TABLE Tab1 ( Number INT );
     ALTER TABLE Tab1 ADD COLUMN Letter CHAR;
END;
We can not use DDL statements within a procedure.
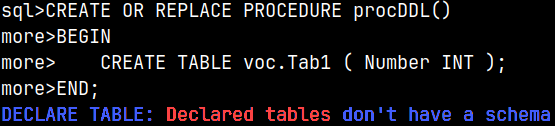
CREATE OR REPLACE PROCEDURE procDDL() BEGIN
     CREATE TABLE Tab1 ( Number INT );
END;
It is possible to use "CREATE TABLE" statement inside of procedure.
But when we try to read from our new table (after we called a procedure), we get nothing: SELECT * FROM Tab1;
I will now try to create a table inside of procedure, but this time I will specify schema. We will get an interesting message.
CREATE OR REPLACE PROCEDURE procDDL() BEGIN CREATE TABLEvoc.Tab1 ( Number INT ); END;
It seems that CREATE TABLE is the same as DECLARE TABLE. We were not using DDL statement, we were just definining a table variable.
Now we know that DDL statements can not be used in Functions and Procedures at all.
Sample Table
CREATE TABLE procTab ( Number INT );
SELECT * FROM procTab;
DML Statements in Procedures
CREATE OR REPLACE PROCEDURE procDML()
BEGIN
     INSERT INTO procTab ( Number ) VALUES ( 1 );
END;
CALL procDML();
--we call the procedure
SELECT * FROM procTab;
DML statements will work normally inside of procedures.
CREATE OR REPLACE PROCEDURE procDML()
BEGIN
     SELECT * FROM Tab1;
END;
SELECT statement is not allowed in procedures. Procedures don't return values.
Variables and Arguments in Procedures
CREATE OR REPLACE PROCEDURE procVar()
BEGIN
     DECLARE Var1 INTEGER;
     SET Var1 = 2;
     UPDATE procTab SET Number = Var1 WHERE Number = 1;
END;
We can use variables in procedures. CALL procVar(); SELECT * FROM procTab;
CREATE PROCEDURE procArg(Arg1 INT)
BEGIN
     UPDATE procTab SET Number = Arg1 WHERE Number = 2;
END;
Procedures can accept arguments.
CALL procArg(3); SELECT * FROM procTab;
CREATE PROCEDURE procArg(Arg1 INT, Arg2 INT)
BEGIN
     UPDATE procTab SET Number = Arg1 + Arg2 WHERE Number = 3;
END;
We can overload procedures, just like functions. CALL procArg( 2, 2 ); SELECT * FROM procTab;
When deleting overloaded procedure we have to use the full signature.
DROP PROCEDURE procArg( INT ); DROP PROCEDURE procArg( INT, INT );
DROP ALL PROCEDURE procARG;
If we use ALL keyword, then we can delete all of the overloaded functions that share the same name, at once.
Transactions in Procedures
CREATE OR REPLACE PROCEDURE procTrans()
BEGIN
     START TRANSACTION;
     UPDATE procTab SET Number = 5 WHERE Number = 4;
COMMIT; END;
Because we can not use TCL ( transaction control language ) statemens inside of procedures, then it is not possible to use transaction statements.
CREATE OR REPLACE PROCEDURE procTrans()
BEGIN ATOMIC
     UPDATE procTab SET Number = 5 WHERE Number = 4;
END;
Just like with functions, we have to use ATOMIC keyword after BEGIN to make procedure one big transaction.
Flow Controls in Procedures
Inside procedures we can use flow control statements like CASE, WHILE and IF.
CREATE OR REPLACE PROCEDURE procCASE(Arg1 CHAR)
BEGIN ATOMIC
     DECLARE Res INT;
     CASE
          WHEN Arg1 = 'A' THEN SET Res = 6;
          ELSE SET Res = 7;
     END CASE;
     UPDATE procTab SET Number = Res;
END;
CALL procCASE( 'A' );
SELECT * FROM procTab;
System Tables
We can read about procedures from sys.functions system table. Procedures are of the type "2". User created procedures have "false" in the system column. SELECT * FROM sys.functions WHERE name = 'proctrans';
Data about procedures argument can be found in the system table sys.args. SELECT * FROM sys.args WHERE func_id = 15148;
Nesting Functions and Procedures
We will try to call this function from one other function: CREATE OR REPLACE FUNCTION funcReturnOne() RETURNS INTEGER BEGIN RETURN 1; END;
This is a function calling a function. CREATE OR REPLACE FUNCTION funcReturnSum() RETURNS INTEGER BEGIN RETURN funcReturnOne() + 2; END;
This will work, we can chain functions.
SELECT funcReturnSum();
CREATE OR REPLACE FUNCTION funcProc()
RETURNS INTEGER
BEGIN
      CALL procCASE( 'B' );
      RETURN 1;
END;
This time, we will call procedure from a function. This function will work as expected. SELECT funcProc();
Procedure "procCASE" will also do its job. It will change the value in "procTab" table. SELECT * FROM procTab;
It is also possible to nest procedures. This will be inner procedure: CREATE PROCEDURE procInner() BEGIN UPDATE procTab SET Number = 8 WHERE Number = 7; END;
This outer procedure will just call inner procedure: CREATE PROCEDURE procOuter() BEGIN CALL procInner(); END; CALL procOuter();
Outer procedure will call inner procedure, and inner procedure will update the table. SELECT * FROM procTab;
Deleting a Procedure
DROP PROCEDURE IF EXISTS procDDL();
If we use "IF EXISTS", then deleting of a procedure will never return an error.
If we try to delete not existing procedure, there will be no error, if we use "IF EXISTS". DROP PROCEDURE IF EXISTS procZZZ();
Function funcProc() is depentand on the procedure "procCASE". That means that we can not delete "procCASE" procedure.
DROP PROCEDURE procCASE;
DROP PROCEDURE procCASE CASCADE;
We can use CASCADE keyword to delete procedure and all of the depending objects. Now our procedure is deleted.
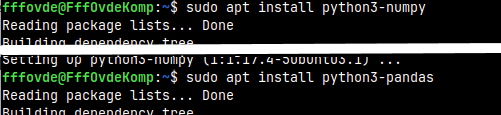
In order to create Python UDFs, we need to fulfill two prerequisites: – We have to install the Monetdb-Python3 package. This package is used by MonetDB to communicate with python. – We have to enable python in each database where we want to create python UDFs (monetdb set embedpy3=true).
How to provide these prerequisites is already explained in one of my previous posts ( 0360 Loader Functions In Monetdb ). Please see this blog post to learn how to enable Python support. Alternatively, you can watch video about loader functions on youtube ( https://youtu.be/2WHb41dzh_A ).
Presence of NumPy and Pandas Packages
In Ubuntu 22.04+, the global Python environment is "externally managed". That means that we have to install numpy and pandas from the official repository.
We can check whether we have numpy and pandas already installed. We don't. python3 -c "import numpy; print('NumPy installed:', numpy.__version__)" python3 -c "import pandas; print('Pandas installed:', pandas.__version__)"
Numpy and pandas are available in the ubuntu's repository. We can install them. sudo apt search python3-numpy; apt search python3-pandas
Pandas is depending on numpy, so we will first install numpy.
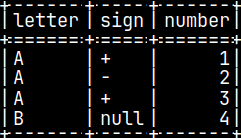
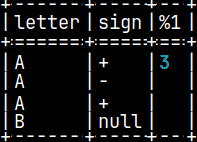
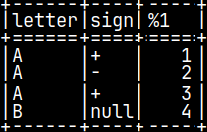
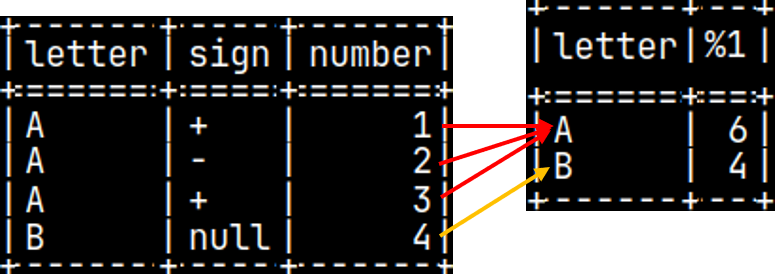
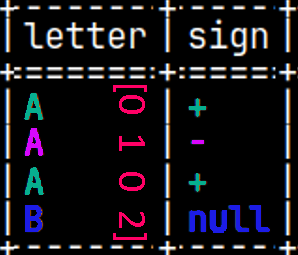
CREATE TABLE pyTab ( Letter CHAR, Sign CHAR, Number INTEGER ); INSERT INTO pyTab VALUES ( 'A', '+', 1 ), ( 'A', '-', 2 ), ( 'A', '+', 3 ), ( 'B', null, 4 ); SELECT * FROM pyTab;
Scalar Python UDF
CREATE OR REPLACE FUNCTION pyConcat(val1 CHAR, val2 CHAR) RETURNS CHAR(2) LANGUAGE PYTHON { return val1 + val2 };
This is simple function that will accept two arguments and will return their concatenation. We can use this function like this:
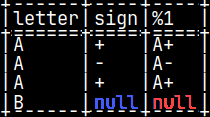
SELECT letter, sign, pyConcat( letter, sign ) FROM pyTab;
In fourth row, if "sign" is null, then the result will be null.
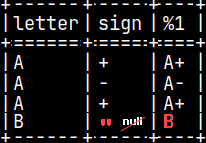
We can improve our function by transforming null values of the arguments into empty strings. =>
CREATE OR REPLACE FUNCTION pyConcat(val1 CHAR, val2 CHAR)
RETURNS VARCHAR(2)
LANGUAGE PYTHON {
    if isinstance(val1, numpy.ma.MaskedArray):
       val1 = val1.filled('')
    if isinstance(val2, numpy.ma.MaskedArray):
       val2 = val2.filled('')
    return val1 + val2
};
Now, we have "B" in the fourth row. This last example showed us what is the nature of arguments in python UDFs. Arguments are NumPy arrays.
import numpy as np
a = np.array([1, 2, 3, 4])
print("Regular array:", a)           # Regular array: [1 2 3 4]
If we have null in some column, then instead of NumPy array, we will get masked array. import numpy.ma as ma b = ma.array([1, -9999, 3, 4], mask=[False,True, False, False]) print("Sum of Masked array:", b.sum()) # Sum of Masked array: 8
A masked array is a combination of a standard NumPy array and a mask. A mask is used to hide invalid or missing values. After we hide the bad values, we can calculate the sum or average of the masked array without the influence of the bad values.
In our example, we have used "isinstance" function to examine if we have NumPy array or masked array. For masked array we have replaced bad values with empty string.
   if isinstance(val2, numpy.ma.MaskedArray):
       val2 = val2.filled('')
If the value in the fourth row is replaced with an empty string, then the null will now affect final result.
The data type of arguments in Python is directly inferred from the SQL data types, according to this mapping.
BOOLEAN
numpy.int8
||
INTEGER
numpy.int32
||
FLOAT
numpy.float64
TINYINT
numpy.int8
||
BIGINT
numpy.int64
||
HUGEINT
numpy.float64
SMALLINT
numpy.int16
||
REAL
numpy.float32
||
STRING
numpy.object
Returned Value
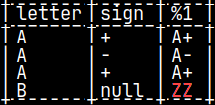
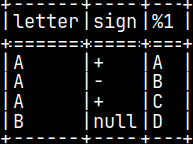
CREATE OR REPLACE FUNCTION pyConcat(val1 CHAR, val2 CHAR)
RETURNS VARCHAR(2)
LANGUAGE PYTHON {
    return(numpy.array(["A+","A-","A+","ZZ"]))
};
Returned value is also NumPy array. I will create one function that will return the result as a constant. Notice that I have place "ZZ" as the last element.
This function will work just fine. We'll get our result.
SELECT letter, sign, pyConcat( letter, sign ) FROM pyTab;
CREATE OR REPLACE FUNCTION pyConcat(val1 CHAR, val2 CHAR)
RETURNS VARCHAR(2)
LANGUAGE PYTHON {
    return( 3 )
};
This is what will happen if we return scaler.
CREATE OR REPLACE FUNCTION pyConcat(val1 CHAR, val2 CHAR)
RETURNS VARCHAR(2)
LANGUAGE PYTHON {
    return( ( 1, 2 ) )
};
If we return a tuple, we will get this message.
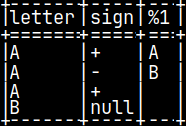
Let's try to return list, dictionary or pandas data frame. We'll call our functions with "SELECT letter, sign, Ret() FROM pyTab;".
CREATE OR REPLACE FUNCTION Ret() RETURNS CHAR LANGUAGE PYTHON { return( ['A','B','C','D'] ) };
CREATE OR REPLACE FUNCTION Ret() RETURNS CHAR LANGUAGE PYTHON { return( {"result":['A','B'] } ) };
CREATE OR REPLACE FUNCTION Ret() RETURNS INTEGER
LANGUAGE PYTHON {
     import pandas as pd -- must import pandas      return(pd.DataFrame({'result':[1,2,3,4]}))
};
Python Traps
CREATE OR REPLACE FUNCTION funcCase(Letter CHAR) RETURNS CHAR LANGUAGE PYTHON { return( Letter ) };
If we try to call this function, we'll get an error. SELECT funcCase('A');
Because python is case sensitive and SQL is not, names of arguments will be turned into lower letters in python script.
Instead of "return( Letter )", we have to type "return( letter )". Arguments inside of python script have to be in lower letters.
After the change, this function will work. SELECT funcCase('A');
Python is, of course, sensitive to indentation. Indentation must be consistent. We'll get an error if it is not.
CREATE OR REPLACE FUNCTION funcIndent() RETURNS CHAR LANGUAGE PYTHON { a = 3 return a };
SELECT funcIndent();
Creating a Table with Python UDF
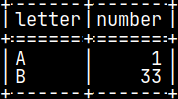
CREATE FUNCTION funcTab() RETURNS TABLE (Letter CHAR, Number INT) LANGUAGE PYTHON { result = dict() result['letter'] = ['A', 'B'] result['number'] = [1, 33] return result };
Python dictionary can be used to create table with python. SELECT * FROM funcTab();
Use Python Function to Filter Data
CREATE OR REPLACE FUNCTION funcBoolean(Number INT) RETURNS BOOLEAN LANGUAGE PYTHON { return number % 2 };
If python function is returning TRUE and FALSE, we can use it as a filter. SELECT Number, funcBoolean( Number ) FROM pyTab WHERE funcBoolean( Number );
Aggregate UDFs
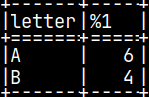
We can group table values with this SQL statement: SELECT Letter, SUM( Number ) FROM pyTab GROUP BY Letter;
SQL statement is using built-in SQL function to aggregate values. We can do the same with python UDF. Let's make UDF function pySUM( Val ). SELECT Letter, pySUM( Number ) FROM pyTab GROUP BY Letter;
Aggregate function argument is a column to aggregate. We will use Number column. This column will be NumPy array. np.array([1, 2, 3, 4])
Beside this, aggregate function needs to know what row belongs to what group.
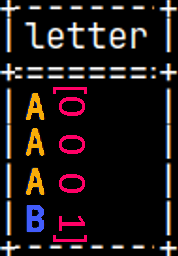
Groups will also be presented with a NumPy array. If we are grouping only by Letter column, our array will show that we only have 2 groups (0,1). If we group by Letter and Sign columns, then array will have 3 groups (0,1,2). This array is always one dimensional and always have the name "aggr_group".
np.array([0, 0, 0, 1])
np.array([0, 1, 0, 2])
So, inputs for our function are "val = np.array([1, 2, 3, 4])" and "aggr_group = np.array([0, 0, 0, 1])". On the left side bellow, we have our function. On the right side we can see interim results and pseudo code.
CREATE OR REPLACE AGGREGATE pySUM(val INTEGER)
RETURNS INTEGER LANGUAGE PYTHON {
unique = numpy.unique(aggr_group) x = numpy.zeros(shape=(unique.size)) for i in range(0, unique.size): x[i] = numpy.sum(val[aggr_group==unique[i]]) return(x) };
val = np.array([1, 2, 3, 4]) #we start with val and aggr_group
aggr_group = np.array([0, 0, 0, 1])
unique = np.array([0, 1]) #we remove duplicates x = np.array([0, 0]) #result array, but filled with zeros for i from 0to 1#for each group x[0] = sum([1, 2, 3, 4] where [0, 0, 0, 1] = 0 ) = 6 #forA x[1] = sum([1, 2, 3, 4] where [0, 0, 0, 1] = 1 ) = 4 #forB return np.array( 6, 4 )
We will run our statement: SELECT Letter, pySUM( Number ) FROM pyTab GROUP BY Letter;
If we try to apply our function without grouping, we'll get an error. SELECT pySUM( Number ) FROM pyTab;
If there are no groups, then "aggr_group" is not defined.
CREATE OR REPLACE AGGREGATE pySUM(val INTEGER)
RETURNS INTEGER LANGUAGE PYTHON {
     try:
         unique = numpy.unique(aggr_group)
         x = numpy.zeros(shape=(unique.size))
         for i in range(0, unique.size):
             x[i] = numpy.sum(val[aggr_group==unique[i]])
     except NameError:
         x = numpy.sum(val) # aggregate on all data
     return(x) };
We have to catch the error above with "try".
We can provide alternative result with "except NameError", that will not use "aggr_group". We will now aggregate the whole column.
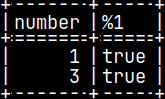
SELECT pySUM( Number )FROM pyTab;
The result without grouping is 10.
System Tables
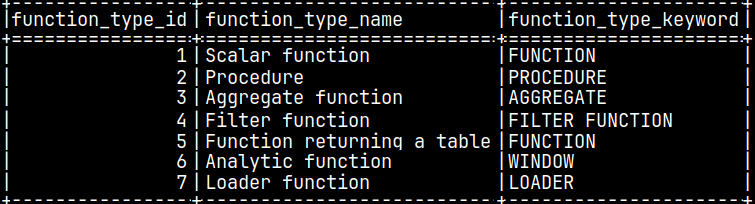
In system table "sys.function_types", we can see that aggregate functions are type 3, and scalar functions are type 1. Functions that return table are type 5.
SELECT * FROM sys.function_types;
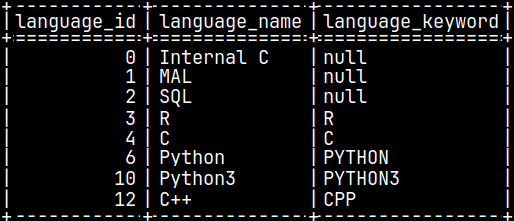
In system table "sys.function_languages", we can see what programming languages can we use to create functions.
SELECT * FROM sys.function_languages;
We can use language and function type to search for our Python functions in system table "sys.functions".
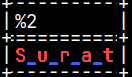
In procedural SQL, WHILE statement is used for iterative statement where we repeat a block of SQL code as long as a specified condition is true. In the example bellow, we will repeat the loop 5 times, because our argument has 5 letters = length ( 'Surat' ).
CREATE OR REPLACE FUNCTION funcWhile( argWord VARCHAR(20) ) RETURNS STRING BEGIN DECLARE i INT; SET i = 1; DECLARE Res VARCHAR(40); SET Res = ''; WHILE i <= length( argWord ) DO SET Res = Res || '_' || SUBSTRING( argWord, i, 1 ); SET i = i + 1; END WHILE; RETURN TRIM( Res, '_' ); END;
(1)'' + '_' + Surat = _S (2)_S+ '_' + Surat=_S_u (3)_S_u+'_' + Surat = _S_u_r (4)_S_u_r+'_' + Surat= _S_u_r_a (5)_S_u_r_a+'_' + Surat = _S_u_r_a_t
TRIM( _S_u_r_a_t, '_') = S_u_r_a_t
SELECT funcWhile('Surat');
This example will return the smallest number X for which 2X >= argument.
SELECT funcExponential(7);
CREATE OR REPLACE FUNCTION funcExponential( argNumber INTEGER ) RETURNS INTEGER BEGIN DECLARE X INT; SET X = 1; WHILE POWER( 2, X ) < argNumber DO SET X=X+ 1; END WHILE; RETURN X; END;
CREATE OR REPLACE FUNCTION funcFactorial( argNumber INTEGER ) RETURNS INTEGER BEGIN DECLARE Res INTEGER; SET Res = 1; WHILE 1 < argNumber DO SET Res = Res * argNumber; SET argNumber = argNumber - 1; END WHILE; RETURN Res; END;
This is an example where we are calculating factorial of an argument.
SELECT funcWhile(4);
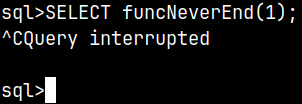
Infinite Loop
If we made a mistake, our WHILE statement can create an infinite loop. In that case, solution is to violentely break the process. In mclient we can exit by typing "Ctrl + C" to exit execution.
CREATE OR REPLACE FUNCTION funcNeverEnd( argNumber INTEGER ) RETURNS INTEGER BEGIN WHILE 1 = 1 DO SET argNumber = argNumber + 1; END WHILE; RETURN argNumber; END;
SELECT funcNeverEnd(1);
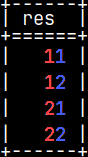
Nesting WHILE
It is possible to nest WHILE statement inside of another WHILE statement.
SELECT * FROM funcNested();
CREATE OR REPLACE FUNCTION funcNested() RETURNS TABLE( Res INT ) BEGIN DECLARE i INT; SET i = 1; DECLARE j INT; DECLARE TABLE tabRes ( Res INT ); WHILE i <= 2 DO SET j = 1; WHILE j <= 2 DO INSERT INTO tabRes VALUES ( i * 10 + j ); SET j = j + 1; END WHILE; SET i = i + 1; END WHILE; RETURN tabRes; END;
IF Statement in Procedural SQL
For conditional logic we can use IF statement. CREATE OR REPLACE FUNCTION funcIF() RETURNS INTEGER BEGIN IF ( 1 = 2 ) THEN RETURN 1; ELSE RETURN 2; END IF; END;
Because 1 <> 2, the returned value is 2.
SELECT funcIF();
It is also possible to have several conditions inside of the IF statement. CREATE OR REPLACE FUNCTION funcIF() RETURNS INTEGER BEGIN IF ( 1 = 2 ) THEN RETURN 1; ELSEIF ( 1 = 2 ) THEN RETURN 2; ELSEIF ( 1 = 1 ) THEN RETURN 3; ELSE RETURN 3; END IF; END;
One of these conditions is TRUE, so the final result will be 3.
SELECT funcIF();
Breaking WHILE Loop
MonetDB doesn't support BREAK keyword in a WHILE loop. We have to use flag variable to mark when we want to exit the loop.
We will set our flag variable to one value, and we will examine whether it has that value at the start of each cycle. Inside of the loop we can change the value of a flag variable when conditions are met. That change will make condition of a loop to fail. SELECT funcBREAK();
CREATE OR REPLACE FUNCTION funcBREAK() RETURNS INTEGER BEGIN DECLARE i INTEGER; SET i = 1; DECLARE Flag INTEGER; SETFlag = 0; WHILE i <= 10 AND Flag = 0 DO SET i = i + 1; IF i = 5 THEN SET Flag = 1; END IF; END WHILE; RETURN i; END;
Skip Some Cycles in a WHILE Loop
MonetDB doesn't support CONTINUE keyword in a WHILE loop. If we want to conditionally skip some cycles, we should wrap our statements in the IF function.
In the example to the right, we are calculating total of the numbers between 1 and 10, but we are skipping all the even numbers. Result should be 1+3+5+7+9=25. SELECT funcCONTINUE();
CREATE OR REPLACE FUNCTION funcCONTINUE()
RETURNS INT
BEGIN
     DECLARE i INT; SET i = 1;
     DECLARE Res INT; SET Res = 0;
     WHILE i < 10 DO
         IF MOD( i, 2 ) <> 0  THEN
             SET Res = Res + i;
         END IF;
         SET i = i + 1;
     END WHILE;
     RETURN Res;
END;
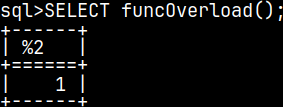
Functions Overloading
In the same schema it is possible to create several functions with the same name. Trick is that these functions must have different arguments. I will create three simple functions.
CREATE FUNCTION funcOverload() RETURNS INTEGER BEGIN RETURN 1; END;
CREATE FUNCTION funcOverload(A INT) RETURNS INTEGER BEGIN RETURN A; END;
CREATE FUNCTION funcOverload(A INT, B INT) RETURNS INTEGER BEGIN RETURN A + B; END;
Creation was successful so we can now test our functions:
SELECT funcOverload();
SELECT funcOverload(5);
SELECT funcOverload(20,5);
Deleting of Overloaded Functions
When we try to delete overloaded function, MonetDB will complain that we have to provide the full signature of a function. DROP FUNCTION funcOverload;
I will delete the version of the function, with one argument, by using full signature.
DROP FUNCTION funcOverload(INT);
Now this version doesn't work.
Other functions still work.
System Tables
System table sys.functions contains all of our functions.
SELECT * FROM sys.functions WHERE name = 'funcneverend';
If we want to list all of the functions that are created by us, we have to filter out system functions.
SELECT * FROM sys.functions WHERE system = false;
Function "funcNeverEnd" has ID 14331. We can use that fact to read about its arguments. SELECT * FROM sys.args WHERE func_id = 14331;
There will always be one argument named "result". This is the argument that represents the value that the function will return.
Table variables are temporary in-memory structures. They exist only during the execution of a function. They are mostly used to build up a result set that will be returned from the function. They can be also used as intermediate result storage for procedural logic.
CREATE FUNCTION funcTableDeclaration() RETURNS TABLE ( Id INTEGER ) BEGIN DECLARE TABLE TableDeclaration ( Id INTEGER ); INSERT INTO TableDeclaration VALUES ( 1 ); RETURN SELECT * FROM TableDeclaration; END;
SELECT * FROM funcTableDeclaration();
Tables created with DECLARE TABLE statement are mutable and can be modified by using any of the DML statements like INSERT INTO, UPDATE, DELETE…
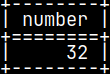
It is also possible to create a table variable based on an existing table, but without inheriting the data. I will create a sample table:
CREATE TABLE sys.tabNum ( Number INTEGER ); INSERT INTO tabNum ( Number ) VALUES ( 32 ); SELECT * FROM tabNum;
CREATE OR REPLACE FUNCTION funcTableDeclaration() RETURNS TABLE( N INTEGER ) BEGIN DECLARE TABLE TableDeclaration AS ( SELECT * FROM tabNum )WITH DATA; RETURN SELECT * FROM TableDeclaration; END;
We have created table variable based on the sample table.
SELECT * FROM funcTableDeclaration(); No inherited data, WITH DATA is not in effect.
Limitations of the Table Variables
CREATE OR REPLACE FUNCTION funcTableDeclaration() RETURNS TABLE ( Id INTEGER ) BEGIN DECLARE TABLE TableDeclaration ( Id INTEGER PRIMARY KEY ); INSERT INTO TableDeclaration VALUES ( 1 ); RETURN SELECT * FROM TableDeclaration; END;
We can not have constraints on the table variables.
CREATE OR REPLACE FUNCTION funcTableDeclaration() RETURNS TABLE( Id INTEGER ) BEGIN DECLARE TABLE TableDeclaration ( Id INTEGER ); INSERT INTO TableDeclaration VALUES ( 1 ); ALTER TABLE TableDeclaration RENAME COLUMN Id to Code; RETURN SELECT * FROM TableDeclaration; END;
It is not possible to apply ALTER TABLE on the table variable.
Declare Scaler Variable
CREATE FUNCTION funcVariableDeclaration()
RETURNS INTEGER
BEGIN
   DECLARE Var1 INTEGER;
   SET Var1 = 77;
   SET Var1 = 88;
   RETURN SELECT Var1;
END;
It is possible to declare and set scaler variable. Scaler variables are mutable, and we can change their values several times.
SELECT funcVariableDeclaration();
CREATE OR REPLACE FUNCTION funcVariableDeclaration() RETURNS TABLE ( Var1 INTEGER, VAR2 CHAR ) BEGIN DECLARE Var1 INTEGER, Var2 CHAR; SET Var1 = 77; SET Var2 = 'A'; RETURN SELECT Var1, Var2; END;
We can declare two variables in one statement.
SELECT * FROM funcVariableDeclaration();
CREATE OR REPLACE FUNCTION funcVariableDeclaration() RETURNS TABLE ( Var1 INTEGER, VAR2 CHAR ) BEGIN DECLARE Var1 INTEGER, Var2 CHAR; SELECT 1, 'A' INTO Var1, Var2; RETURN SELECT Var1, Var2; END;
Beside declaring two variables at once, we can also set the values of the both variables by the "SELECT INTO" statement.
Expressions for Values
CREATE OR REPLACE FUNCTION funcVariableDeclaration() RETURNS INTEGER BEGIN DECLARE Var1 INTEGER; SET Var1 = 32 + 5; RETURN SELECT Var1; END;
Result of an expression can be assigned as a variable value.
SELECT funcVariableDeclaration();
CREATE OR REPLACE FUNCTION funcVariableDeclaration()
RETURNS INTEGER
BEGIN
   DECLARE Var1 INTEGER;
   SET Var1 = ( SELECT * FROM tabNum );
   DECLARE Var2 INTEGER;
   SET Var2 = Var1 + 5;
   RETURN SELECT Var2;
END;
Result of a query can be assigned to a variable.
SELECT funcVariableDeclaration();
CREATE OR REPLACE FUNCTION funcVariableDeclaration()
RETURNS INTEGER
BEGIN
   DECLARE Var1 INTEGER;
   SET Var1 = ( SELECT * FROM tabNum ) + 5;
   RETURN SELECT Var1;
END;
We can also use this shorter syntax.
CREATE OR REPLACE FUNCTION funcVariableDeclaration() RETURNS INTEGER BEGIN DECLARE Var1 INTEGER, Var2 INTEGER; SET ( Var1, Var2 ) = ( SELECT Number, Number FROM tabNum ); RETURN Var1 / Var2; END;
If the query is returning one row with several columns, we can assign all of those values to several variables in one statement.
Usage of the Scaler Variables
Scaler variables are, also, temporary in-memory structures. We can use them anywhere where we can use constants:
CREATE OR REPLACE FUNCTION funcVariableDeclaration() RETURNS INTEGER BEGIN DECLARE Var1 INTEGER; SET Var1 = 32; RETURN SELECT * FROM tabNum WHERE Number = Var1; END;
SELECT funcVariableDeclaration();
But we can not use scaler variable to give a name to a column of a table variable. We can not use variables instead of the identifiers:
CREATE OR REPLACE FUNCTION funcTableDeclaration()
RETURNS TABLE ( Id INTEGER )
BEGIN
   DECLARE Var1 CHAR;
   SET Var1 = 'N';
   DECLARE TABLE TableDeclaration ( Var1 INTEGER );
   RETURN SELECT N FROM TableDeclaration;
END;
SELECT * FROM funcTableDeclaration();
CREATE OR REPLACE FUNCTION funcVariableDeclaration()
RETURNS INTEGER
BEGIN
   DECLARE Var1 INTEGER;
   RETURN SELECT Var1;
END;
Variable without assigned value will be NULL.
SELECT funcVariableDeclaration();
Control Flow With CASE
In a police lineup, a witness goes from left to right, scanning each person. When the witness recognizes the culprit, he stops scanning.
This is how the CASE control flow structure works. We examine the values one by one until we find a value that matches the description.
Search CASE
CREATE OR REPLACE FUNCTION funcCASE( argNumber INTEGER )
RETURNS CHAR
BEGIN
   DECLARE Res CHAR;
   CASE
      WHEN argNumber = 1 THEN SET Res = 'A';
      WHEN argNumber = 2 THEN SET Res = 'B';
      ELSE SET Res = 'C';
   END CASE;
   RETURN Res;
END;
CASE statement is made of conditions checks ( WHEN subclause ) and the results ( THEN subclause ) when the condition is met.
The results must be complete statements. In this case, it is a SET statement. If none of the conditions is met, we will return the statement after the "ELSE" keyword.
SELECT funcCASE( 1 );
SELECT funcCASE( 2 );
SELECT funcCASE( 99 );
CREATE OR REPLACE FUNCTION funcCASE( argNumber INTEGER )
RETURNS CHAR
BEGIN DECLARE Res CHAR; CASE WHEN argNumber < 3 THEN SET Res = 'A'; WHEN argNumber < 5 THEN SET Res = 'B'; ELSE SET Res = 'C'; END CASE; RETURN Res; END;
If the conditions overlap, the condition closer to the top of the list will win. For example, if argNumber is "2", then both the conditions "2 < 3" and "2 < 5" will be true. The final result will be the letter "A", because it is related to the top condition in the list.
SELECT funcCASE( 2 );
Simple CASE
CREATE OR REPLACE FUNCTION funcCASE( argNumber INTEGER )
RETURNS CHAR
BEGIN
   DECLARE Res CHAR;
   CASE argNumber
      WHEN 1 THEN SET Res = 'A';
      WHEN 2 THEN SET Res = 'B';
      ELSE SET Res = 'D';
   END CASE;
   RETURN Res;
END;
This here is a shorthand for writing the conditions "ArgNumber = 1" and "ArgNumber = 2". This syntax is only useful when we are sure that we will only use equality-based conditions.
SELECT funcCASE( 2 );
On the other hand, when we use "Search CASE" then we can use whatever condition we want.
Nested CASE and Default Result of the CASE statement
CREATE OR REPLACE FUNCTION funcCASE( argNumber INTEGER )
RETURNS CHAR
BEGIN
   DECLARE Res CHAR;
   CASE
      WHEN argNumber = 1 THEN SET Res = 'A';
      CASE
         WHEN argNumber = 2 THEN SET Res = 'B';
      END CASE;
   END CASE;
   RETURN Res;
END;
We can nest CASE structures, one inside of another.
Notice that this time we don't have ELSE substatement. In that case every value of the argument, except 1 and 2, will cause the function to return NULL.
Procedural programming languages are based on a series of commands that are executed step by step. Programmer is responsible to explain, not only what should be done, but also how it should be done. Procedural programming is using, variables to store interim results, control flow constructs (IF, CASE, LOOP, WHILE…) to change the value of variables, error handling to catch errors, and everything is organized into blocks of code.
This is the opposite from SQL, which is abstract and declarative language. SQL is great for data querying, filtering, joining, grouping, but it can not use loops, variables and conditions.
Major blocks of code, in procedural languages, are functions and procedures. We can hide complex logic behind each function or procedure and then call that complex logic with simple calls. Functions and procedures can pass arguments between them. All of this allow for modular structure, which provides reusability and better organization of a code.
These blocks of code can be parameterized which gives them much greater reusability than SQL.
Procedural SQL
Procedural SQL is a procedural programming language used in databases. It is closely related to SQL. The purpose of procedural SQL is to extend SQL with procedural capabilities. Now we can place the application logic in the database, where it will be close to the data.
SQL is standardized and highly portable between databases. This allows programmers to learn it once, and use it everywhere. On the other hand, procedural SQL, on different servers, varies in scope and detail. The same procedural SQL commands may look the same but behave differently. This is why we have many dialects of procedural SQL, such as PL/SQL in Oracle or T-SQL in SQL server.
Procedural SQL is used when:
We want to perform complex transformations.
We need logic flow control.
We need more flexibility, so our logic must be parameterized.
We are performing validation and error checking.
We want to embed application logic into database to avoid expensive network round trips.
SQL is better than Procedural SQL because:
It is portable and standardized.
It is faster. It uses less memory and computational power.
It is less complex; user doesn't have to be closely familiar with the data in database and algorithms.
It is easier to read. For procedural loops we can use many lines, while SQL can do the same in one simple statement.
The reasons, why SQL is faster than Procedural SQL are:
SQL gives the optimizer more information on which to base optimization.
SQL needs less logging for rollbacks and transactions.
Less locks are taken, when we use SQL.
Set based logic is focus of RDBMS, so they are heavily optimized for it.
User Defined Functions (UDF) in MonetDB
MonetDB has a lot of built-in functions. We can solve most of the problems using string, mathematical, date time functions. For other problems we can create our functions using procedural SQL.
CREATE OR REPLACE FUNCTION funcReturnTwo() RETURNS INTEGER BEGIN RETURN 2; END;
On the left side, we can see an example of the simple UDF function in MonetDB. This function will always return number 2. We can use this function in SELECT statement: SELECT funcReturnTwo();
Our function has name, returned data type and returned value. Parentheses are for the arguments of a function.
We can delete function with the statement: DROP FUNCTION funcReturnTwo();
We can use SELECT statement to acquire a value that will function return:
CREATE OR REPLACE FUNCTION funcReturnTwo() RETURNS INTEGER
BEGIN
      RETURN SELECT 2;
END;
SELECT funcReturnTwo();
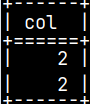
But, SELECT statement must return scalar in order to be used in the function. This SELECT statement will return a column:
SELECT * FROM (VALUES (2), (2)) AS t( Col );
CREATE OR REPLACE FUNCTION funcReturnTwo()
RETURNS INTEGER
BEGIN
      RETURN SELECT * FROM (VALUES (2), (2)) AS t( Col );
END;
MonetDB will accept this SELECT statement in the UDF function, but that function will not be usable: SELECT funcReturnTwo();
Sample Table and Usage of Arguments
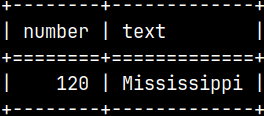
CREATE TABLE NumText ( Number INTEGER, Text VARCHAR(50) );
INSERT INTO NumText VALUES ( 120, 'Mississippi' );
SELECT * FROM NumText;
This time, our function will accept an argument of INTEGER data type. CREATE OR REPLACE FUNCTION funcAddTwo( argNumber INTEGER ) RETURNS INTEGER BEGIN RETURN argNumber + 2; END;
SELECT funcAddTwo( Number ) FROM NumText; '120 + 2 = 122
Data Manipulation Language (DML) and Data Definition Language (DDL) Statements in UDF
DML statements, like SELECT, INSERT, UPDATE, are working normally inside of the UDF functions.
CREATE OR REPLACE FUNCTION funcUpdate( )
RETURNS INTEGER
BEGIN
      UPDATE NumText SET Number = 130 WHERE Number = 120;
      RETURN SELECT Number FROM NumText;
END;
<= We will first update a table, and then we will read from that table. SELECT funcUpdate( );
DDL statements are statements that define and manage the structure of the database ( CREATE, ALTER, DROP… ). If the purpose of the function is to return a value that can be used in a query, is it possible to use DDL statements in the function? Let's try that.
CREATE OR REPLACE FUNCTION funcCreate() RETURNS INTEGER BEGIN CREATE TABLETest ( Number INTEGER ); INSERT INTO Test ( Number ) VALUES ( 7 ); RETURN SELECT Number FROM Test; END;
Our function created a table and then read from that table:
SELECT funcCreate();
We can see that CREATE statement is working correctly inside of a function. We will now read from the tables "NumText" and "Test":
SELECT * FROM NumText; '120 permanently changed to 130
SELECT * FROM Test; There is no table "Test".
We can see that there is no table "Test", although function "funcCreate" works normally. This means that not everything will work inside of the function as we expect to. Because function can be called zillion times, it is smart to avoid executing DDL statements inside of the UDF function.
I will try to rename column in the NumText table, inside of a function. CREATE OR REPLACE FUNCTION funcAlter() RETURNS INTEGER BEGIN ALTER TABLE NumText RENAME COLUMN Text to Tekst; RETURN SELECT Number FROM NumText; END;
This will fail. So, some DDL statements will not work at all.
We can conclude that the main purpose of the UDF function is to calculate and return values. It is not their purpose to significantly change state of a database. That is why, DDL statement will not work inside of the functions, or will have a limited effect.
Environment Variables
The question is, whether it is possible to change environment variables, like CURRENT_SCHEMA, inside of the function? Will that change be permanent?
CREATE OR REPLACE FUNCTION funcSchema() RETURNS VARCHAR(10) BEGIN SET SCHEMA voc; RETURN CURRENT_SCHEMA; END;
SELECT funcSchema();
SELECT CURRENT_SCHEMA;
We can see above, that we can permanently change environment variables inside of the functions.
UDF Can Return Table
UDF functions can return tables, not just scalers. Tables returned by UDF can be used as subqueries.
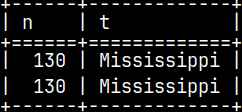
CREATE OR REPLACE FUNCTION funcTable()
RETURNS TABLE ( N INTEGER, T VARCHAR(50) )
BEGIN RETURN SELECT * FROM NumText; END;
SELECT * FROM funcTable();
We can combine returned table, with normal tables.
SELECT * FROM funcTable() UNION ALL SELECT * FROM NumText;
Temporary Tables
We will create two temporary tables, and then we will check, can we use those tables in the UDF function? CREATE LOCAL TEMPORARY TABLE locTable ( Number INTEGER ) ON COMMIT PRESERVE ROWS; INSERT INTO locTable ( Number ) VALUES ( 1 ); SELECT * FROM locTable;
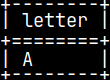
CREATE GLOBAL TEMPORARY TABLE globTable ( Letter CHAR ) ON COMMIT PRESERVE ROWS;
INSERT INTO globTable ( Letter ) VALUES ( 'A' );
SELECT * FROM globTable;
We will successfully create these two UDF functions.
CREATE OR REPLACE FUNCTION funcLocTable()
RETURNS TABLE ( Number INTEGER )
BEGIN
      RETURN SELECT * FROM locTable;
END;
CREATE OR REPLACE FUNCTION funcGlobTable()
RETURNS TABLE ( Letter CHAR )
BEGIN
      RETURN SELECT * FROM globTable;
END;
We can see bellow, that it is possible to use temporary tables inside of the custom functions.
SELECT * FROM funcLocTable();
SELECT * FROM funcGlobTable();
BEGIN ATOMIC
CREATE OR REPLACE FUNCTION funcAtomic() RETURNS INTEGER
BEGIN
     START TRANSACTION;
RETURN 2; COMMIT; END;
We can not use transaction statements inside of the UDF function. This is a problem because, inside of the one UDF function we can have several statements. We want all of them to succeed or all of them to fail.
CREATE OR REPLACE FUNCTION funcAtomic()
RETURNS INTEGER
BEGIN ATOMIC
     RETURN 2;
END;
If we add the word "ATOMIC" after "BEGIN", we will turn our UDF into one transaction. "Atomic" means undividable.
Optimization of the UDF
SELECT funcAddTwo( Number ) FROM NumText;
We have already seen that a UDF function can be executed for each row of a table. If our UDF is complicated and the server cannot optimize it, executing the UDF on a large table may be inefficient. Then we should look for another way to accomplish our task.


 No inherited data, WITH DATA is not in effect.


 '120 + 2 = 122

 '120 permanently changed to 130