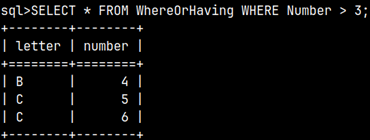
Where is simple. It is a filter that will exclude all the rows which don't satisfy the condition. SELECT * FROM WhereOrHaving WHERE Number > 3;
Having
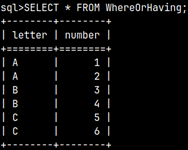
Having is more complex. First, we will group our table by the first column.
SELECT Letter, SUM( Number ) As sumOfGroup
FROM WhereOrHaving
GROUP BY Letter
;
Then we will remove all the rows where sumOfGroup is smaller or equal to 3. This time we do not use WHERE clause. We are not filtering detail rows, this time we are filtering groups. For that we use HAVING clause.
SELECT Letter, SUM( Number ) As sumOfGroup
FROM WhereOrHaving
GROUP BY Letter
HAVING SUM( Number ) > 3;
Let's combine these two clauses to better understand them.
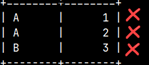
1) This is our starting table. We will transform it step by step.
2) Next, we will filter only those rows where Number is bigger than 3.
3) We will now group the table from the previous step by the "Letter" column.
4) And finally, we will filter only groups that are bigger than 6.
So, first we have to use WHERE. WHERE is always used before grouping, because it works on the detail rows. After this comes grouping. When we get our groups then is the time to pick only some of them by using HAVING condition.
INSERT
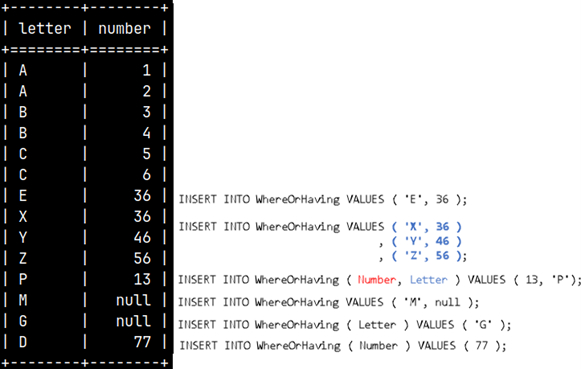
INSERT statement is used to enter data into table. We will insert some more rows to table WhereOrHaving. Basic way of using INSERT is to make a list of values. These values will be placed in the table as a new row. Our table WhereOrHaving has two columns of CHAR and TINYINT types, so we should be careful to insert data of that data types.
INSERT INTO WhereOrHaving VALUES ( 'E', 36 );
It is also possible to enter several rows at once. INSERT INTO WhereOrHaving VALUES ( 'X', 36 ), ( 'Y', 46 ), ( 'Z', 56 );
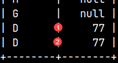
If we don't provide values for all the columns, insert will fail. INSERT INTO WhereOrHaving VALUES ( 'M' );
We have to provide values for all the columns, even if some of values are nulls. INSERT INTO WhereOrHaving VALUES ( 'M', null );
Sometimes we want to be specific into which columns we want to enter values. Now we can provide values in any order we want.
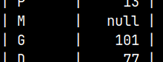
INSERT INTO WhereOrHaving ( Number, Letter ) VALUES ( 13, 'P'); We will first provide value for Number and then for Letter.
If we use syntax where some of the columns are specified, but other are not, then all other columns will be filled with nulls.
INSERT INTO WhereOrHaving ( Letter ) VALUES ( 'G' );
If we enter value for Number, and not for Letter, then the DEFAULT value will be used for the Letter.
INSERT INTO WhereOrHaving ( Number ) VALUES ( 77 );
This image will revise all of our results.
INSERT With SELECT
We will take small sample from the table above.
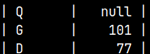
SELECT * FROM WhereOrHaving WHERE Letter = 'D';
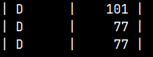
We can now add this sample into any other table. Presumption is that destination table should have the same structure as our sample. For simplicity we will not add this sample to same other table, but we will add it back to our WhereOrHaving table. Then, our table will have two ( 'D', 77 ) rows.
INSERT INTO WhereOrHaving SELECT * FROM WhereOrHaving WHERE Letter = 'D';
UPDATE
We saw that we now have two rows in WhereOrHaving table with nulls. We have "M, null" and "G, null".
UPDATE WhereOrHaving
SET Number = 101
WHERE Letter = 'G';
We have updated "G, null" to "G, 101".
We can update values "M, null" to "Q, null".
UPDATE WhereOrHaving
SET Letter = 'Q'
WHERE Number IS null;
To find rows where column value is null, we use operator IS, and not =.
DEFAULT value for Letter columns is "D". We can set any field in Letter column to this default value.
UPDATE WhereOrHaving
SET Letter = DEFAULT
WHERE Number = 101;
Now we have default letter "D" beside number 101.
DELETE
We use DELETE for deletion of rows. We can return our table, WhereOrHaving, to its original state, by deleting all the added rows.
DELETE FROM WhereOrHaving
WHERE NOT Letter in ( 'A', 'B', 'C' );
Built-In Variables
MonetDB has a collection of built-in variables. Those variables can provide us with valuable information about our current session and current time.
CURRENT_SCHEMA
CURRENT_DATE
CURRENT_TIMESTAMP
LOCALTIME
CURRENT_USER
CURRENT_TIME
CURRENT_TIMEZONE
LOCALTIMESTAMP
SELECT CURRENT_SCHEMA AS CurrentSchema, CURRENT_USER AS CurrentUser, CURRENT_DATE AS CurrentDate , CURRENT_TIME AS CurrentTime, CURRENT_TIMESTAMP AS CurrentTimestamp, CURRENT_TIMEZONE AS CurrentTimezone , LOCALTIME AS LocTime, LOCALTIMESTAMP AS LocTimeStamp;
Let's say we have a purple and a green data set. The data set is the result of a query. Using the SET operators, we can treat the rows in those two data sets similar to mathematical sets.
With joins, we concatenate tables horizontally. If we want to fuse tables vertically then we would use a union. For union to work we need to meet three conditions: – Two data sets must have the same number of columns. – Order of columns in one data set must be the same as order of the columns in another data set. – Columns at the same position must have similar data type.
There are two kinds of unions, we have "UNION" and we have "UNION ALL". "UNION ALL" would just glue two data sets together. If the first data set has X rows, and the second one Y rows, final data set would have X + Y rows.
"UNION" will return the same thing, but without duplicates.
"INTERSECT" means that we are looking for the rows that belong both to the first and the second data set. "INTERSECT" will return only distinct rows.
"EXCEPT" returns only rows from the first dataset, that do not have equivalents in the second data set. Again, only distinct rows will be returned.
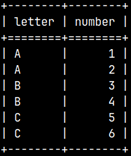
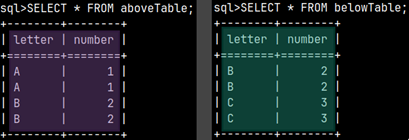
Sample tables
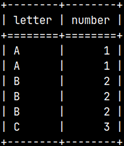
We will create two sample tables. Notice that columns in these tables are using compatible data types ( CHAR vs VARCHAR(1), TINYINT vs SMALLINT ).
1) CREATE TABLE aboveTable ( Letter CHAR, Number TINYINT );
2) INSERT INTO aboveTable ( Letter, Number )
  VALUES ( 'A', 1 ), ( 'A', 1 ),
         ( 'B', 2 ), ( 'B', 2 );
1) CREATE TABLE belowTable ( Letter VARCHAR(1), Number SMALLINT);
2) INSERT INTO belowTable ( Letter, Number )
  VALUES ( 'B', 2 ), ( 'B', 2 ),
         ( 'C', 3 ), ( 'C', 3 );
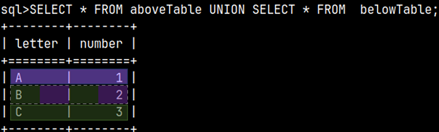
UNION ALL
Our tables are meeting conditions for a UNION ALL.
SELECT * FROM aboveTable UNION ALL SELECT * FROM belowTable;
UNION
UNION will remove duplicate rows.
SELECT * FROM aboveTable UNION SELECT * FROM belowTable;
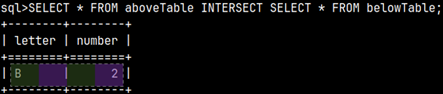
INTERSECT
Intersect will give us overlap between two tables.
SELECT * FROM aboveTable INTERSECT SELECT * FROM belowTable;
EXCEPT
Let's see rows that exist in the aboveTable, but not in the belowTable.
SELECT * FROM aboveTable EXCEPT SELECT * FROM belowTable;
INTERSECT and EXCEPT with duplicates
If we can use ALL with UNION, is it possible to use it with INTERSECT and EXCEPT? It is possible. This way, all of the duplicates will remain.
SELECT * FROM aboveTable INTERSECT ALL SELECT * FROM belowTable;
SELECT * FROM aboveTable EXCEPT ALL SELECT * FROM belowTable;
ORDER BY and SET operators
When we use ORDER BY, it must be applied on the last query.
SELECT * FROM aboveTable
UNION
SELECT * FROM belowTable ORDER BY Number DESC;
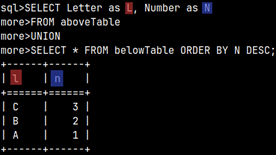
Column names and SET operations
The above SELECT is determining names of columns. Names of columns in above and below SELECT don't have to be the same.
SELECT Letter as L, Number as N
FROM aboveTable
UNION
SELECT * FROM belowTable ORDER BY N DESC;
Connecting More Than 2 Tables with Set Operators
How EXCEPT works
SELECT * FROM aboveTable
UNION ALL
SELECT * FROM belowTable
EXCEPT
SELECT * FROM belowTable;
Chained operations are conducted in sequence manner. First, we make a UNION, and then we apply EXCEPT.
Let's see below steps that are leading to our results.
1) In the first step, UNION ALL will unite our two tables. Next, we have to do EXCEPT vs belowTable.
2) In the second step, all duplicates from both tables will be removed. Then we would do EXCEPT operation.
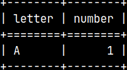
3) The only row that exist in the first table, and not in the second table is a row "A1". That is our result.
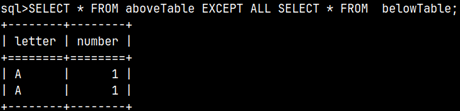
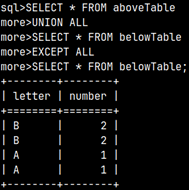
How EXCEPT ALL works
SELECT * FROM aboveTable
UNION ALL
SELECT * FROM belowTable
EXCEPT ALL
SELECT * FROM belowTable;
When we use EXCEPT ALL, we would get 4 rows as a result. Let's see below steps that have leaded to this outcome.
1) In the first step, UNION ALL will unite our two tables. Next, we have to do EXCEPT ALL vs belowTable.
2) This time there is no duplicate removal.
Rows from the two tables will destroy each other like matter and antimatter. What remains in the left table will be our final result.
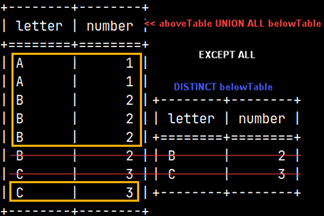
EXCEPT ALL with DISTINCT
Statement below will return table on the right image. Now we have 6 rows in the result data set.
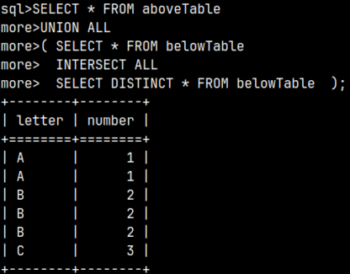
SELECT * FROM aboveTable
UNION ALL
SELECT * FROM belowTable
EXCEPT ALL
SELECT DISTINCT * FROM belowTable;
This time only two rows from the UNION ALL tables will be excluded so we will be left with 6 remaining rows.
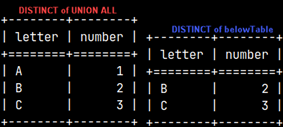
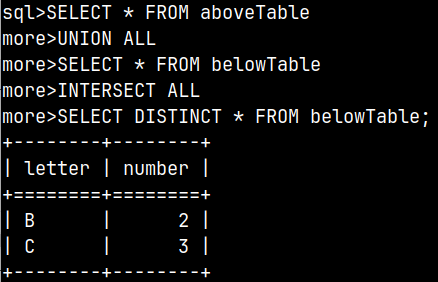
UNION AND INTERSECT
Here is one example with INTERSECT. Again, first two data sets will be connected with UNION ALL. Their result will be than intersected with the last data set.
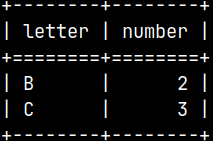
SELECT * FROM aboveTable
UNION ALL
SELECT * FROM belowTable
INTERSECT ALL
SELECT DISTINCT * FROM belowTable;
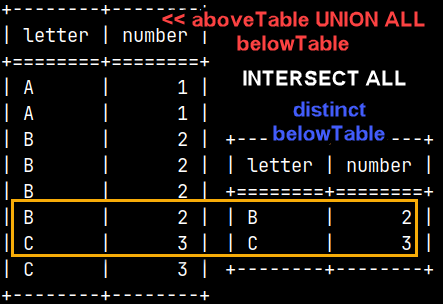
1) We will start with two intermediate data sets. First one is the result of UNION and it will have 8 rows. The other one is created with DISTINCT from the belowTable, and it has 2 rows. 2) Intersection between these two data sets is this:
Two Conclusions
1) SET operators don't have priority among them. They are applied from the top to the bottom. This is different than in some other databases where INTERSECTION has the top priority. This would be the result if we enforce priority of an INTERSECT operator with parenthesis.
2) SET operators without ALL specifiers will first remove duplicates from their operands. SET operators with ALL specifiers will leave their operands untouched. This is true not only for EXCEPT (like in previous examples), but also for UNION and INTERSECT. The message here is that removal of the duplicates is not conducted on the result, but on the operands, and after that SET operators will apply their logic.
Corresponding
When working with SET operators we need to be careful to order our columns correctly. Their position has to match between tables. This makes things harder. We will face errors many times.
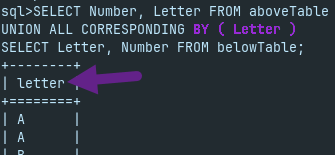
CORRESPONDING clause can fix this problem. CORRESPONDING clause will match columns not by position, but by their names. When we use CORRESPONDING, MonetDB will automatically reorder columns so that they match.
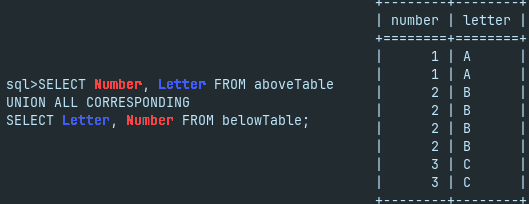
SELECT Number, Letter FROM aboveTable
UNION ALL CORRESPONDING
SELECT Letter, Number FROM belowTable;
We can limit the result with the CORRESPONDING BY ( Col1, Col2 ) subclause, to only some columns.
SELECT Number, Letter FROM aboveTable
UNION ALL CORRESPONDING BY ( Letter )
SELECT Letter, Number FROM belowTable;
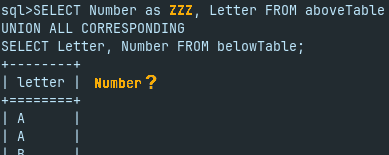
I will rename one column, so that is no more paired by the name with a column from another dataset. Such unpaired columns will not be part of the result data set.
SELECT Number as ZZZ, Letter FROM aboveTable
UNION ALL CORRESPONDING
SELECT Letter, Number FROM belowTable;
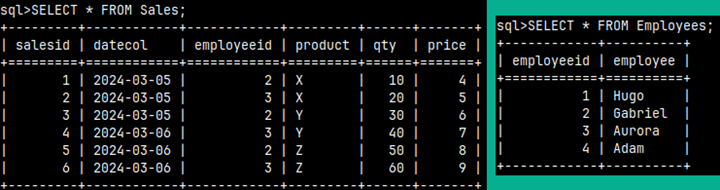
We will create these two tables in the MonetDB database:
We can create these two tables using these statements. The first statement will create the table. The second statement will populate that table with data. These are the same tables we have used in the previous blog post, so maybe you already have them in your database.
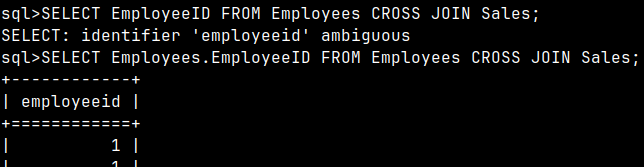
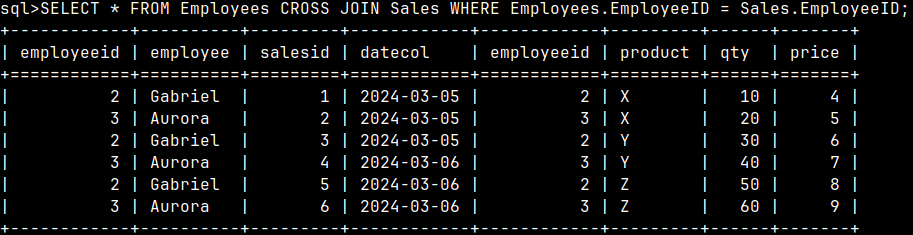
A cross join is when we combine every row from one table with every row from another table. If one table has X rows and the other Y rows, then the result table will have X * Y rows.
SELECT * FROM Employees CROSS JOIN Sales;
In our example, the Employees table has 4 rows, the Sales table has 6 rows, so the resulting table has 24 rows. In the picture we can see that each row of the Employee table is combined with each row from the Sales table.
"EmployeeID" column will appear twice if we use SELECT with a star.
Statement with a specific column "EmployeeID" will become ambiguous. SELECT EmployeeID FROM Employees CROSS JOIN Sales;
We'll have to write the full column name to avoid that ambiguity. SELECT Employees.EmployeeID FROM Employees CROSS JOIN Sales;
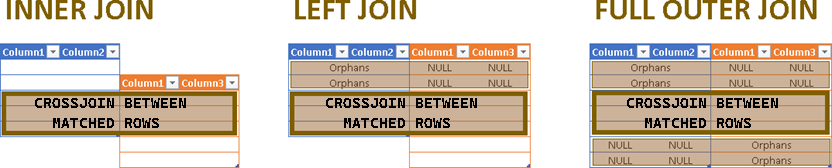
Diagram
Diagram shows two tables that we want to join. There are three basic ways how we can join tables, INNER join, LEFT join, and FULL OUTER join.
INNER JOIN means only matching rows will remain after join. In LEFT JOIN, we will not exclude any row from the left table and such rows will be matched with null values in the right table. A FULL OUTER JOIN means that no one will be left out. All orphan rows will be padded using nulls.
INNER JOIN
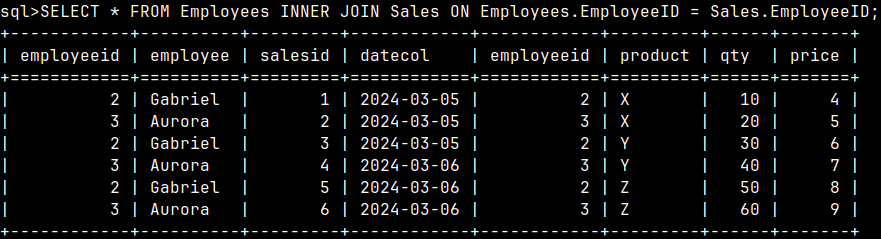
Let's filter the CROSSJOIN table so that only the rows where the Emploiees.EmploieeID column is equal to the Sales.EmploieeID column will remain.
SELECT * FROM Employees CROSS JOIN Sales WHEREEmployees.EmployeeID = Sales.EmployeeID;
This is the definition of an INNER JOIN. An INNER JOIN is a CROSS JOIN where only columns that meet certain conditions are saved in the result.
For INNER JOIN we have this specialized syntax. It makes it clearer what we are trying to achieve.
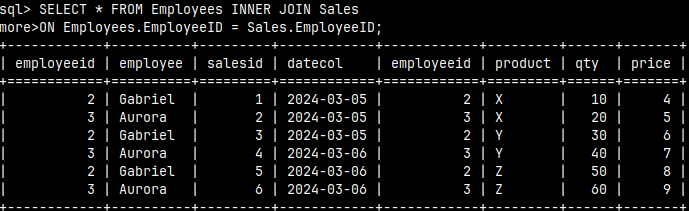
SELECT * FROM Employees INNER JOIN Sales
ON Employees.EmployeeID = Sales.EmployeeID;
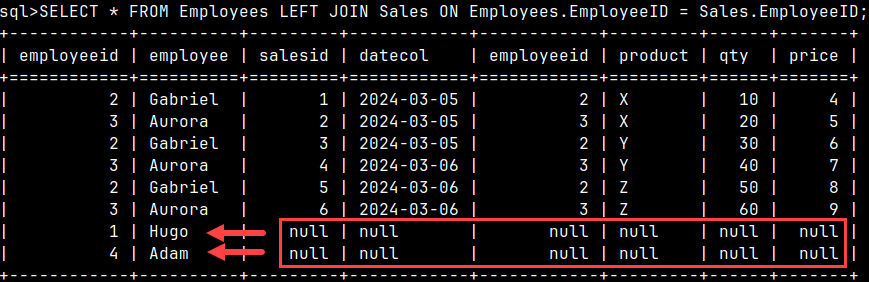
The point of INNER JOIN is to only look for successful employees. Gabriel and Aurora each made three sales and we want to see those results. Hugo and Adam did not make any sales so they will be missing from the score.
We combine each row from the Employees table with only the matching rows from the Sales table.
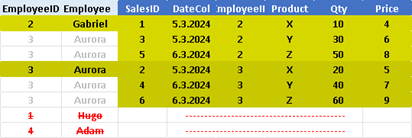
LEFT JOIN
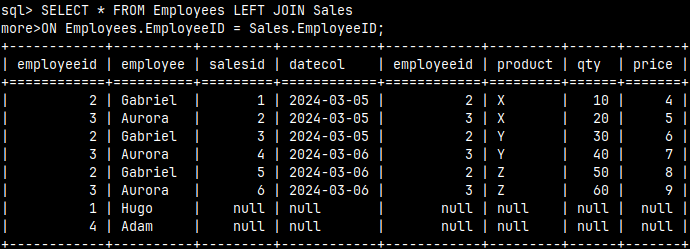
SELECT * FROM Employees LEFT JOIN Sales
ON Employees.EmployeeID = Sales.EmployeeID;
LEFT OUTER JOIN is when we want to expose employees without sales. LEFT OUTER JOIN will show us all rows from the Employees table. If any rows from the Employees table do not have matching rows in the Sales table, then they will be accompanied by null values.
Nulls will help us easily see which rows from the Employees table do not have corresponding rows in the Sales table.
FULL OUTER JOIN
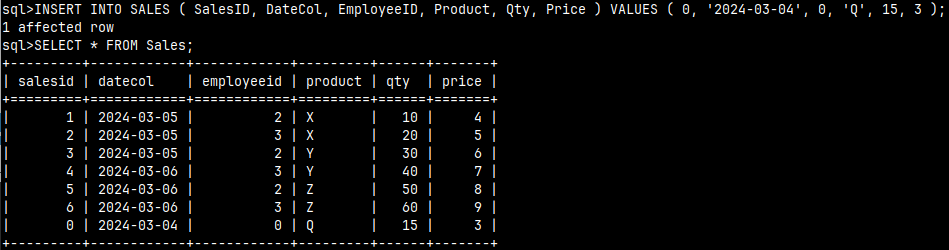
I will add another Sale to the Sales table. We'll pretend that the former employee made that sale. INSERT INTO SALES ( SalesID, DateCol, EmployeeID, Product, Qty, Price ) VALUES ( 0, '2024-03-04', 0, 'Q', 15, 3 );
That will help us explain the FULL OUTER JOIN.
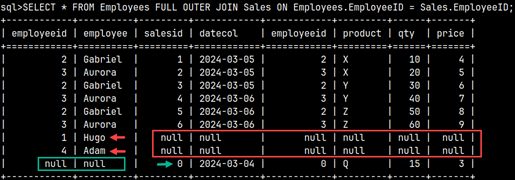
A FULL OUTER JOIN will explain all our sales and show employees without sales. Now we can see the complete picture. We can see the source of our sales and we can see who is not making sales.
SELECT * FROM Employees FULL OUTER JOIN Sales
ON Employees.EmployeeID = Sales.EmployeeID;
In a FULL OUTER JOIN, matching rows will be cross-joined, but non-matching rows, from the both tables, will be completed with nulls.
Matching condition and aliases
The matching conditions can be more complex than in our examples. It can consist of several columns.
SELECT Tab1
INNER JOIN Tab2
ON Tab1.Col1 = Tab2.Col1
   AND (Tab1.Col2 = 3
       OR Tab1.Col2 > Tab2.Col3)
;
We can notice that an overly complex SELECT statement can lead to hard-to-read code. This is a case where we can use aliases wisely. In practice, we usually use short aliases, consisting of only one letter, such as "a" and "b".
SELECT Tab1 a
INNER JOIN Tab2 b ON a.Col1 = b.Col1
AND (a.Col2 = 3
     OR a.Col2 > b.Col3)
;
The left table would be given the alias a and the right table would be given the alias b. This makes things much more readable.
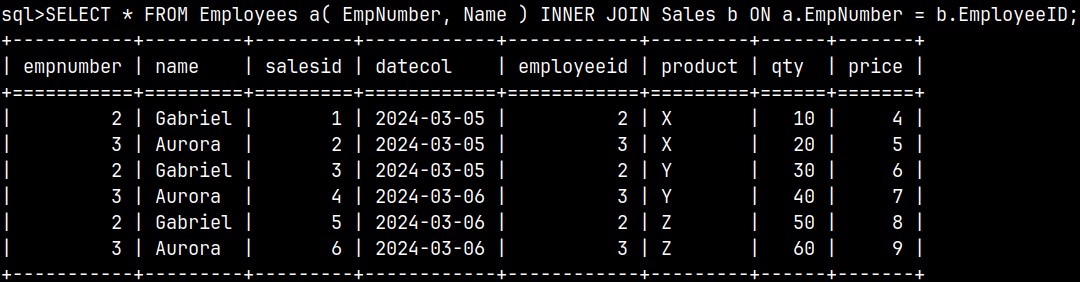
It is also possible to create aliases for the columns.
SELECT * FROM Employees a( EmpNumber, Name ) INNER JOIN Sales b ON a.EmpNumber = b.EmployeeID;
Join with more than two tables
We will add one more table to our database in order to explain JOIN with more than two tables.
The tables are connected in a chain manner. We can join as many tables as we want.
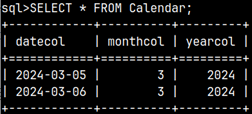
SELECT * FROM Employees FULL OUTER JOIN Sales ON Employees.EmployeeID = Sales.EmployeeID FULL OUTER JOIN Calendar ON Sales.DateCol = Calendar.DateCol;
Special syntaxes
These special syntaxes are not often used. These syntaxes are based on the fact that tables are usually joined by columns with the same name and data type.
NATURAL JOIN
A NATURAL JOIN is an INNER JOIN between two tables. The condition is based on equality between columns that have the same name and the same data type. Let's say we have an INNER JOIN between the Emploees and Sales tables.
INNER JOIN
SELECT * FROM Employees INNER JOIN Sales
ON Employees.EmployeeID = Sales.EmployeeID;
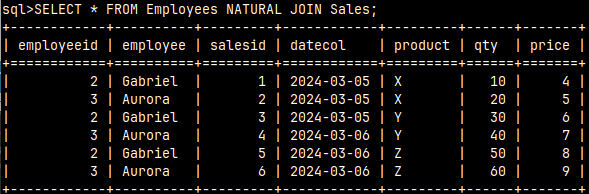
An easier way to achieve this is to use NATURAL JOIN. A NATURAL JOIN will give us the same result based on the fact that the EmployeeID column exists in both tables and is of the same data type. There are no other columns with such quality. Notice that now we only have one "employeeid" column in the result.
SELECT * FROM Employees NATURAL JOIN Sales;
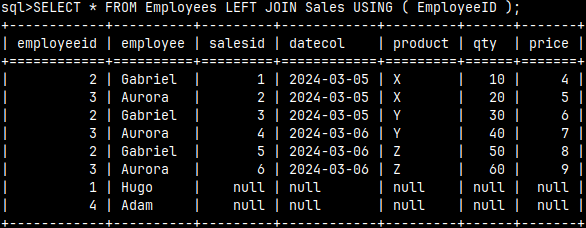
USING Clause
The USING clause also assumes that we have some columns in both tables that have the same name and are of the same type. With the USING clause, we can specify any type of join (INNER, LEFT, LEFT OUTER). Let's make a left join between the tables Employees and Sales.
LEFT JOIN SELECT * FROM Employees LEFT JOIN Sales ON Employees.EmployeeID = Sales.EmployeeID;
An easier way to achieve this is to use the USING clause. In the USING clause, we only need to specify some of the columns that exist in both tables and have the same name and data type. The JOIN condition will be based on the equality of those columns. Again, the column "employeeid" will appear only once.
SELECT * FROM Employees LEFT JOIN Sales
USING ( EmployeeID );
We will create these two tables in the MonetDB database:
We can create these two tables using these statements. The first statement will create the table. The second statement will populate that table with data.
The simplest SELECT statement will read the entire table. The star "*" is a symbol that represents all columns. This statement will read all columns and all rows from the table.
SELECT * FROM Employees;
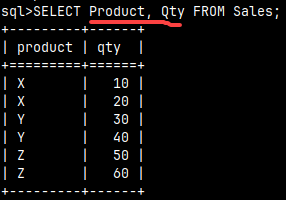
If we don't need all the columns, we have to specify them. After the SELECT keyword, we need to type the list of columns we want to read. Only those columns will be fetched.
SELECT Product, Qty FROM Sales;
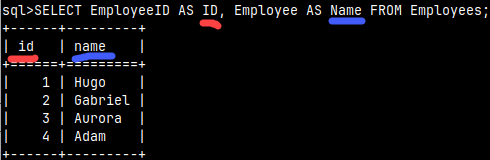
If we want to rename columns, we can use "AS Alias" after the column name.
SELECT EmployeeID AS ID, Employee AS Name FROM Employees;
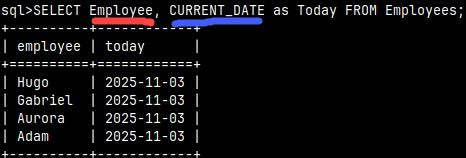
We don't need a table for our SELECT statement. We can use expressions to create values. If we don't provide aliases for these expressions, their columns will have generic names like "%2, %3, %4".
SELECT 3+3, CURRENT_DATE;
We can combine columns and expressions.
SELECT Employee, CURRENT_DATE as Today FROM Employees;
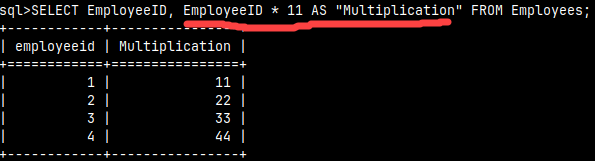
An expression can reference values from columns. In our example, the Multiplication column is calculated by multiplying the value from the EmploeeID column by 11. If we put double quotes around the alias "Multiplication", then this alias will preserve its case in the result. Otherwise, it will be written in lowercase letters.
SELECT EmployeeID, EmployeeID * 11 AS "Multiplication" FROM Employees;
Reminder of the Identifiers
If we create a table with double quotes, like CREATE TABLE Tab1 ( "Col1" CHAR ), then the header of this table will be like this:
The column name will be case sensitive. This will force us to write the SELECT statement with double quotes as well. If we omitted the double quotes, our SELECT statement would not work. If we want our column name to have any non-standard characters or spaces, then we would always have to use double quotes.
Filtering and Ordering Rows
After the FROM clause we can use WHERE. With WHERE we can define a condition that will filter only matching rows. Within that expression we can reference any column. Expressions can be much more complex than this.
SELECT * FROM Employees WHERE EmployeeID >= 3;
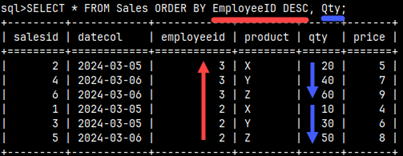
The server will read rows from the table in a way that achieves the best performance. We don't know in advance the order in which the server will read the records, so we should make the server sort the result using the ORDER statement. The ORDER command will have a list of columns by which the rows will be sorted. We can sort using ASC or DESC order, but ASC is the default. The table will be sorted first by EmploeeID and then by Qty, so the order of the columns in the ORDER statement is important. SELECT * FROM Sales ORDER BY EmployeeID DESC, Qty;
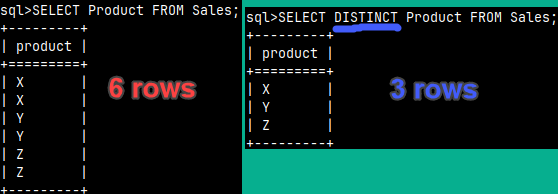
If we add DISTINCT to our statement, we will remove duplicate rows.
SELECT Product FROM Sales; 6 rows
SELECT DISTINCT Product FROM Sales; 3 rows
We can limit the number of rows we want the server to return. For that we use the keywords LIMIT and OFFSET. We will also use ORDER BY in this example to better understand what MonetDB did. MonetDB will skip one row and then read the next two rows.
SELECT * FROM Employees ORDER BY EmployeeID LIMIT 2OFFSET 1;
Using only LIMIT, we can read a limited number of lines from the beginning. Using only OFFSET, we can read everything except the lines at the beginning.
Grouping our Data
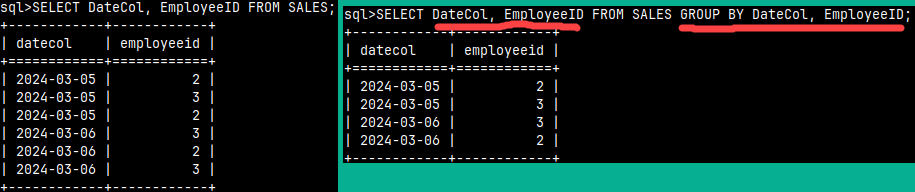
If we want to remove duplicates from our columns, we can use GROUP BY. In this simplest case, we must mention all columns after both SELECT and GROUP BY. This result could be made much easier with the DISTINCT keyword. In practice we use GROUP BY to achieve something different and this will become clearer in the example below.
SELECT DateCol, EmployeeID FROM SALES GROUP BY DateCol, EmployeeID;
GROUP BY will remove rows for non-aggregated columns by removing duplicates. For columns like Quantity and Value, we can consolidate rows by aggregating the values. SELECT DateCol , EmployeeID , SUM( Qty ) AS Qty , SUM( Price * Qty ) AS Value FROM Sales GROUP BY DateCol, EmployeeID;
If one of the columns we are grouping on is an expression, then we have to use alias for that expression in the GROUP BY. SELECT DateCol , 2 * 3 AS Expression , SUM( Qty ) AS Qty FROM Sales GROUP BY DateCol, Expression;
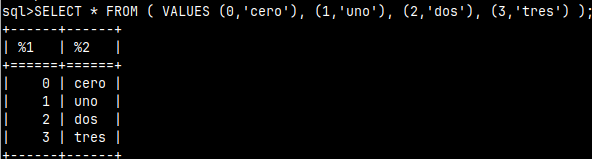
Using VALUES Clause
We can create a SELECT statement that will return our hard-coded values.
SELECT * FROM ( VALUES (0,'cero'), (1,'uno'), (2,'dos'), (3,'tres') );
We can also give such a table an alias. SELECT * FROM ( VALUES (0,'cero'), (1, 'uno' ) ) AS TableName(Number, Word);
This alias will come in handy in some more complex statements.
All tables in the same schema must have unique names. Tables cannot have the same name as a view. When we create a new table, we can omit the schema name. In this case, the table will be created in the current schema.
This is the simplest CREATE TABLE statement. We need to specify table name, column name and column data type. CREATE TABLE Tab1 ( Col1CLOB );
If we try to create a table with the same name again, we will get an error. CREATE TABLE: name 'tab1' already in use
We can avoid that error with clause "IF NOT EXISTS". A new table will only be created if no other table with that name exists. If a table with that name already exists, nothing will happen, but we won't get an error. CREATE TABLE IF NOT EXISTS Tab1 ( Col1 CLOB );
If we want to create a table in a non-current schema, we must use the fully qualified table name. Of course, we have to have enough privileges for that. CREATE TABLE sys.Tab1 ( Col1 CLOB );
After the data type we can include some options that better describe our column. Those options are DEFAULT, NOT NULL, PRIMARY KEY, UNIQUE.
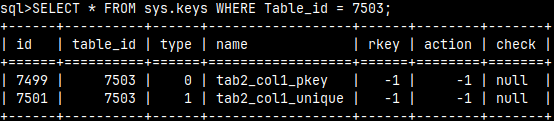
In the system table sys.keys, we can now find our constraints for the primary key and for the unique constraint. Both of these constraints belong to table Tab2, which has ID 7503. SELECT * FROM sys.keys WHERE Table_id = 7503;
There is also a system table sys.columns where we can find columns named "col1". The column in the last row belongs to table Tab2, because table_id = 7503. SELECT * FROM sys.columns WHERE name = 'col1';
If we read from the table sys.tables, we can search for our tables by using their ID-s. SELECT * FROM sys.tables WHERE id = 7496 or id = 7503;
It is possible to insert nothing into our table. Such a statement will work. When we try to read from our table, we will see that the DEFAULT value has been written into it.
If we try to write a NULL value to our table, such an act will fail, because our column is defined as a NOT NULL column. INSERT INTO Tab2 VALUES (null);
If we try to write the default value again to our table, it will fail. We cannot have two rows with the same value in column Col1, due to primary key constraints.
In the real world, we would never mix DEFAULT and PRIMARY KEY constraints. PRIMARY KEY means that each row should be unique. That's the opposite of what DEFAULT is trying to do. PRIMARY KEY also means that our column does not accept nulls, so there is no need for a formal NOT NULL constraint. UNIQUE is also redundant as PRIMARY KEY will not allow duplicates anyway. In the real world, we would never use all the constraints on the same column.
Creating a Table Based on Some Other Table
Using LIKE operator
Previously, we created a table Tab2 with a column Col1 that has many constraints. Now we want to create a new table that will be a copy of Tab2, but will have a few more columns. We can do it in one step. This statement below will create all the columns found in the Tab2 table and place them in the Tab3 table. Tab3 will also have another column of type INTEGER.
CREATE TABLE Tab3 ( LIKE Tab2, Col2 INTEGER ); We can see on the image, Tab3 inherited "Col1" from the table Tab2. We also added one more column "Col2" in table Tab3.
Constraints on columns in Tab2 will not be inherited. If we read from system table sys.columns, we will notice that table with ID 7507 (Tab3), doesn't have the same constraints as the table 7503 (Tab2). All of the constraints are lost.
Using AS SELECT
By using AS SELECT statement we would create a table based on some SELECT query. We can type:
CREATE TABLE Tab5 ( Zcolumn, Today )
AS ( SELECT Col1, current_date  FROM Tab2 );
The new table will not inherit the constraints from the old column. We can see that we don't have the same restrictions on the 'zcolumn' column as we did on the 'col1' column.
We don't have to provide aliases. We can use original column names. CREATE TABLE Tab6 AS ( SELECT Col1, current_date AS Today FROM Tab2 );
If add "WITH NO DATA" clause, then we would get the columns, but without data. CREATE TABLE Tab7 AS ( SELECT Col1, current_date AS Today FROM Tab2 ) WITH NO DATA;
Table Constraints
We can place PRIMARY KEY constraint on one column. It won't help us if our table has a composite primary key. If this is the case, we need to place constraints on the table itself. We can write the statement like this: