0200 MonetDB: Window Functions Theory
Imagine people scattered through some area, looking through binoculars. None of them will see the whole scenery, they will only see part of it. It is like each of them is looking through the different window.

Now, imagine that in each row, of a database table, there is a data scientist looking through binoculars. Each data scientist can only see some of the rows from that table. Each data scientist has his own window.
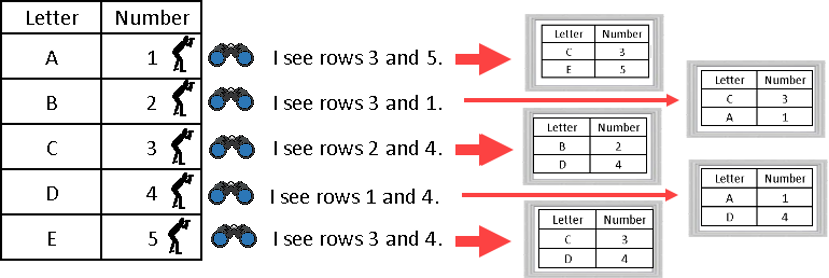
What would scientist do to represent nature of data he is looking at? He would aggregate them. If each of our scientist decide to calculate average of data he is looking at, we would get a table like this one:
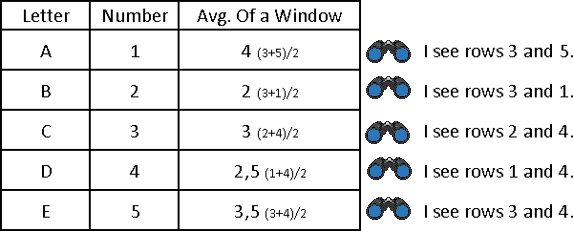
In the real database table, with millions of rows, these average values would not be representatives of anything. Our windows are too random. If we can create a rule by which windows are created, then we would have a scientific view of our data. Let's say that each data scientist can only see his own row, and previous two rows. Then we would have a rule. Check out animated image below (left image).
 | By using this rule for a window creation, we can calculate "moving averages", which are often used in statistics.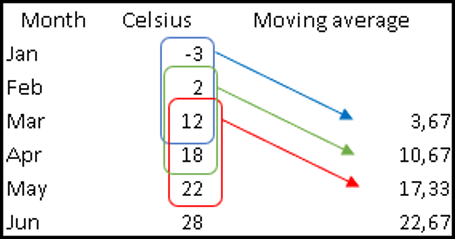 |
We can also define these rules in SQL if we use Window Functions. Window Functions are special, because they can define windows and then apply some aggregation to data in those windows. We can apply aggregations like SUM, AVG, MAX, but we can also use some special aggregation functions.
Window functions are also called Analytic functions, because they give us abilities that are beyond traditional SQL statements. With them we can do things which were previously hard to achieve in SQL, and they are really useful for a deep analysis of our data. Windows are like overlapping samples from our tables. They can reveal us how the nature of our data is changing through time and dimensions.
Terminology
In SQL, window, as explained above, is actually called "frame". The term "window" means something else. We will now discern difference between window, partition and a frame.
Frame is group of records that will be aggregated. Frame is presented with the moving red rectangle in the animation bellow.
Tables in animation below, show how many points each country won on some sport competition.

| Sport results presented on the animation above will not be held in a database like three tables, but they will be placed together into one big table. That big table is our Window (assuming we are using no filters on that table). Smaller tables are called Partitions. Red moving rectangles are Frames. Window functions can process partitions separately, the same as they were separate tables. | 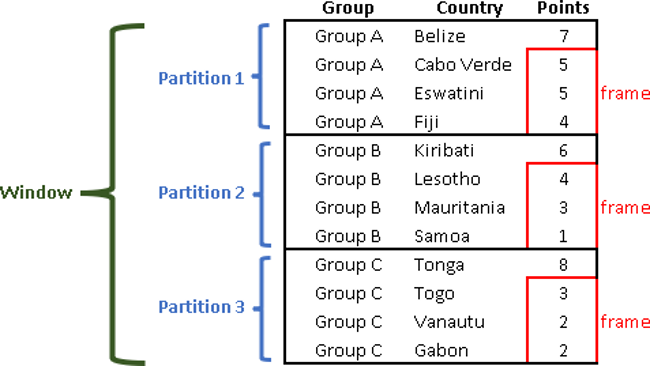 |
How to Define Window?
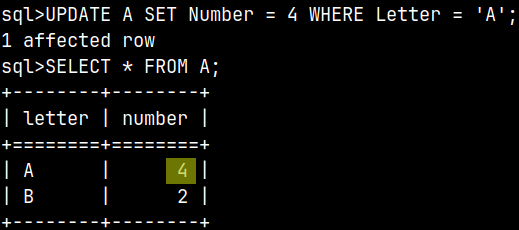
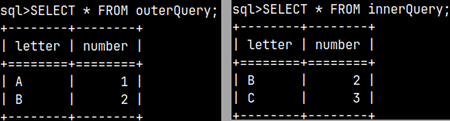
SELECT employee_id, salary FROM employees WHERE department_id = 101 AND salary > (SELECT AVG(salary) FROM employees); | Subquery is not under direct influence of the outer query. In the example, we have a filter department_id = 101 on the outer query. But subquery is not under the influence of that filter. Subquery will calculate average salary for all of the employees. Meaning is, that we are looking for employees from department 101, that have bigger salary then the global average. |
This is not true for window functions. Window is under influence of the query context. Everything that is used inside FROM, WHERE, GROUP BY and HAVING clauses will define our window. Window functions can only do their magic after the final dataset is defined and unchangeable. That also means that Window functions can only be used in SELECT and ORDER BY clauses.
How to Define Partitions?
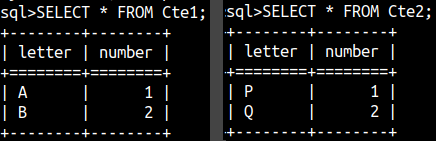
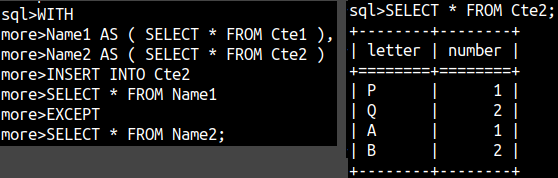
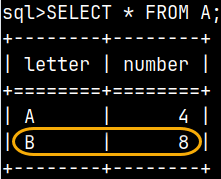
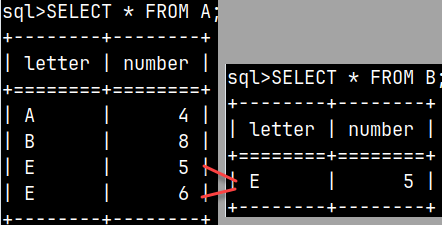
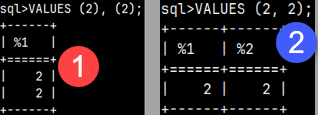
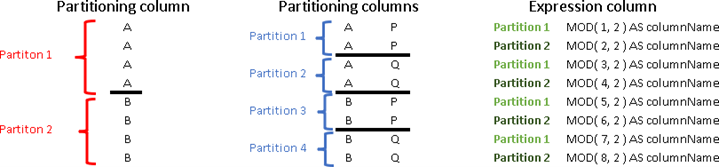
Partitions can be defined by the values of one column. All rows that have the same value will be the same partition. On our image, all the rows with letter "A" will create Partition 1. It is also possible to use combination of the values from two or more columns to define partitions. Each unique combination of values will define a partition. On the image below, combination of values A and Q will define Partition 2. We can use expression to calculate values for our column(s). In our example, all the rows, where MOD function returns 1 will belong to Partition 1. Rows that return 0 will belong to Partition 2.
How to Define Frames?
Frames are moving and so, they are always calculated relative to the current row. Two other reference points are the first and the last row in our partition. Position of the frame is always relative to those reference points.
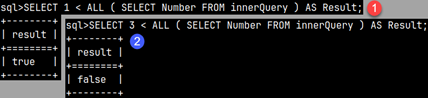
For definition of a frame, we have to define its start row, and its end row. End row has to be after Star row. Below we can see all the ways how to define start and end row.
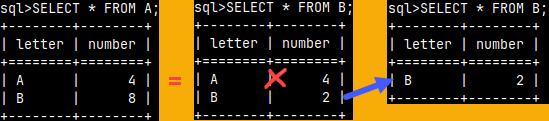
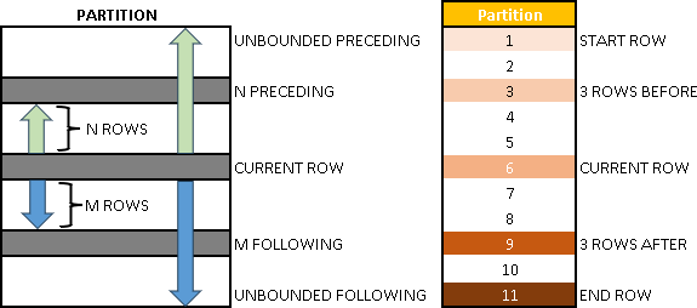 | Can only be START ROW – UNBOUNDED PRECEDING – the first row in the partition Can be both START or END ROW – N PRECEDING – row that is N rows before current row. – CURRENT ROW – our major reference point. – M FOLLOWING – row that is M rows after current row. Can only be END ROW – UNBOUNDED FOLLOWING – the last row in the partition | An example: 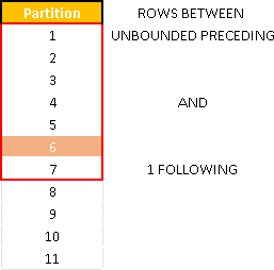 |
Notice that for all of this to make sense, records have to be sorted.
What is a Group?
For window functions, start and end of a frame doesn't have to be a row. Start and end can also be defined with ranges and groups. Ranges and Groups are not individual records, they are sets of records.
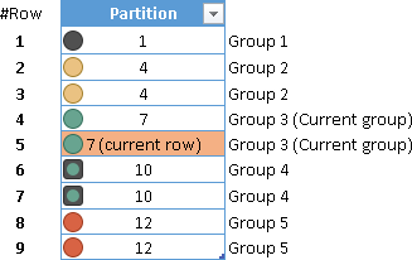 | Groups are defined similar to Partitions. All rows with the same value will be one group. On the image to the left, current row is the row 5, but the current group is the Group 3. We are no more looking at 9 records, we are looking at 5 groups. Our frame will start with one of the groups and will end with one of the groups after. | 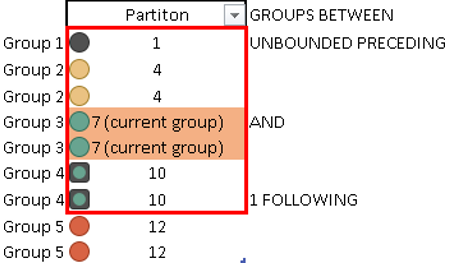 | In this example, our frame will start with the first group in Partition, and will end on the group that is just after the current group. |
What is a Range?
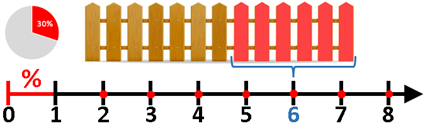
Relative positions are important for rows and groups, but not for ranges. With ranges, we are dealing with values in our column.
Let's say that some student took a school test. She scored 85 points on a test and she got a grade "A", because if number of points is between 76-100, then the grade is "A". It is similar with Ranges in window functions. Each frame is defined with a range of values. If a field value belongs to that range, then that record belongs to a frame defined by that range.

So, how we define a range? Really simple. If our current row has a value of X, we will add or subtract some number to that X, and we will get an extreme value of our range.
| current value – N (syntax: N preceding) current value + M (syntax: M following) |  | If, adjacent rows of the current row, have values that are close enough to the current value, then those rows will together make a frame. Our frame is between [20,30], so all the rows beside the first and the last one, belong to this frame. |
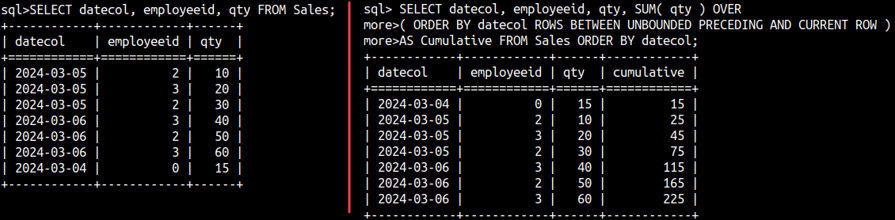
Demonstration
This is a simple example of a window function. This example shows how to calculate cumulative of the qty column. We are not using PARTITION BY clause, so the whole table is one big partition.