Note: Before reading this blog post, you should read article about merge tables in the MonetDB ( article ), or you can watch on youtube ( video ).
Advice: I suggest you follow this blog as a strict instruction. Any freestyling could mean that you will have problems to create remote tables.
Visual Presentation
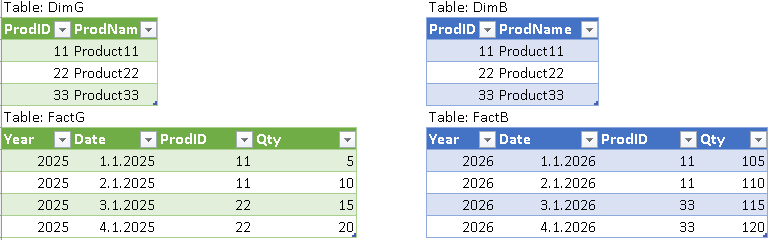 | In this case, we will use two MonetDB instances that are placed on two different computers. Both of them will have dimension table with products, and that table will have the same data on both computers (DimG and DimB on the image). I will use (G)reen and (B)lue colors to differentiate servers. Fact table will be divided into two parts. FactG will be on the green server, and FactB will be on the blue server. They will have different data. |
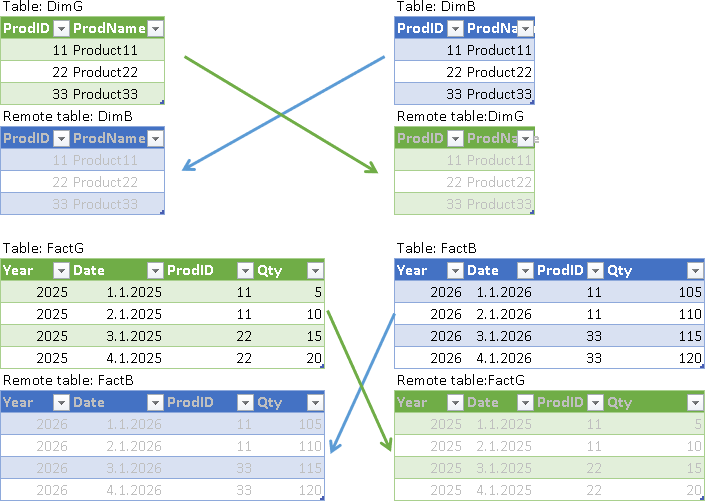
The next step is to create remote tables. Remote tables are references on one server to tables on another server. The purpose of remote tables is to let each server know about all of the tables in the system and how those tables are connected. This allows each server to create a query execution plan, even though that query uses tables from both servers.
| Green server | Blue server |
| Table: DimG Remote table: DimB Table: FactG Remote table: FactB | Table: DimB Remote table: DimG Table: FactB Remote table: FactG |
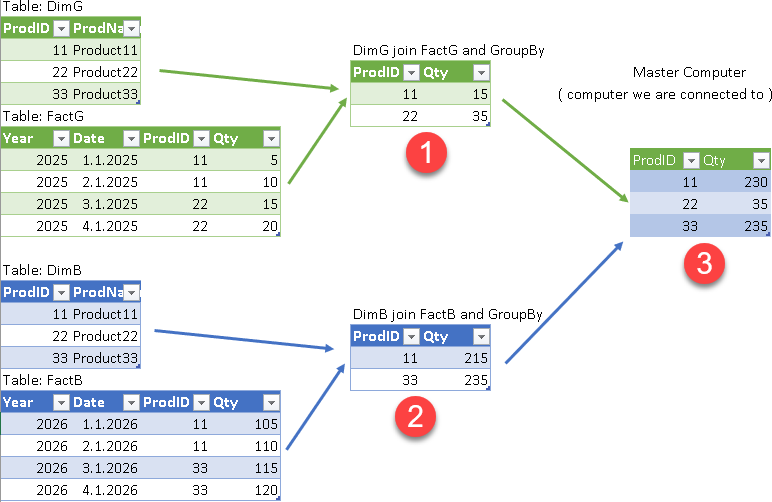 | As a user, we can now connect to one server (it doesn't matter which one) and we can execute a query that will use tables from both servers. The computer we connect to will create an execution plan for the query. This plan will usually assume that intermediate results (1,2) will be calculated on each server. That way we can divide processing between the servers and increase parallelism. The intermediate results will then be collected by the master computer (the one that creates the execution plan) and transformed into the final result (3). The whole purpose of distributed queries is to divide the work between the computers in the cluster and increase performance. |
Green Server Setup
mkdir /home/sima/monetdb/DBfarmG --create monetdb folder --initialize monetdb folder monetdbd start /home/sima/monetdb/DBfarmG --start monetdbd deamon --create database "DatabaseG" --make "DatabaseG" available --log as administrator to "DatabaseG" (pass="monetdb") | In this part, we will create MonetDB folder, one database, and we will login as administrator. |
As admin we will create new role, schema and user. Schema will have that role as authorization. User will have that schema as default schema, and role as default role. That means that user will be able to use all of the objects in this schema.CREATE ROLE RoleGB; |
| Letters "GB" mean that this role, schema and user will exist in both the green and the blue server. In order for one user to access tables from both servers, his account must be present in both servers. |
mclient -u usergb -d DatabaseG --be careful about upper and lower letters , ( 2025, '2025-01-03', 22, 15), ( 2025, '2025-01-04', 22, 20); | Then, we will login as a new user "usergb". We will create two tables, " DimG" and "FactG", and we will fill them with the data. At the start of this blog post, we already saw content of these tables. |
monetdbd stop /home/sima/monetdb/DBfarmG 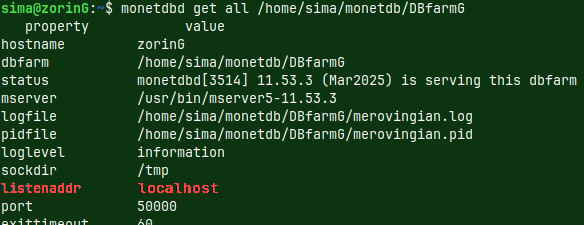 | We are back in the shell. I will stop monetdb folder because I want to change one setting. That setting is "listenaddr". This setting is currently "localhost" which means that server is only available from the local computer.We will change that value to "0.0.0.0" which means that anyone can access MonetDB server. We will then start our MonetDB folder again: monetdbd start /home/sima/monetdb/DBfarmG |
We can test who is listening the port 50.000. ss -tulnp | grep 50000 |
Below you can see some commands that you can use to configure your firewall so that you can control communication between servers. I will not teach you how to manage the firewall. I will just show you how I configured it. If you have any problems with the firewall, you can reset all the rules with "sudo ufw reset", and then you can disable the firewall with "sudo ufw disable".
| I will now set firewall by running these commands in the shell. " ufw" means "uncomplicated firewall".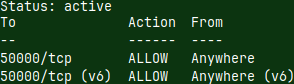 | sudo ufw enable --the firewall will be permanently enabled. It is disabled by default. sudo ufw default deny incoming --no one can call us --we can call anyone -- bellow is command that will open incoming traffic on port 50.000 for tcp protocol. -- it will also limit the range of IP addresses only to IP addresses on my local network. -- I don't know whether your local network is using the same range of IP addresses. I will delete this rule. -- I will create a simpler rule that will only limit the port number and tcp protocol. sudo ufw status --we can check the status of the firewall. |
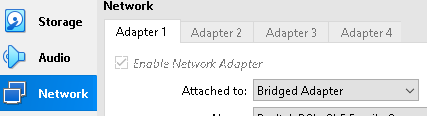 | This step is just for the people who are following this tutorial with linux virtual machines inside of the Virtual Box. Go to Settings > Network > Adapter 1, and choose the "Bridged Adapter" option. This will include virtual machines into the local network. This step is needed so that two virtual machines can communicate over the network. |
Testing Remote Access to the Green Server
In the green server shell, run this command. This is how you can find IP address of a server.ip addr | grep inet |  |
Now you can go to the blue server, and from there you can run this code.mclient -h 192.168.100.145 -p 50000 -u usergb -d DatabaseG-- password is "gb"This is how we can log to remote green server, over the network. | 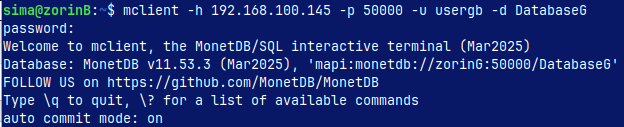 |
Blue Server Setup
There is nothing different in preparing of the blue server. I will just repeat the same commands, but with different identifiers.
mkdir --create monetdb folder monetdbd create /home/sima/monetdb/DBfarmB --initialize monetdb folder --start monetdbd deamon --create database "DatabaseB" --make "DatabaseB" available --log as administrator to "DatabaseB" |
CREATE ROLE RoleGB; --all identifiers are the same for the privileges, as for the green server quit; |
mclient -u usergb -d DatabaseB --now we login as the user CREATE TABLE FactB ( YearNum INT, Dates DATE, Prodid INT, Qty INT ); INSERT INTO FactB VALUES (2026, '2026-01-01', 11, 105), (2026, '2026-01-02', 11, 110) , (2026, '2026-01-03', 33, 115), (2026, '2026-01-04', 33, 120); CREATE TABLE DimB ( ProdID INT, ProdName VARCHAR(50) ); INSERT INTO DimB VALUES (11, 'product11'), (22, 'product22'), (33, 'product33'); quit |
monetdbd stop /home/sima/monetdb/DBfarmB --we make the server available from the network ss -tulnp | grep 50000 |
sudo ufw enable --if needed, we can set firewall |
We can login to blue server from the green server (password="gb").mclient -h 192.168.100.146 -p 50000 -u usergb -d DatabaseB |  |
Preparing REMOTE, REPLICA and MERGE Tables in the Green Server
In the green server, we will create REMOTE tables that are just references toward tables in the blue server. mclient -u monetdb -d DatabaseG --only admin can create REMOTE tables (pass="monetdb") SET SCHEMA SchemaGB; --we must be in the same schema as the physical tables in the blue server --ip address of blue server |
CREATE REPLICA TABLE Dim( prodid INT, prodname VARCHAR(50) ); | Tables "DimG" and "DimB" are totally identical. We must notify MonetDB that they are "replicas". For queries MonetDB can use any of these tables interchangeably. |
CREATE MERGE TABLE Fact( YearNum INT, Dates DATE, ProdID INT, Qty INT ); ALTER TABLE Fact ADD TABLE FactG; | Tables "FactG" and "FactB" are just partitions of the merge table. This is why you should read/watch video about merge tables. |
| We can now query these two new tables Dim and Fact. | Dim table is unchanged, but Fact table is UNION of FactG and FactB. |
SELECT * FROM Dim; SELECT * FROM Fact;  | 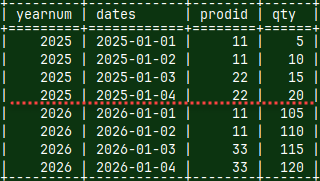 |
Preparing REMOTE, REPLICA and MERGE Tables in the Blue Server
I will again repeat all of the steps, but this time for the blue server.
mclient -u monetdb -d DatabaseB --only admin can create REMOTE tables. (pass="monetdb") SET SCHEMA SchemaGB; --we must be in the same schema as the physical tables in the blue server |
CREATE REPLICA TABLE Dim( ProdID INT, ProdName VARCHAR(50) ); ALTER TABLE Dim ADD TABLE DimG; ALTER TABLE Dim ADD TABLE DimB; | For performance reasons, MonetDB does not check if the replica tables are indeed identical. This responsibility is left to the database users. |
CREATE MERGE TABLE Fact( YearNum INT, Dates DATE, ProdID INT, Qty INT ); |
SELECT * FROM Dim;  | 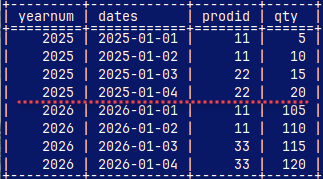 | Horizontally dividing one table between computers in a cluster is called "sharding". |
System Tables
In "sys.tables" we can find all our tables. Based on the system table "sys.table_types" we can see that we have regular (0), remote (5), merge (3) and replica tables (6).SELECT * FROM sys.tables WHERE name IN ( 'factg', 'factb', 'fact', 'dimg', 'dimb', 'dim' ); | SELECT * FROM sys.table_types;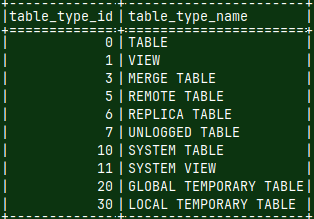 |
Dependencies inside of "fact" and "dim" table can be seen in the system view "sys.dependencies_vw".SELECT * FROM sys.dependencies_vw WHERE depend_type = 2; |  |
The Fruit of Our Labor
In the green server, I will now login as a "UserGB". This user has privileges over all of the objects in the "SchemaGB". He can query "Dim" and "Fact" tables.mclient -u usergb -d DatabaseG --password "gb" SELECT ProdName, SUM( Qty ) AS QtyGROUP BY ProdName; | Finally, we can run a query that will use the power of the two computers and two MonetDB servers.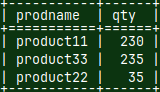 |
It is the same for the blue server. mclient -u usergb -d DatabaseB --password "gb" GROUP BY ProdName; | We finally have a working distributed query processing system. 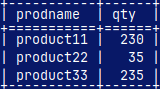 |
Load Balancer
The question is how to divide users between two (or more) servers to equalize the load. The easiest way is to have all users born from January to June use the green server, and all users born from July to December use the blue server.
A more professional way is to use a load balancer, something like HAproxy (link). This program will direct users to a server that is currently not under load.