Ubuntu versus Other Linux Systems
| Ubuntu is based on Debian Linux distribution. Debian is distro oriented toward stability and reliability. Often, Debian repository will have PostgreSQL version that is not the newest one. Debian will rather have stable and tested version of PostgreSQL than having the newest features. | I am using Linux distro that is based on the older version of Ubuntu ( LTS version, 24 ). In its repository there is only one version of PostgreSQL, and that version is 16. Debian will choose only one version of PostgreSQL and it will integrate it tightly. sudo apt list postgresql |
It is possible to install newest versions of PostgreSQL on Debian based machines, but the strategy used by people from Debian is to:
| choose one PostgreSQL version | test it with other libraries | they will integrate it tightly into system | they will manage it centrally |
What are PostgreSQL Clusters?
A PostgreSQL cluster is a directory initialized by PostgreSQL that contains multiple databases and is managed by a single server process.
| PostgreSQL prepares a directory by setting up everything needed to run a database system, including configuration files, system tables and folders for data. PostgreSQL will later be able to create and manage databases inside of that directory. All databases inside of this directory are controlled by one " postgres" process. That "postgres" process is our server. | 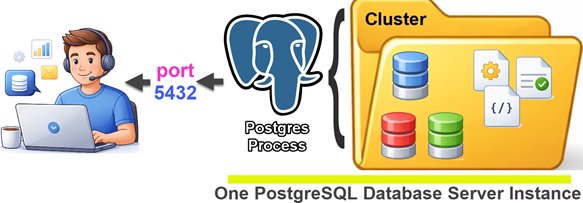 |
Each cluster is separate independent PostgreSQL server, but Debian has tools to manage several clusters centrally. Debian Linux is unique, because it has one unified system for all PostgreSQL server instances, to manage all of them from a single location.
Debian is optimized for system administration simplicity at scale. That means that:
– PostgreSQL clusters are standardized and registered.
– They are controlled through common tools ( pg_ctlcluster, pg_lsclusters ).
– They are integrated with system services ( like systemd ).
Ubuntu's Way of Installing PostgreSQL
We will now install Postgres 16 from Ubuntu's repository. It is really easy to do it.
sudo apt update | sudo apt upgrade -y | sudo apt install postgresql | We will update our repository and then we will install PostgreSQL. |
Apt will install the only available version from available repositories. That is the version 16.psql --version #psql command line client is also installed |  |
Default Cluster
When we use command "pg_lsclusters", we will see that we already have default cluster. It is exposed through the default port 5432. |  |
Our main cluster is at the location:/var/lib/postgresql/16/main.This is the cluster directory, I was talking earlier. All the folders and files inside of this directory are created after PostgreSQL initialized this directory. Here the databases will be, after we create them. |  |
Default User
During installation, PostgreSQL will create a new Linux user with the name "postgres". This user is also administrator of the clusters. |  cat /etc/passwd | grep postgres |
 | If we take a look who is the owner of the default cluster directory, it is the user "postgres". sudo ls -l /var/lib/postgresql/16/main |
Linux user "postgres" has no password. It is not possible to log-in into Linux using this user. The only way is to log-in as a Linux OS administrator and then to take the role of this user. After we take the role of this user, we can freely log-in into any database. We haven't created any database, but after the installation PostgreSQL has three embedded databases. Their names are "postgres", "template0" and "template1".
Using the Database
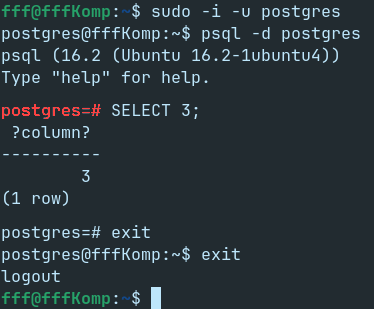 | sudo -i -u postgres #we become user "postgres". psql -d postgres #we log-in into the embedded database with the name "postgres". #prompt 'postgres=#' means that we are inside of the "postgres" database. SELECT 3; –we can run some query. postgres=# exit –we log-out from "postgres" database. postgres@fffKomp:~$ exit #we go back being administrator Linux user. |
We already learned how to install and use PostgreSQL. There is only one problem. We were working on the old version of PostgreSQL, version 16. We want to learn about the newest PostgreSQL version, version 18. I will now show you how to un-install PostgreSQL. After that we will se how to install the newest version of PostgreSQL on Ubuntu.
How to Uninstall PostgreSQL
When installed on Ubuntu, PostgreSQL will be a service. As we know, any full-blooded service on the Ubuntu is controlled by systemd. sudo systemctl status postgresql | We can see that "postgresql" is Linux service.  |
Being a service, PostgreSQL will automatically start after the system reboot. That means, that in order to uninstall the PostgreSQL, we first have to stop this service. sudo systemctl stop postgresql | We will now delete all of the "postgres*" packages, and we will remove all of the dependencies. sudo apt purge -y postgresql* |
 | During the uninstall process, we will confirm that we want all of the directories deleted. |
We will try to delete any leftovers so that we are completely wiped. sudo apt autoremove -y #this will remove cluster if it is still there | sudo rm -rf /var/lib/postgresql/sudo rm -rf /var/run/postgresql |
We will delete "postgres" Linux user: sudo deluser postgres | We will refresh systemd. sudo systemctl daemon-reexec sudo systemctl daemon-reload |
We no more have PostgreSQL on our computer.psql --version |  |
PGDG Way of PostgreSQL
PostgreSQL Global Development Group ( PGDG ) is the organization behind PostgreSQL. We will now see how to install the latest version of PostgreSQL using PGDG repository. We will install the version 18. First, we will update our Ubuntu system.
sudo apt update | sudo apt upgrade -y |
sudo apt install -y wget gnupg2 | We usually already have these applications, but if we don't have them, we can install them. – " wget" is used to download files from the internet. – " gpg2" is used for working with gpg keys. |
Installing GPG key
GPG key is a key that Ubuntu will use to verify PostgreSQL packages before installing them.
First, we will create folder /etc/apt/keyrings, if we don't have it. We will use permissions 755 on this folder. Administrator will have full access to this folder, but other users will have read and execute rights. This is necessary because "apt" application will access this GPG key, not only with administrator rights, but also as a special low-privilege user.sudo mkdir -p /etc/apt/keyrings #option -p means that we will create parent directories, if they do not exist.sudo chmod 0755 /etc/apt/keyrings |
We will use wget to download GPG key from the internet. wget -qO - https://www.postgresql.org/media/keys/ACCC4CF8.asc | sudo gpg --dearmor -o /etc/apt/keyrings/postgresql.gpg " wget" application will quietly (-q) download gpg key from provided URL. This key will be downloaded in textual ASCII format (.asc). Option (-O) means that this downloaded file will be sent to standard out. After the pipe "|" this file will be sent to gpg application. Because we want to save this gpg key in binary format, we will use gpg application to transform (.asc) format into (.gpg) format, by using option " --dearmor". (-o) is for output file. Now our key is stored in "postgresql.gpg" file.We will also change permissions on this binary " .gpg" file.sudo chmod 0644 /etc/apt/keyrings/postgresql.gpg |
 |
This postgresql.gpg file is a binary file. We can read its content with the command:gpg --no-default-keyring --keyring /etc/apt/keyrings/postgresql.gpg --fingerprint |
--no-default-keyring #This means that we will not read other GPG keys.--keyring /etc/apt/keyrings/monetdb.gpg #We will read only this GPG key.--fingerprint #Because GPG key is binary file, we will only read its textual presentation, its "fingerprint". #This fingerprint is a long hexadecimal number. |
| If result of this command is equal to "B97B 0AFC AA1A 47F0 44F2 44A0 7FCC 7D46 ACCC 4CF8", then that means that we have installed the correct key. |
 |
Adding a Repository Where PostgreSQL is Stored
We will read the version of our Ubuntu system. It is "noble". cat /etc/os-release | grep VERSION_CODENAME |  |
Next, in folder "/etc/apt/sources.list.d" we will create a file with the name "pgdg.list". | #jump to that foldercd /etc/apt/sources.list.d #create new file, you will be asked to provide password sudo touch pgdg.list |
Inside of the file we must place this text. This is address to PostgreSQL repo. We will install "main" version of PostgreSQL (not test or alpha). deb [signed-by=/etc/apt/keyrings/postgresql.gpg] https://apt.postgresql.org/pub/repos/apt noble-pgdg main | |
We can add this text by running this line in the terminal: sudo sh -c 'echo "deb [signed-by=/etc/apt/keyrings/postgresql.gpg] https://apt.postgresql.org/pub/repos/apt noble-pgdg main" >> pgdg.list' | |
Now our file looks like this:  | |
PostgreSQL installation
We will read content of this new repository and then we will install PostgreSQL. Beside the server, the client "psql" will also be installed. | sudo apt update | sudo apt install -y postgresql |
By default, apt will install the latest version it can find. It will skip version 16 from the Ubuntu's repository and will install the version 18 from PGDG repository. psql --version |  |
We have installed PostgreSQL from PGDG repository. We could assume that now we have our server out of Ubuntu central control, but that is not the case. I will use command "pg_lsclusters" to list available clusters. We will see that Ubuntu already created one cluster. That means that our PostgreSQL installation is under control of the Ubuntu central management system.
pg_lsclusters |  |
Tools like "pg_ctlcluster" and "pg_lsclusters" are used on Debian/Ubuntu systems. On other Linux distributions we use tools "initdb" and "pg_ctl". It is never smart to use "intdb" and "pgctl" on Ubuntu, but that is exactly what we are going to do! I will show you how to create PostgreSQL cluster without Ubuntu interference.
Manual Creation of a Cluster
We know that PostgreSQL has data directory "/var/lib/postgresql/18/main". We will create another cluster inside of this folder "18".
cd /var/lib/postgresql/18 #we jump to this folder | sudo mkdir manualCluster #we create a folder for our cluster |
We will make "postgres" user the owner of this folder. | sudo chown postgres:postgres /var/lib/postgresql/18/manualCluster |
/usr/lib/postgresql/18/bin/initdb | PostgeSQL is installed at this location. There we can find "initdb" program. This utility is used to initialize a PostgreSQL cluster. |
sudo -i -u postgres #we must become postgres user Only then can we initialize this folder. /usr/lib/postgresql/18/bin/initdb -D /var/lib/postgresql/18/manualCluster It is important that this must be done as a " postgres" user and that this user must be the owner of the folder. | 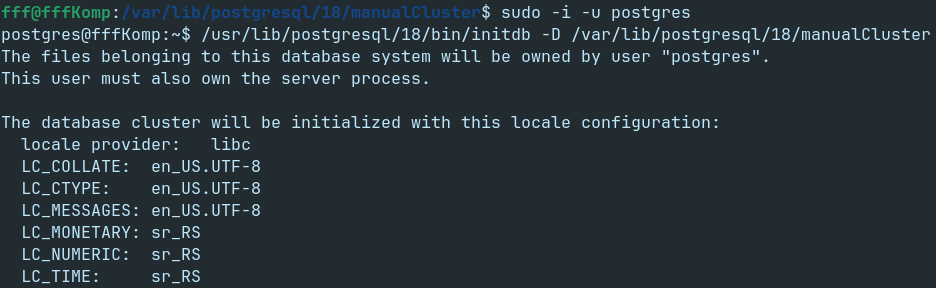 |
 | Now we have another cluster. ls /var/lib/postgresql/18/manualCluster |
 | Command "pg_lsclusters" will not show this new cluster. This one is outside of the control. |
| If we check the status of the cluster, we will find out that this server is not running. /usr/lib/postgresql/18/bin/pg_ctl -D /var/lib/postgresql/18/manualCluster status | pg_ctl: no server running |
Starting of the Manual Cluster
| This is how we can start the server. /usr/lib/postgresql/18/bin/pg_ctl -D /var/lib/postgresql/18/manualCluster -o "-p 5433" start | We must be "postgres" user and we must useother port than alredy used port 5432. |
We can log into this new cluster:psql -p 5433 -d postgres #postgres is the name of the built-in database Queries: SELECT current_database(); #postgres and SHOW data_directory; #/var/lib/postgresql/18/manualCluster, will tell us that we are inside of the new cluster. | 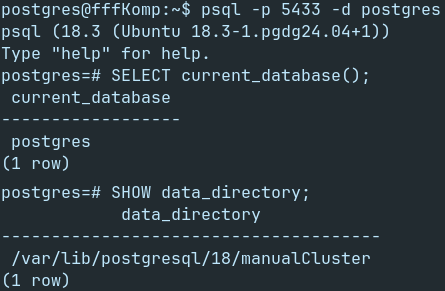 |
I will exit psql. If we check for processes with the command "ps aux | grep 18/bin", we will see that we have two processes. One is for the "main", and the other one is for the "manualCluster" cluster. |
 |
I will use stop command to stop this server. /usr/lib/postgresql/18/bin/pg_ctl -D /var/lib/postgresql/18/manualCluster stop | I will exit to be admin again (fff@fffKomp:). I will delete this manually created cluster, just like any other folder. sudo rm -rf /var/lib/postgresql/18/manualCluster |
Installing Different Version of PostgreSQL
 | From PGDG repository we can install different versions of a PostgreSQL. If we run apt search postgresql- #including dash , we will get 5.000 rows as on the image to the left. There we can find all the possible versions and packages for PostgreSQL. | |
sudo apt install | For installation of specific versions of PostgreSQL, we just have to specify their number. It is possible to install several versions of PostgreSQL server at once. I will install only the version 17. | |
In the "/user/lib/postgresql" we can see both our servers.cd /usr/lib/postgresql | Because we already have auto-created cluster, a new cluster will not be created for the version 17.cd /var/lib/postgresql | |
 |  | |
Creation of a Cluster in Ubuntu Style
sudo pg_createcluster 17 main | I will use "pg_createcluster" to create one cluster for the version 17. |
I will get the familiar message because "pg_createcluster" is just wrapper for "initdb". |  |
We now have two clusters ( pg_lsclusters ), but one of them has not started. Noticed that the version 17 automatically got port number 5434.pg_lsclusters |  |
I will start this new cluster. sudo pg_ctlcluster 17 main startI will log in into this cluster as a "postgres" user. sudo -i -u postgres We can see that we are inside data directory for the cluster " /var/lib/postgresql/17/main" ( for SHOW data_directory; ). | 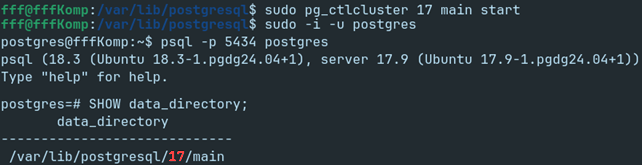 I will exit to administrator prompt by typing " exit" twice. |
Auto-start Configuration Files
We have separate configuration files for the version 17 and for the version 18.cd /etc/postgresqlls -alh Configuration files are placed inside of the " /etc/postgresql/18/main" folder. | One of the reasons why we have central control on Debian based systems is to make it easier to have separate versions of PostgreSQL. That is why we have everything double in our case. If we were using "initdb" and "pg_ctl" then we would have to set everything manually, and that would be much harder. |
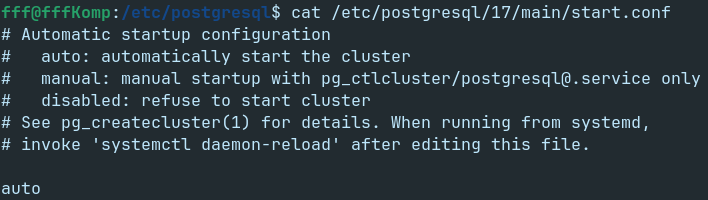 | For this section, the important configuration file is "start.conf". Such file exists for each cluster on our system.cat /etc/postgresql/17/main/start.confInside of this file we can have: – auto # cluster will start after the reboot of the computer. – manual # cluster must be started manually. – disabled # cluster can not be started manually. |
This setting is all that we have to change, to control whether the cluster will start automatically after the reboot. In order for something to start after the reboot it has to be a daemon controlled by the systemd. After we start the computer, the systemd will start PostgreSQL process "postgresql.service". This service will start pg_ctlcluster separately for each cluster. For each cluster, it will check if there is "auto" written into start.conf file. If it is, then the clusters will start automatically.

 | We can check the status of this postgresql.service daemon. systemctl status postgresql.service |
By using systemctl in combination with start/stop commands and enable/disable we can control all of the clusters together.
sudo systemctl stop postgresql.service | We will stop all of the clusters. |
sudo systemctl disable postgresql.service | We can disable the start of all of the clusters after the reboot. |
sudo systemctl enable postgresql.service | We can enable the start of "auto" clusters after the reboot. |
sudo systemctl start postgresql.service | We can start all of the "auto" clusters at once. |
Testing Auto-Start
 | After we stop "postgresql" service, sudo systemctl stop postgresql.service,all our clusters will stop. |
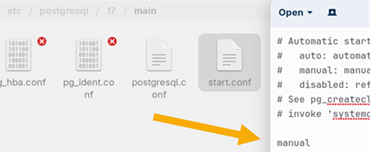 | For the cluster 17/main I will change the settging in the "start.conf" file to manual. After that, I will reboot my computer with the "reboot" command. |
 | After the reboot, only the 18/main cluster will start. This is because we set 17/main cluster to manual so that cluster will not start automatically. |
 | I will now change the "manual" setting to "auto" again, and I will reboot again. Both of our clusters will be active this time. |