Systemd Unit File
Systemd Unit File is a file with settings that Systemd will use when starting and controlling some daemon. From version 11.53.13, MonetDB is using a new systemd file that allows us to change the default directory ( DBfarm ) for databases that are controlled by Systemd.
Old Systemd Unit File
 | systemctl status monetdbdThis command will show us where is systemd unit file for Monetdbd daemon. /lib/systemd/system/monetdbd.service |
cat /lib/systemd/system/monetdbd.service The old system unit file was hard coded to always use the directory " /var/monetdbd5/dbfarm". Only databases located within this directory could be controlled by systemd. Only such databases could be started automatically after the computer boots. 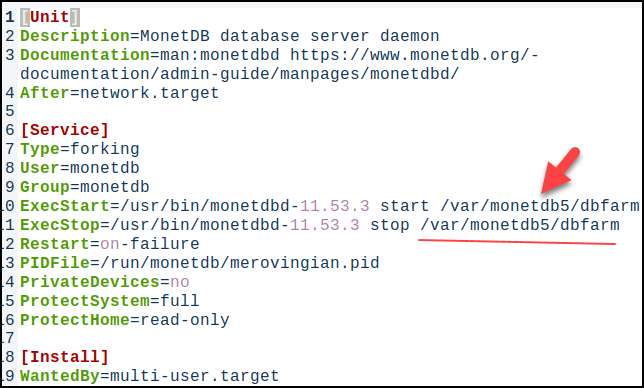 | [Unit] Description=MonetDB database server daemon Documentation=man:monetdbd https://www.monetdb.org/documentation/admin-guide/manpages/monetdbd/ After=network.target[Service] Type=forking User=monetdb Group=monetdb ExecStart=/usr/bin/monetdbd-11.53.3 start /var/monetdb5/dbfarmExecStop=/usr/bin/monetdbd-11.53.3 stop /var/monetdb5/dbfarmRestart=on-failurePIDFile=/run/monetdb/merovingian.pidPrivateDevices=noProtectSystem=fullProtectHome=read-only[Install]WantedBy=multi-user.target |
New Systemd Unit File
From version 11.53.13, we have a new system file that allows us to change DBfarm folder, controlled by Systemd.
 | systemctl status monetdbdThis command will show us where is systemd unit file for Monetdbd daemon. /usr/lib/systemd/system/monetdbd.service |
cat /usr/lib/systemd/system/monetdbd.serviceThis is the new look of the Systemd unit file. We can notice that now we have environ variable DBFARM that is directed to directory " DBFARM=/var/monetdb5/dbfarm" by default. This file is now more complex because it allows us to take some other directory for the DBfarm. 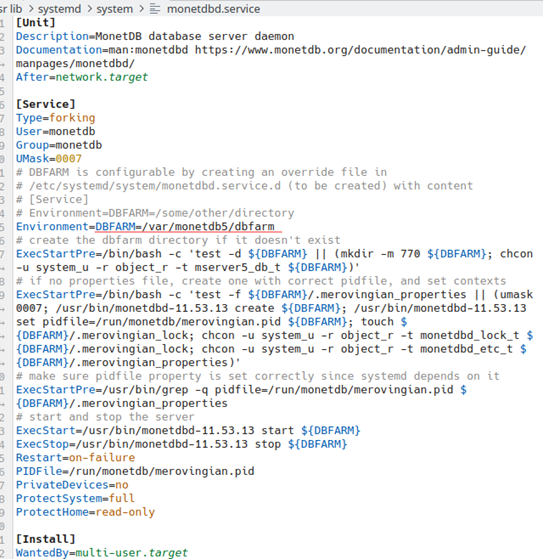 | [Unit]Description=MonetDB database server daemon Documentation=man:monetdbd https://www.monetdb.org/documentation/admin-guide/manpages/monetdbd/ Environment=DBFARM=/var/monetdb5/dbfarm ExecStartPre=/bin/bash -c 'test -d ${DBFARM} || (mkdir -m 770 ${DBFARM}; chcon -u system_u -r object_r -t mserver5_db_t ${DBFARM})' |
Changing The Default Directory
| We will not change the original Systemd unit file. Instead of that we will create a "drop-in". That means that we will create another file that will be "amendment" to the original file. "Drop-in" file augments or overrides parts of a unit file without touching the original unit file. We create this "drop-in" file by running the command: sudo systemctl edit monetdbd | 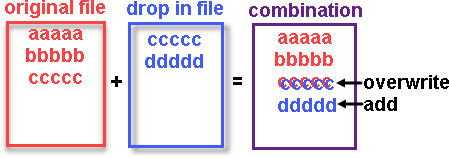 |
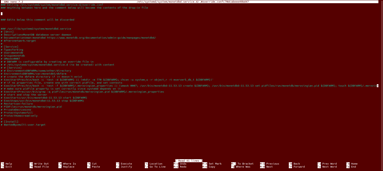 | An instance of Nano text editor will open. Inside of it we will se the whole original Systemd unit file, but all the lines will be commented out (every line will start with #). Inside of this file we have to add these lines. [Service]This location will override the original " /var/monetdb5/dbfarm" location. |
I am using linux distribution "KDE Neon". This distribution doesn't use "SELinux". "SELinux" is security feature of the "Red Hat" distribution. The original Systemd unit file provided by the MonetDB developer team is using the command "chcon" that is only useful for the distributions that are using SELinux. I will exclude this code from my Systemd unit file. ExecStartPre=/bin/bash -c 'test -d ${DBFARM} || (mkdir -m 770 ${DBFARM}; chcon -u system_u -r object_r -t mserver5_db_t ${DBFARM} )'ExecStartPre=/bin/bash -c 'test -f ${DBFARM}/.merovingian_properties || (umask 0007; /usr/bin/monetdbd-11.53.13 create ${DBFARM}; /usr/bin/monetdbd-11.53.13 set pidfile=/run/monetdb/merovingian.pid ${DBFARM}; touch ${DBFARM}/.merovingian_lock; chcon -u system_u -r object_r -t monetdbd_lock_t ${DBFARM}/.merovingian_lock; chcon -u system_u -r object_r -t monetdbd_etc_t ${DBFARM}/.merovingian_properties)' |
| Extraordinary, because I am using distro without SELinux, I will also add these corrected lines to my "drop-in" Systemd unit file. |
# First, we will delete all of the "ExecStartPre=".ExecStartPre=# This line will add the first part of the "ExecStartPre=". The line "ExecStartPre" is split into three parts, # just to make it more readable. These three lines can be considered as one script. ExecStartPre=/bin/bash -c 'test -d ${DBFARM} || (mkdir -m 770 ${DBFARM})'# This line will add the second part of the "ExecStartPre=". ExecStartPre=/bin/bash -c 'test -f ${DBFARM}/.merovingian_properties || (umask 0007; /usr/bin/monetdbd-11.53.13 create ${DBFARM}; /usr/bin/monetdbd-11.53.13 set pidfile=/run/monetdb/merovingian.pid ${DBFARM}; touch ${DBFARM}/.merovingian_lock)'# Third line is unchanged. ExecStartPre=/usr/bin/grep -q pidfile=/run/monetdb/merovingian.pid ${DBFARM}/.merovingian_properties |
 |
| This config snippet will be "amendment" to original Systemd unit file. This snippet must be added above the comment "Edits below this comment will be discarded". We will save this change with "Ctrl+O" ENTER, and then we will exit with the "Ctrl+X". After that we must reload all the systemd unit files. sudo systemctl daemon-reload |
The Changes We Made
 | This command will show us the new value of the DBFARM environ:systemctl show monetdbd | grep ^Environment= |
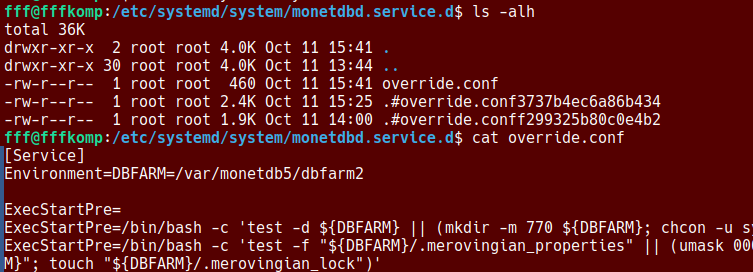 | "drop-in" file is written inside of the:/etc/systemd/system/monetdbd.service.d/override.conf On the image we use these commands to check override.conf: cd /etc/systemd/system/monetdbd.service.d ls -alh cat override.conf |
systemctl cat monetdbd | This command is also useful because it will show us the original file, and it overrides, and their locations, all together. |
Testing The Changes
Because we are going to use Systemd, we should add our user to "monetdb" group.
sudo usermod -aG monetdb "$USER" | After that, we should log out and then log in. |
newgrp monetdb | Sometimes log out/in will not be enough. In that case, try to open a new session ( a tab ) in a terminal, or run this command in the existing session. This is happening because OS will try to recycle the old session, so changes are not applied. |
We will now create one database and after that we will restart our computer to see if it will be started automatically.
systemctl start monetdbd | -- Start monetdbd daemon controlled by systemd. -- Create a database.-- Make database available. -- Make monetdbd to start automatically after computer reboot.-- Restart our computer. |
 | After the reboot, I will open the terminal, and I will try to log in:mclient -u monetdb -d DBdesktopIt will work. We don't have to start the daemon manually. |
The last step is to check if DBdesktop is really inside of the dbfarm2 directory.cd /var/monetdb5/dbfarm2 |  |
What is Schema
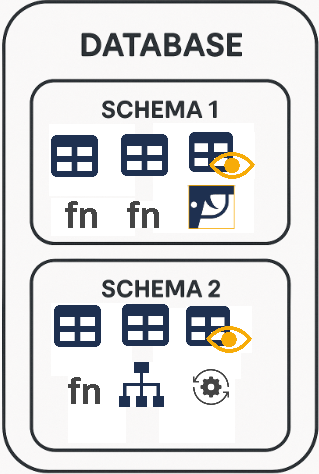 | Database is made of tables, views, indices and so on. Inside of Database, each of these objects belongs to some schema. Database is organizationally divided into schemas. There is no overlap between schemas. Some special objects are outside of a schema, like roles. Usage and modification of schema elements is strictly done by the user or the role that owns that schema. During creation of a schema, we should decide who will be the owner, because later it will not be possible to change ownership. If we want several people to maintain one schema then we should set a role as an owner of a schema. Only 'monetdb' user and 'sysadmin' role are allowed to create new schemas. |
Schema as a File
We can create a file that will contain all the instructions the server needs to create database objects inside of the schema. This file would tell the database which tables, relations, indexes, views to create. In this way, we can create everything that makes up one schema. That is why we call such a file a "schema file". Although we have not learned all the SQL commands needed to create such a file, we can use the "schema file" that the MonetDB development team has prepared for us.
| First, we will download sample database from this location: https://dev.monetdb.org/Assets/VOC/voc_dump.zip This will give us ZIP file. Inside of it, there is SQL script with the schema for our new database. | 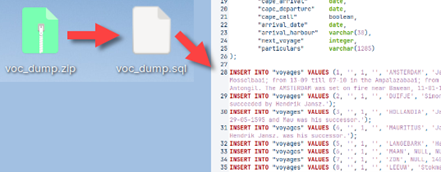 |
Creation of a New User
For our schema we will create a new user. First, we will enter mclient with 'monetdb' privileges. > monetdbd start /home/fffovde/DBfarm1 --password monetdb |  |
For creation of a user, we need username (USER), password (WITH PASSWORD), user's full name (NAME), and default schema for that user (SCHEMA). The default schema is schema that MonetDB will use as a current schema when the user log in. For tables in the current schema, the user can type "SELECT * FROM Table1", but for tables in NON current schemas, the user must type "SELECT * FROM schema.Table1".
"sys" schema is a built-in schema in MonetDB. We will use it temporarily so we can create a new user. sql> CREATE USER "voc" WITH PASSWORD 'voc' NAME 'VOC Explorer' SCHEMA "sys"; |
As a 'monetdb' administrator we can create a new schema. We will say that previously created "voc" user is the owner of that schema.
sql> CREATE SCHEMA "voc" AUTHORIZATION "voc"; |  |
Don't get confused. The name of our database is "voc", but the name of the new schema is also "voc", and the name of the user is "voc".
We will set the new schema as the default schema for our user. sql> ALTER USER "voc" SET SCHEMA "voc"; -- we can exit mclient with "quit" or "\q" |
Since the "voc" schema is the default schema for the "voc" user, this schema will be active when this user logs in to MonetDB. Everything the user does will be reflected in this schema, unless the user explicitly mentions that they want to work in a different schema.
Populating our Schema with Database Objects
Our "voc" schema is currently empty, but we have definitions of all the tables, view, indices … inside of our downloaded SQL script. We will use that script to populate our schema. We type:
> mclient -u voc -d voc ~/Desktop/voc_dump.sql This code will log " voc" user into "voc" server. It will also execute all the SQL commands from the "voc_dump.sql" file. When the user log in, and his default schema is "voc", that means that he will log in into "voc" schema. All the SQL commands will be executed inside of this schema. |  |
We will log in again:mclient -u voc -d voc #password is vocWe can use mclient command " \d" to list all the tables and views inside of our database. sql> \d | This is what we would get: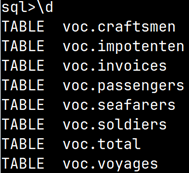 |
DBeaver Database Manager Program
We will install DBeaver database manager program to peruse our database.> sudo snap install dbeaver-ce |
| This program is GUI program, so we will open it in our desktop environment. In the program we will click on the triangle (1), and then we will select "Other" (2) to open other servers. There we will find MonetDB. We will click on it (3), and a new dialog will open. In this dialog, host and port are already entered. We just need to enter Database/Schema (4), Username and Password (5) (which is "voc"). | 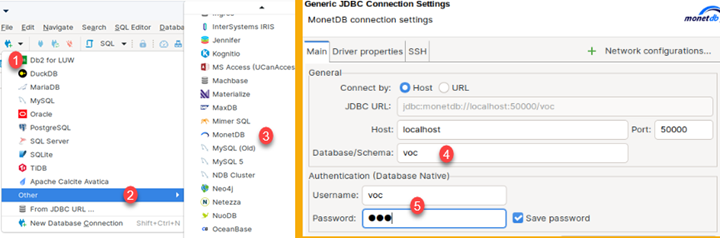 |
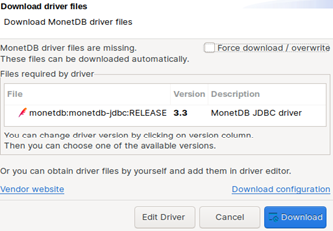 | DBeaver will not have driver for MonetDB database installed, so it will offer you to download it. Just accept that offer. |
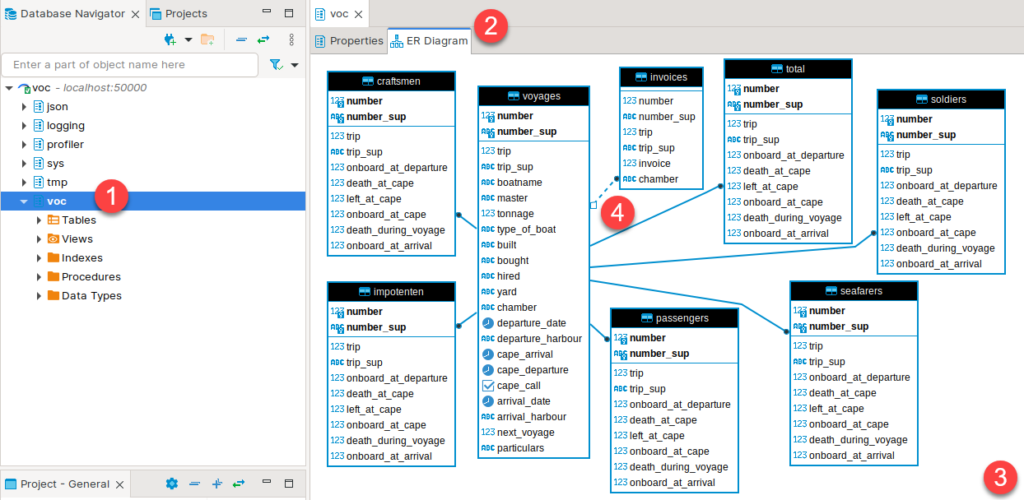
At the end, objects of our database will appear inside of pane on the left side of a program. There, we should double click on schema name (1). After that we can select tab "ER Diagram" (2). There, after some rearrangement, we will see ER diagram of our database (3). As we can see, tables are organized in star schema with "voyages" table as the only fact table. All tables are connected with foreign key constraints, where foreign key is also primary key inside of dimension tables. The only exception is Invoice table where foreign key columns are not primary key columns, and that is why that relationship is shown with dashed line (4).
Here is download for voc_dump.zip file used in this blog post:
DBeaver is an excellent program. If you want to learn more about it, you can try this linkedin tutorial.