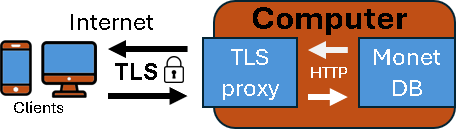
 | MonetDB can not encrypt its communication over the wire. This is leaved to specialized programs that are called "TLS Termination Proxy". In that way we get superb protection and flexibility provided by these tools. Clients must also have support for TLS. "Mclient" and "Pymonetdb" have support for TLS. |
| TLS (Transport Layer Security ) is a critical internet protocol that encrypts and authenticates data in transit. TLS is widely tested and trusted, and it is used in HTTPS, email, and VPNs to prevent eavesdropping and tampering. Most popular client tools (DBeaver, JDBC, Python libraries, etc.) already support TLS. |  |
Purple Server
| I will create totally new server for this blog post. I will call it "Purple Server". This is the server on the new virtual machine. We will use this server in some of the later videos. I am currently the user "fff". I will add myself to "monetdb" group. This group was created after the installation of the MonetDB. People from this group can start a database. sudo adduser fff monetdbFor this to apply, we have to log out, and then to log in. | Then, I will start monetdbd service, and I will create a database "tlsDB".sudo systemctl start monetdbd This database will be created in the default folder " /var/monetdb5/dbfarm/".This command bellow will make my server the full fledged systemctl controled daemon. That means that MonetDB will automatically start when I start my computer. systemctl enable monetdbd |
Self-Signed Certificate
In this tutorial we will create certificate ourselves, and we will use that certificate both on the server and on the client.
| We will change default port of the MonetDB to 49999. This is because I want to use the port 50000 for TLS connection. | monetdbd set port=49999 /var/monetdb5/dbfarm |
| Internal communication will use 127.0.0.1:49999, and external encrypted communication will use 192.168.100.152:50000. The only way to access MonetDB is through the TLS proxy server. |  |
Creation of a Self-Signed Certificate
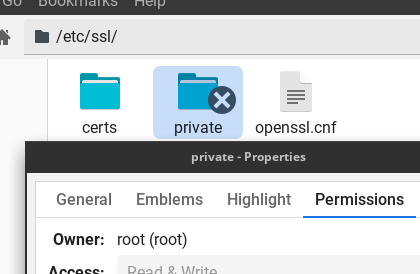 | At the location "/etc/ssl/private" we have a folder that is only accessible to root. We can use any other folder, but it is important that folder has restrictive permissions, and that only admin can access it.We can not access this folder with " sudo cd" because sudo doesn't work with built-in command "cd". We will first take the role of the root with "sudo -i", and then we will "cd /etc/ssl/private". That will make this folder our current folder.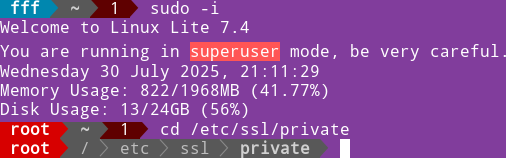 |
Inside of this folder I will make a script. touch /etc/ssl/private/SelfCertScript.shI will open this script in nano. I will paste the code. nano SelfCertScript.shThis is the version where we use IP address for the server. I don't have a domain name, so I will use this version. => | #!/bin/bash |
This is the version you use, if you have a domain name. #!/bin/bash | This is the version with the both. #!/bin/bash |
| https://dbhost.mymonetdb.org https://192.168.100.152 | If we use IP in the script, then the clients must use IP. If we use domain name, then the clients must use domain name. If we use both in the script, then the client tool can connect both with the IP or with the domain name. |
We will now run our script. bash ./SelfCertScript.sh Two files will be created inside of the private folder. " selfsigned.key" is our secret that must be secure. This is why is important to use folder accessible only to root. "selfsigned.crt" is file that we will send to clients so that they can access our database. |  |
We can also change permissions on files. sudo chmod 600 /etc/ssl/private/selfsigned.* | Only root now have read, write rights on our files. |
Using Some Other Folder
| We can also keep our script, key and certificate in some other folder. First, we will create a folder, and then we can make that folder only accessible to a root. " chmod 700" means read/write/executerights. | sudo mkdir /etc/ssl/private2 |
Script Explanation
!/bin/bash | Shebang: run this script with the Bash shell (not sh, zsh, etc.). |
-e (errexit) | Exit immediately if any simple command returns a non-zero status (if there is an error). |
-u (nounset) | Treat the use of unset or empty variables as an error, and exit. |
-o pipefail | in a pipeline a | b | c, the pipeline's exit status is the first non-zero exit code among a, b, or c (instead of just c). |
| Let's dissect this line. | openssl req -x509 -newkey rsa:2048 -sha256 -nodes -keyout "$KEY" -out "$CRT" -days "$DAYS" -subj "/CN=$DOMAIN" -addext "subjectAltName=DNS:$DOMAIN,IP:$IP" |
openssl req | We start self-signed certificate creation process. |
-x509 | Create a self-signed certificate instead of a certificate signing request (CSR). CSR is for commercial certificates. |
-newkey rsa:2048 | Generate a new RSA private key of 2048 bits. |
-sha256 | Use SHA-256 as the hash algorithm. |
-nodes | Private key will not be encrypted. This is useful for automation, because there is no need for a password. |
-keyout "$KEY_FILE" | Private key will be saved to this file. |
-out "$CRT_FILE" | Certificate will be saved to this file. |
-days "$EXPIRATION_DAYS" | Certificate will be valid for 90 days. Clients usually do not trust certificates with a longer lifespan. |
-subj "/CN=$IP" | IP address (or domain name). |
-addext "subjectAltName=IP:$IP" | The same as above, but modern, because it can accept several IP addresses or domains. |
Stunnel
"Stunnel" is the name of a program that we will use as a "TLS Termination Proxy". We now have to install it and configure it.
apt install stunnel4 | We install it. We are already the root, so we don't need "sudo".stunnel -version |  |
which stunnel | We find its installation folder. |
cd /etc/stunnel | We'll go to stunnel installation folder. There we will create configuration file. |
We'll open this file in nano, and we will paste the code. nano monetdb.conf | foreground = yes |
Stunnel Systemd Service
MonetDB service will always run automatically, because it is controlled by systemd. We want the same for stunnel. For stunnel to become a service, first we have to create configuration file for that service (systemd unit file).
First, we go to folder where we have to place systemd unit file. cd /etc/systemd/system We create new file: touch stunnel-monetdb.service We open this file in nano text editor: nano stunnel-monetdb.service We paste our code into it: | [Unit] [Service] |
Let's explain parts of this systemd unit file:
After=network.target | This is a prerequisite. Stunnel should only be started after the network becomes functional during system startup. |
ExecStart=/usr/bin/stunnel /etc/stunnel/monetdb.conf | Start stunnel program, with specified configuration file. |
ExecReload=/bin/kill -HUP $MAINPID | $MAINPID is process ID of the stunnel. "-HUP" means that stunnel should reload without restarting process. |
Restart=on-failure | Restart stunnel if it crushes. |
PrivateTmp=yes | Instead of /tmp and /var/tmp, service will use its own private temporary folders. |
WantedBy=multi-user.target | During the startup, stunnel should start after some basic services already started. |
Now we have to use this "stunnel-monetdb.service" file to register our new service with systemd:
sudo systemctl daemon-reexec | Used to refresh systemd. |
sudo systemctl daemon-reload | Reload all of the "systemd unit files". Now, it will include our "stunnel-monetdb.service" file. |
sudo systemctl enable stunnel-monetdb.service | To have the service start automatically during reboot. |
sudo systemctl start stunnel-monetdb.service | Start our service immediately, without waiting for the first reboot. |
We can now check who is listening on port 50.000. So, port 50.000 is listened by stunnel.
sudo ss -tnlp | grep 50000 |
FYI: MonetDB Systemd Unit File
We can find location on MonetDB systemd unit file with this command:systemctl status monetdbd |  |
We can read its content like this:systemctl cat monetdbd | [Unit] |
TLS Connection from the Local Computer
I will exit being root with "exit". I am running this on the purple server. URL is of the purple server.mclient -d monetdbs://192.168.100.152:50000/tlsDBIt won't work because mclient doesn't have access to the certificate. |  |
| We will copy content of our certificate to $HOME folder. We need folder where mclient has access. | sudo cat /etc/ssl/private/selfsigned.crt >$HOME/selfsigned.crt |
We will use that folder to signal mclient where to find certificate. mclient -d "monetdbs://192.168.100.152:50000/tlsDB?cert=$HOME/selfsigned.crt"Now, we have access. |  |
If you continue to get message "certificate verify failed", check your SelfCertScript.sh. Make sure that there are no invisible characters in it. After that recreate your certificate and copy it again for mclient. Try to restart your computer a few times. I had problems each time, and restarting of the computer helped.
TLS Connection from the Remote Computer
On the other virtual machine, I will place "selfsigned.crt" into home directory.ls -alh selfsigned.crt |
The same command will work here, too. mclient -d "monetdbs://192.168.100.152:50000/tlsDB?cert=$HOME/selfsigned.crt" |  |
How to use TLS with Pymonetdb
We will now see how to connect to TLS protected database from python. First, we will install pymonetdb.
We can not install pymonetdb with the pip.sudo apt install python3-pip #install pip pip install pymonetdb #install pymonetdb | 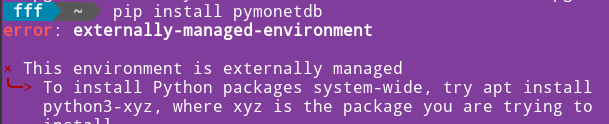 |
While we can install pip, we will not be able to install pymonetdb in this way. Ubuntu is trying to prevent us to install packages into global python context. Ubuntu wants us to use virtual environment. It doesn't want us to mess with global python environment.
We can still install into global environment in this way. This will only work for packages that are inside of the ubuntu repository. sudo apt install python3-pymonetdb |  |
I will install Spyder IDE: sudo apt install spyder I will open this GUI program and I will run this code=> | import pymonetdb monetdbs://192.168.100.152:50000/tlsDB?cert=/home/fff/selfsigned.crt") |
We can also test the code in the command line. python3 -c 'import pymonetdb;connection = pymonetdb.connect("monetdbs://192.168.100.152:50000/tlsDB?cert=/home/fff/selfsigned.crt" );cursor = connection.cursor();cursor.execute("SELECT 2");print(cursor.fetchone())' |
 |
We can also use syntax like this one: connection = pymonetdb.connect("monetdbs://192.168.100.152:50000/tlsDB", cert="/home/fff/selfsigned.crt") |
How to use TLS with ODBC
We will again use our Green server. We created that server in this blog post "link", and we installed ODBC drivers in it, in this other post "link".
In the mentioned post "0500 Proto_loaders, ODBC and COPY in MonetDB", we created the file "/etc/odbc.ini" with the credentials of the Blue server. We will now modify that file, so that it leads toward the Purple server, because we want to test TLS connection.We'll change credentials, but we will add two more properties. We'll add TLS and CERT property. | FOR THE BLUE SERVER: [DatabaseB] Description = Connect to Blue Server Driver = MonetDB Server = 192.168.100.146 Port = 50000 Database = DatabaseB User = monetdb Password = monetdb | FOR THE PURPLE SERVER: [tlsDB] Description = Connect to Blue Server Driver = MonetDB Server = 192.168.100.152 Port = 50000 Database = tlsDB User = monetdb Password = monetdb TLS = ON CERT = /home/sima/selfsigned.crt |
| Now it is easy to connect to stunnel through ODBC driver manager. isql -v tlsdB | 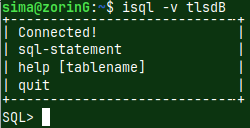 |  |
How to use TLS with JDBC
In this blog post "link", we downloaded JDBC driver/client to the green server. We will use that client again, but this time with the connection string for TLS.
java -jar /home/sima/Desktop/jdbcclient.jre8.jar -u monetdb -d "jdbc:monetdbs://192.168.100.152:50000/tlsDB?cert=/home/sima/selfsigned.crt" |
 |
We will also connect through DBeaver and JDBC. Before my explanation, it would be wise to read how to use DBeaver and JDBC without TLS. It is explained on this blog "link". I will not repeat here the whole story, just the difference. The difference is in the connection, we have to provide certificate.
We can create new connection (1), or we can edit the existing one (2).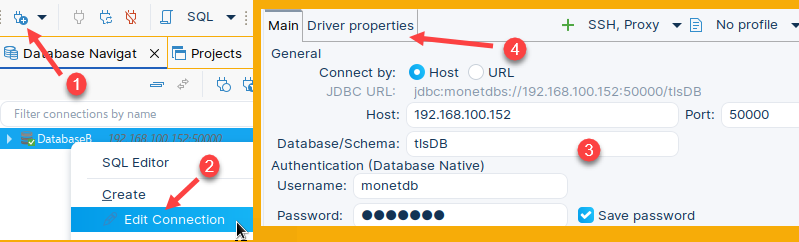 | We will fill the dialog with credentials for the Purple server (3). After that, we will go to the "Driver properties" tab (4). There we have to add our certificate. Now we can connect. |
Including Certificate Inside of the URL
We can run this command on the purple and the green server, and we would get the same result:
openssl x509 -in /home/fff/selfsigned.crt -outform DER | sha256sum | |
openssl x509 -in /home/sima/selfsigned.crt -outform DER | sha256sum |  |
This command will take our certificate, it would transform it into DER format, and then it would calculate SHA256 hash of that format in HEX digits.b89c338234850f8def5d4612e6c868cc5f85fe22e6d6a6b5acf8a7d17a15d764
For this demonstration, we just need the first 16 digits. So we would complete command like this:openssl x509 -in /home/sima/selfsigned.crt -outform DER | openssl dgst -sha256 -r | cut -c1-16b89c338234850f8d
We can now use those first 16 digits inside of our URL: mclient -d "monetdbs://192.168.100.152:50000/tlsDB?certhash=sha256:b89c338234850f8d"
This way we can also connect to MonetDB.
 |  |