Relative Time References in Cognos Reports
This post contains a sample file for these two videos:
https://www.youtube.com/watch?v=1y1XuFCiUX0&t=493s
https://www.youtube.com/watch?v=Le8b6ui-V7k&t=27s
This post contains a sample file for these two videos:
https://www.youtube.com/watch?v=1y1XuFCiUX0&t=493s
https://www.youtube.com/watch?v=Le8b6ui-V7k&t=27s
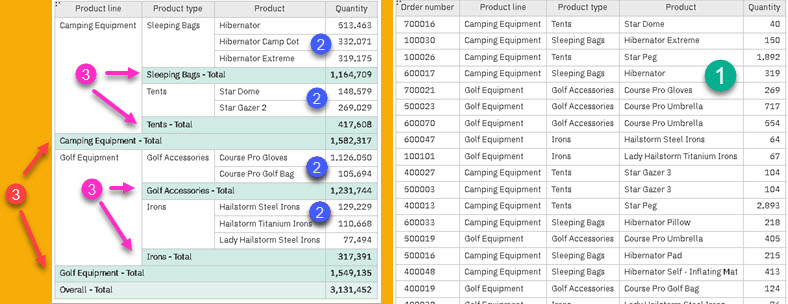
We have source data (1). For each order we have products on that order and their quantity. We made report by grouping our data. We grouped data by "Product" (2), then by "Product type" and "Product line" (3,3). We can filter data by using all those three levels of data (1,2,3,3).
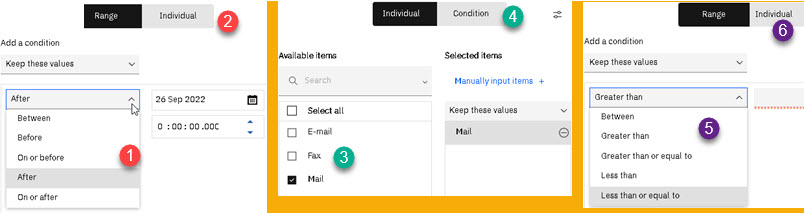
There are specialized dialogs for filtering Dates, Strings and Numbers. Dates could be filter by range (1) or individually (2). Strings could be filtered by selection (3) or by condition (4). Numbers could be filtered by range (5) or individually (6).
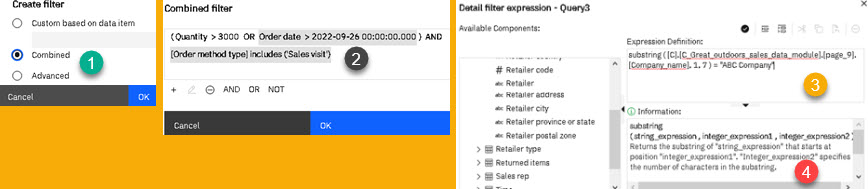
Beside filtering with one column, we also have "Combined" and "Advanced" filter (1). Combined filter is just a combination of simple filters (2). First we filter some Dates, Strings and Numbers by using Cognos dialogs, and then we can combine those filters. Those filters can be connected with logic operators AND, OR, NOT.
Advanced filter allows creation of really complex filters. Such filters are expressions made of columns, built-in functions and parameters (3). Cognos Expression builder helps us to create such expressions by making lists of all functions and columns that we can use in our expressions. We just have to click on chosen column, function or parameter that we want to appear in our expression. For each used function, we will get explanation for its usage, arguments and returned values (4).
It is possible to parametrize report filter. Parameters can be used in Advanced filter where we refer to parameter as its name delimited by question marks (1). User can provide values for this parameters before execution of report, but he doesn't have to, default value can be used then instead.
Parameter values can be provided by using a variety of different prompts (2).

It is possible to present to user which filters are used in the report (1). We can control which filters will be presented in such a way and which will not. This will help user to understand what data are shown in the report.
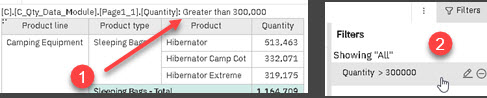
After creating report in HTML format, user can further filter data by using different prompts. It is not necessary to create explicit prompts for this task. We can just allow user to change or delete some of the filters and such ability will appear in the HTML report in a Filters pane (2). This ability is only available for simple and combined filters, and not for advanced filters.
Watch about all different ways how to filter data in Cognos report.
Crosstabs created in Cognos reports will not have names of columns in dimensions header area by default (1). This could make crosstab harder to understand, especially when crosstab has many dimension columns. We want that our dimension columns have their names nicely presented (2).

Let's solve this problem. From toolbox (1), from advanced tab, we will drag "Crosstab space" (2) element between rows header area and data area (3). This will create an empty column (4). Because we have two columns in rows header area, we will repeat this action once more (5).

Now, we have to move right part of crosstab (1) close to the left part (2), like some tetris elements. For that to succeed, we just need to delete empty cells that we don't need any more (3).

We, first, have to select not needed cells (1), and then in Properties pane, we will find property "Box type" (2). When we change the value of this property to "None", selected cells will disappear. We will now get our header desired shape (3).

Last thing to do is to add column names into their places. Before that, we will unlock our report (1). We will use padlock in the upper right part of the Cognos window. Now, it is possible to drag object "Text Item" (2), from toolbox to designated cell. At that moment, dialog (3) will appear, and we will fill this dialog with the name of the column. We have created the name for our first column (4), and then we will do the same for the second column.

For aesthetic reasons, we will move column names to bottom of the cells (1). We will use command from toolbar for this. Finally, we have our header the way we like it (2), and all the columns are properly labeled.
